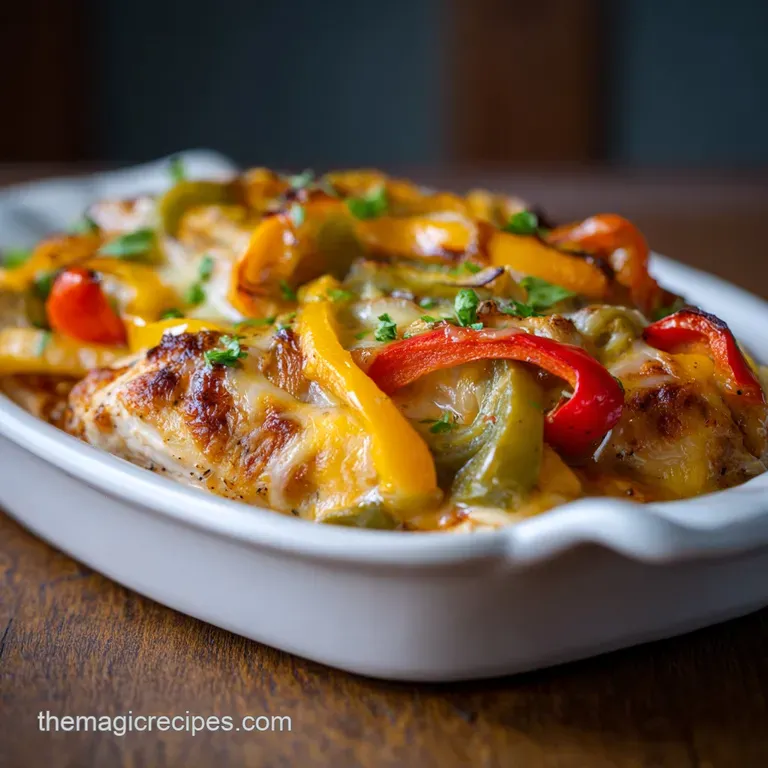
Cheesy Fajita Baked Chicken
- Time: Active 15 minutes, Passive 25 minutes, Total 40 minutes
- Flavor/Texture Hook: Zesty, smoky chicken paired with velvety melted cheese and crisp tender bell peppers.
- Perfect for: Busy weeknight dinners, low carb meal prep, or beginner cooks wanting big flavor with minimal tools.
- Making The Best Cheesy Fajita Baked Chicken
- Common Mistakes with Baked Fajita Chicken
- Essential Recipe Stats and Performance
- Picking the Best Fresh Ingredients
- Minimal Tools for Faster Cleanup
- Detailed Steps for Fajita Success
- Solving Your Most Common Problems
- Easy Variations and Scaling Tips
- Myths About Baking Fajita Chicken
- Storage and Reducing Kitchen Waste
- Serving for the Best Experience
- Very High in Sodium
- Recipe FAQs
- 📝 Recipe Card
Making The Best Cheesy Fajita Baked Chicken
Picture this: you walk through the door after a long day, and the kitchen is filled with the sharp, earthy scent of smoked paprika and toasted cumin. There is a faint, rhythmic sizzle coming from the oven, and through the glass door, you can see Monterey Jack cheese forming those gorgeous, golden brown bubbles that we all live for.
This is what I call a "sanity saver" meal. It’s the kind of dish that feels like a massive win without requiring you to stand over a splattering pan for forty minutes.
We’ve all been there with the traditional stovetop fajitas smoke everywhere, chicken sticking to the pan, and the constant stirring that makes it impossible to even pour a glass of water. I wanted something that captured that restaurant style zing but let the oven do the heavy lifting.
This Cheesy Fajita Baked Chicken is exactly that. It's built on a foundation of vibrant peppers and onions, but the real magic happens when that cream cheese melts into the spice rub, creating a silky sauce that coats every single strip of protein.
Trust me, once you see how the lime juice cuts through the richness of the cheese, you’ll never go back to the old way. We aren't just tossing things in a pan and hoping for the best; we’re using a few smart layering tricks to ensure the chicken stays juicy and the peppers stay bright.
It's a reliable, one pan wonder that actually delivers on the promise of a stress free dinner.
The Secret to Non Soggy Peppers
The Dry Brine: Allowing the salted spice rub to sit on the meat and vegetables for 10 minutes pulls out just enough surface moisture to prevent a "steaming" effect in the dish.
Fat Barrier: The cream cheese acts as an insulator, protecting the chicken strips from the direct heat of the oven while they finish cooking.
over High heat Blast: Baking at 400°F ensures the moisture in the vegetables evaporates quickly rather than pooling at the bottom of the ceramic dish.
| Method | Total Time | Cleanup Level | Texture Result |
|---|---|---|---|
| Traditional Stovetop | 30 minutes | High (grease splatters) | Charred but often greasy |
| Our Oven Baked Way | 40 minutes | Low (one dish) | Juicy chicken, snappy peppers |
| Slow Cooker | 4 hours | Medium (liner needed) | Shredded and very soft |
Whether you are cooking for a hungry family or just looking to simplify your Tuesday, this approach is the most efficient way to get that fajita fix. It provides a consistent result every time because the heat is controlled and even, unlike a temperamental stovetop burner.
Common Mistakes with Baked Fajita Chicken
The most common grievance with oven baked versions of this dish is a watery mess at the bottom of the pan. Most people don't realize that bell peppers are about 90% water. If you just throw everything in and turn on the heat, you're essentially making a fajita soup.
I learned the hard way that you cannot overcrowd the dish. If those chicken strips are piled four layers deep, the heat can't reach the middle, and the whole thing just steams in its own juices. You want a single, even layer to encourage that beautiful sizzle.
Another hurdle is the chicken texture. Since we are using boneless, skinless breasts, they are prone to becoming rubbery if they aren't sliced correctly. Always cut against the grain! This shortens the muscle fibers, meaning every bite will be tender rather than chewy. I also see many cooks skipping the resting phase.
That ten minute wait after seasoning isn't just a suggestion; it’s when the salt does the work of tenderizing the meat. Without it, the spices just sit on the surface instead of flavoring the protein all the way through.
| Ingredient | Science Role | Pro Secret |
|---|---|---|
| Avocado Oil | Heat Transfer | Its high smoke point prevents the spices from burning and turning bitter at 400°F. |
| Cream Cheese | Emulsification | Creates a velvety bridge between the lean chicken and the melting Monterey Jack cheese. |
| Sea Salt | Protein Denaturation | Breaks down the tough fibers in the chicken breast strips, ensuring a silky mouthfeel after baking. |
A quick tip for the spice lovers: don't be shy with the smoked paprika. It provides that "outdoor grill" flavor that you usually only get from a cast iron skillet. If you find your spices are clumping, mix them with the oil first to create a paste. This ensures every square inch of the chicken is coated, which is vital for both flavor and moisture retention. If you love this flavor profile, you might also enjoy my Low Carb Pizza Chicken which uses a similar over high heat method for maximum juice.
Essential Recipe Stats and Performance
When you're trying to get dinner on the table, knowing the numbers is half the battle. This recipe is designed for four people, but it’s incredibly easy to double if you have a second baking dish. The total time of 40 minutes includes that crucial "prep and rest" period.
Don't try to rush the 15 minutes of prep; those minutes are spent getting your peppers into thin, uniform strips that will cook at the same rate as the chicken.
One thing I love about this specific version is the protein to fat ratio. It’s incredibly satiating. You’re getting over 60 grams of protein per serving, which means nobody is going to be raiding the pantry for snacks an hour later.
The carbohydrates stay low because we’re skipping the heavy tortilla shells and letting the vegetables provide the bulk. It’s a functional meal that actually fuels you for the next day.
Chef's Note: If you are using a glass baking dish instead of ceramic, keep an eye on the bottom. Glass heats up faster and can sometimes scorch the onions if they are sliced too thin. Half moons are the sweet spot for thickness.
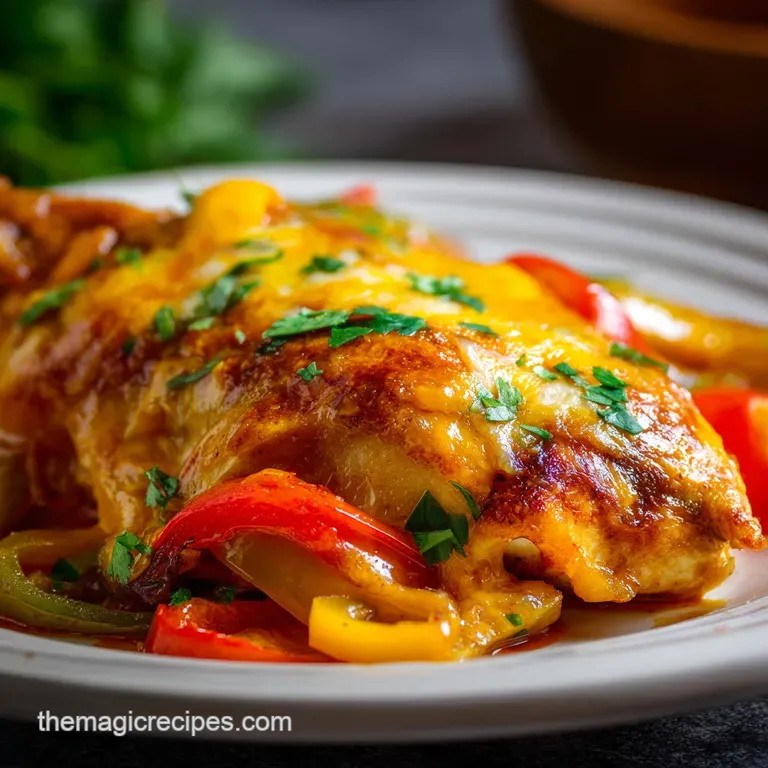
The "doneness" cue you are looking for isn't just a timer beep. You want to see the edges of the onions turning translucent and slightly charred, and the Monterey Jack should have those distinct brown "leopard spots" on top.
That’s when the sugars in the peppers have caramelized and the cheese has achieved its peak flavor. If it's just melted but pale, give it another two minutes. Those golden spots are where the nutty, toasted cheese flavor lives.
Picking the Best Fresh Ingredients
Quality ingredients make or break a simple bake like this. For the chicken, I always look for "air chilled" breasts if the budget allows. They haven't been soaked in a water bath, which means they won't release as much liquid in your pan.
It’s a small detail, but it’s the difference between a velvety sauce and a watery one.
For the peppers, I use a trio of red, green, and yellow. It isn't just for the photos; each color has a different sugar content. Red and yellow are sweet and mellow, while the green provides that classic, slightly bitter fajita bite that cuts through the cream cheese.
When slicing your onion, aim for half moons about a quarter inch thick. If they are too thin, they disappear; if they are too thick, they stay crunchy while the chicken overcooks.
- 1.5 lbs chicken breasts: Sliced into 1/2 inch strips across the grain. Why this? Strips cook faster and more evenly than whole breasts in this setup.
- 3 large bell peppers: One of each color for balanced sweetness. Why this? Provides the essential "crunch" and bulk of the dish.
- 1 large white onion: Sliced into half moons. Why this? White onions have a sharper bite that stands up to heavy spices.
- 2 tbsp avocado oil: For tossing and coating. Why this? High smoke point and neutral flavor.
- The Spice Rub: 1 tbsp chili powder, 1 tsp cumin, 1 tsp smoked paprika, 0.5 tsp garlic powder, 0.5 tsp onion powder, 1 tsp sea salt, 0.5 tsp black pepper.
- 4 oz cream cheese: Softened and cubed. Why this? Creates the "cheesy" sauce that defines the dish.
- 1.5 cups Monterey Jack: Shredded fresh from the block. Why this? Pre shredded cheese has starch that prevents a smooth melt.
- Finishing touches: 0.25 cup cilantro and 1 lime.
| Original Ingredient | Substitute | Why It Works |
|---|---|---|
| Monterey Jack | Pepper Jack | Adds a spicy kick with the same melting point. |
| Avocado Oil | Ghee | Provides a rich, buttery flavor and handles high heat well. |
| Chicken Breasts | Chicken Thighs | More fat content; stays even juicier but may need 5 extra minutes. |
Minimal Tools for Faster Cleanup
I am a firm believer that a great recipe shouldn't leave you with a mountain of dishes. For this Cheesy Fajita Baked Chicken, you really only need one large mixing bowl and one 9x13 baking dish.
I prefer a ceramic dish because it holds heat more steadily than metal, which helps the cheese stay melted longer once it hits the table.
You will also need a sharp chef's knife. Since there is a fair amount of slicing involved with the peppers and onions, a dull knife will just make the job frustrating and messy. If you have a bench scraper, use it to move your piles of sliced veggies into the bowl it saves your knife edge and your fingers.
Aside from that, a simple silicone spatula for tossing the spices and a cheese grater (if you’re grating your own Jack) are all you need.
- 9x13 Inch Baking Dish: Ceramic or glass works best for even heat.
- Large Mixing Bowl: Enough room to toss everything without spilling spices.
- Sharp Knife: Crucial for thin, uniform chicken and pepper strips.
- Cutting Board: Use a large one to accommodate all the produce.
- Citrus Squeezer: To get every last drop of that lime juice at the end.
Using minimal tools means you can actually enjoy your dinner instead of dreading the cleanup. I often toss the chicken and veggies directly in the baking dish to save the bowl, though you have to be a bit more careful with the spice distribution that way.
If you’re in a rush, just make sure the oil hits the ingredients before the dry spices so they stick!
Detailed Steps for Fajita Success
- Preheat your oven to 400°F (200°C). Note: A hot oven is non negotiable for getting the right texture on the vegetables.
- Slice your 1.5 lbs of chicken into 1/2 inch strips, ensuring you cut across the grain for tenderness.
- Prepare the 3 bell peppers and the white onion into thin, uniform strips and half moons.
- In your large mixing bowl, toss the chicken, peppers, and onions with the 2 tbsp of avocado oil until everything looks glossy.
- Sprinkle the chili powder, cumin, paprika, garlic powder, onion powder, salt, and pepper over the mixture. Toss until the spices are evenly distributed and no clumps remain.
- Let the mixture sit for 5 to 10 minutes. Note: This dry brine allows the salt to penetrate the chicken fibers.
- Spread the mixture into your 9x13 inch baking dish in an even layer. Ensure the chicken isn't all bunched up in one corner.
- Place the 4 oz of softened cream cheese cubes on top of the mixture, spacing them out evenly.
- Bake for 20 minutes. You should hear a faint sizzle and see the peppers starting to soften.
- Remove from the oven and scatter the 1.5 cups of Monterey Jack cheese over the top.
- Bake for another 5 minutes until the cheese is bubbling and shows golden spots.
- Rest for 3 minutes, then top with fresh cilantro and a heavy squeeze of lime juice.
Solving Your Most Common Problems
Even with the best instructions, things can go sideways in the kitchen. The most common issue is excess liquid. If you find your chicken is swimming in a pool of water halfway through the cook, don't panic. You can carefully tilt the dish and spoon out a few tablespoons of the liquid.
This usually happens if the chicken was previously frozen and released extra moisture.
Another thing I see is the cheese browning too quickly before the chicken is done. This happens if your oven has a strong top heating element. If the cheese looks perfect but you’re worried about the chicken, just tent a piece of foil over the top for the last few minutes.
This stops the browning but keeps the heat inside to finish the protein.
Why Your Fajita Bake Might Be Watery
If the bottom of your pan looks like a lake, the culprit is usually one of two things: either the oven wasn't preheated fully, or the dish was too crowded. High heat is what evaporates that vegetable moisture. If you’re doubling the recipe, use two separate dishes rather than one deep one.
| Problem | Root Cause | Solution |
|---|---|---|
| Tough Chicken | Sliced with the grain | Always slice across the muscle fibers to shorten them. |
| Bland Flavor | Skipped the resting | Let the spices sit for 10 minutes to brine the meat. |
| Oily Sauce | Too much oil/fat | Ensure you only use 2 tbsp oil; the cream cheese adds plenty of fat. |
Common Mistakes Checklist
- ✓ Always preheat your oven to a true 400°F before the dish goes in.
- ✓ Pat the chicken strips dry with a paper towel before tossing with oil.
- ✓ Shred your own Monterey Jack cheese for a much silkier melt.
- ✓ Don't skip the lime juice at the end; the acid is what "wakes up" the heavy spices.
- ✓ Use a large enough baking dish so the ingredients aren't stacked too high.
Easy Variations and Scaling Tips
This dish is a fantastic canvas for whatever you have in the fridge. If you want a bit more heat, you can add a sliced jalapeño or two into the mix with the bell peppers. If you’re looking for a more "comfort food" vibe, some people love adding a cup of cooked pasta at the very end, right before the Monterey Jack goes on, to create a Cheesy Chicken Fajita Pasta Bake. If you do this, just make sure to add a splash of heavy cream to keep things saucy. For another cheesy favorite, my Cheesy Chicken Casserole is a great alternative for weeknight rotations.
Scaling for a Crowd
- Cutting it in half: If you’re cooking for two, use an 8x8 pan. Reduce the bake time by about 5 minutes, but keep the temperature at 400°F. Use half a block of cream cheese and one large bell pepper.
- Doubling the batch: Use two 9x13 dishes. Do not try to cram 3 lbs of chicken into one dish! You can bake them on two different racks, but rotate them halfway through to ensure even browning.
- Spices: When doubling, I usually only increase the salt and chili powder by 1.5x. Spices can become overwhelming when perfectly doubled, so start there and taste as you go.
If you are looking for a shortcut, you can buy pre sliced "fajita vegetables" in the produce section of most grocery stores. Just make sure they are fresh, not frozen, as frozen veggies will release way too much water and ruin the texture of the bake.
Myths About Baking Fajita Chicken
One big myth is that "baking chicken always makes it dry." This only happens if you overcook it or leave it uncovered without any fat. In this recipe, the combination of the avocado oil coating and the cream cheese layer acts like a protective blanket.
The cream cheese melts down and "basts" the chicken while it bakes, keeping it velvety and moist.
Another misconception is that you need a "fajita seasoning" packet. Those packets are often filled with cornstarch and sugar. By making your own rub with smoked paprika and cumin, you get a much cleaner, more vibrant flavor. Plus, you can control the salt levels, which is key for a healthy meal.
Finally, people think they need to sear the chicken first. While searing adds flavor, it also adds 15 minutes and a messy pan. At 400°F, you get enough caramelization on the edges of the chicken strips that a pre sear really isn't necessary for a great weeknight result.
Storage and Reducing Kitchen Waste
Leftover Cheesy Fajita Baked Chicken is actually one of my favorite things to find in the fridge. The flavors continue to meld overnight, and the spices get even deeper. You can store this in an airtight container in the fridge for up to 3 days.
When reheating, I recommend using the oven or a toaster oven at 350°F for about 10 minutes. This helps the cheese get bubbly again. The microwave works too, but it can make the peppers a bit softer.
To avoid waste, look at your vegetable scraps. Those pepper tops and onion ends are flavor gold! I keep a bag in my freezer for "stock scraps." Once the bag is full, I simmer them with some water and chicken bones to make a rich base for soups.
If you have leftover cilantro that’s starting to wilt, blend it with some olive oil and lime juice to make a quick "fajita pesto" that you can drizzle over eggs the next morning. It's a great way to make sure nothing goes to waste while keeping your meals interesting.
Serving for the Best Experience
Presentation is everything, even for a quick family dinner. Instead of just scooping it onto a plate, I like to serve this right out of the ceramic dish. The colors of the peppers against the golden cheese are stunning. Adding the fresh cilantro at the very last second ensures it stays bright green and fragrant.
I always serve this with a side of lime wedges. The heat of the oven mellows out the spices, so that final hit of fresh acidity from the lime juice is what really makes the flavors pop.
If you aren't doing the low carb thing, this is incredible served over a bed of fluffy cilantro lime rice or tucked into warm flour tortillas. For those keeping it light, a big scoop of guacamole and a dollop of sour cream on top of the chicken is all you need.
It’s a complete, vibrant meal that looks as good as it tastes!

Very High in Sodium
950 mg 950 mg of sodium per serving (41% 41% of daily value)
The American Heart Association recommends no more than 2,300mg of sodium per day for adults, with an ideal limit of less than 1,500mg per day for most adults.
Tips to Reduce Sodium
-
Eliminate Added Salt-25%
The recipe calls for 1 teaspoon of sea salt. Removing this entirely will significantly reduce sodium. You can replace the flavor with more herbs and spices.
-
Reduce Cheese Quantity-15%
Monterey Jack cheese contributes a notable amount of sodium. Try reducing the amount of shredded Monterey Jack cheese by half, or opt for a reduced sodium version if available.
-
Choose Low-Sodium Cheese-10%
If you prefer to keep the full amount of cheese, look for 'low-sodium' or 'reduced sodium' Monterey Jack cheese options. This can often be found in specialty cheese sections.
-
Boost Flavor with Herbs & Spices
Amplify the taste by increasing the chili powder, cumin, smoked paprika, garlic powder, and onion powder. Fresh cilantro and lime juice also add brightness without sodium.
-
Rinse Onion (if canned)
While this recipe uses fresh onion, if you were to substitute with canned ingredients in other recipes, always opt for no-salt added versions and rinse them thoroughly.
Recipe FAQs
How to keep the dish from becoming a watery soup?
Spread the chicken and vegetables into a single, even layer in your baking dish. Overcrowding causes the ingredients to steam in their own juices rather than roast; keeping them in one layer ensures the liquid evaporates properly for a better texture.
Is it true that I should skip the resting step to save time?
No, this is a common misconception. Allowing the chicken and spices to rest for 5 to 10 minutes acts as a dry brine, which helps the seasonings penetrate the meat and improves the overall flavor intensity of the final dish.
How to reheat leftovers while keeping the cheese texture fresh?
Reheat in an oven or toaster oven at 350°F for about 10 minutes. This method is superior to the microwave because it re-melts the cheese properly and maintains the integrity of the peppers, whereas microwaving tends to make them excessively soft.
How to achieve the perfect golden, bubbly cheese finish?
Add the Monterey Jack cheese during the final 5 minutes of the 25-minute total bake time. If you enjoyed mastering precise searing techniques here, you will appreciate how this split timing method ensures the protein reaches doneness without the cheese becoming burnt or greasy.
Can I prepare the ingredients ahead of time?
Yes, you can slice the chicken and vegetables in advance and store them in the refrigerator. Keep the meat and produce in separate airtight containers and combine them with the oil and spices only when you are ready to start the 15-minute prep phase to ensure the freshest results.
Is there a way to store leftovers safely?
Store in an airtight container in the refrigerator for up to 3 days. The flavors will continue to meld during storage, often making the leftovers taste even more flavorful than when served immediately after baking.
How to ensure the chicken stays juicy throughout the 25-minute bake?
Slice your chicken into uniform 1/2 inch strips to promote even cooking. Consistent sizing prevents smaller pieces from drying out while waiting for thicker portions to reach the required internal temperature within the 25-minute window.
Cheesy Fajita Baked Chicken

Ingredients:
Instructions:
Nutrition Facts:
| Calories | 649 kcal |
|---|---|
| Protein | 64.7 g |
| Fat | 35.6 g |
| Carbs | 12.8 g |
| Fiber | 2.5 g |
| Sugar | 5.8 g |
| Sodium | 950 mg |
