Easy Focaccia Bread Recipe
- Time: Active 20 min, Passive 3 hrs 40 mins, Total 4 hrs
- Flavor/Texture Hook: Shatter crisp bottom with a velvety, honeycomb center
- Perfect for: Beginner bakers and stress free weekend hosting
- Master the Ultimate Focaccia Bread Recipe
- Crunchy and Fluffy Results
- Essential Stats for Success
- Simple Items You Need
- Minimal Gear Required
- Step by Step Guide
- Avoid These Common Errors
- Easy Flavor Swaps
- Storage and Leftover Tips
- Best Pairing Ideas
- Scaling Guidelines
- Bread Texture Truths
- Focaccia Bread Recipe FAQs
- 📝 Recipe Card
Master the Ultimate Focaccia Bread Recipe
The first time I heard the sizzle of olive oil bubbling against the sides of a hot metal pan, I knew I was in for something special. There is a specific, intoxicating aroma that fills the kitchen when fresh rosemary and sliced garlic hit hot dough, a scent that signals comfort is on the way.
I used to be terrified of yeast, thinking it was a fickle beast that would fail me, but this focaccia bread recipe changed everything because it is practically foolproof.
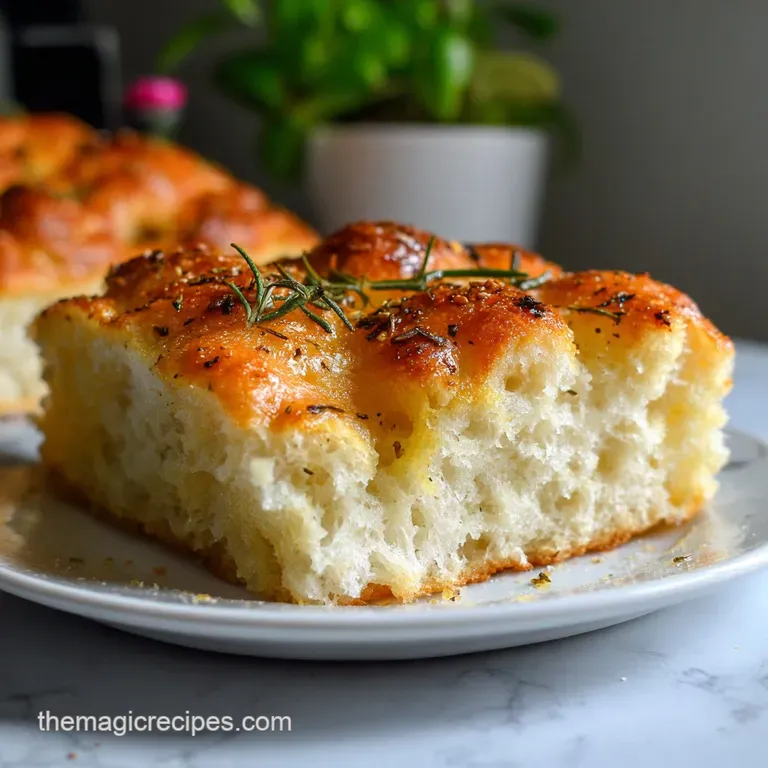
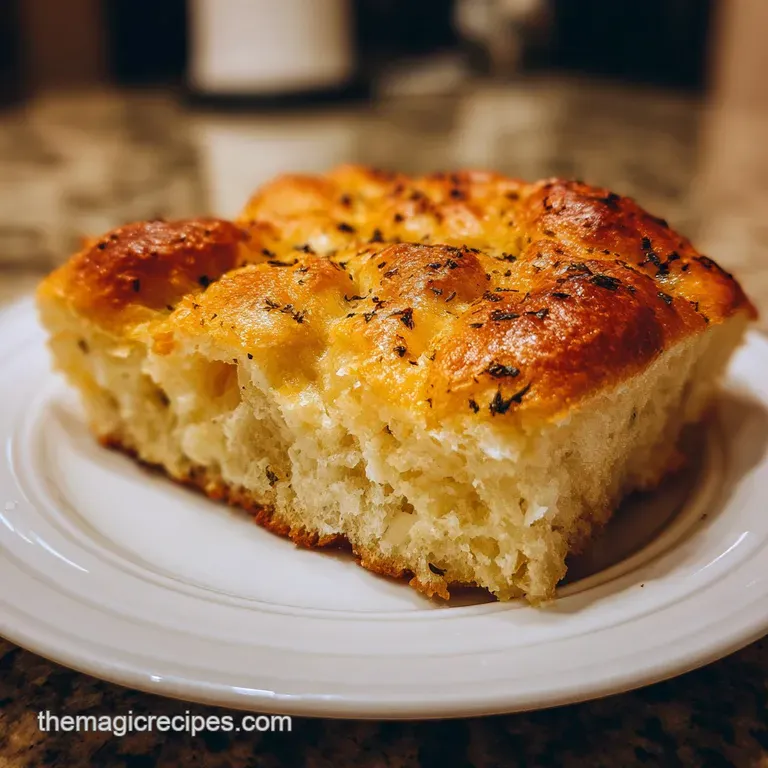
I remember my biggest mistake early on was being "polite" with the olive oil. I drizzled it like a salad dressing, and the bread came out dry and sad. Now, I treat the oil like a primary ingredient, let it pool in the dimples, and the result is a crust that literally shatters when you bite into it.
It's the kind of bread that disappears from the table before the main course even arrives.
Trust me, you don't need fancy equipment or a professional bakery setup to get this right. We are going to use a simple bowl and a standard pan to create a loaf that looks like it came from a high end Italian deli.
If you have been searching for a reliable, no knead bread recipe, this is the one that will make you feel like a pro baker on your very first try.
Crunchy and Fluffy Results
The secret to this success lies in the high water content and the way we handle the dough. By giving it time rather than muscle, we allow the gluten to develop naturally without the need for intense kneading.
- Starch Gelatinization: High hydration (80%) allows the flour starches to fully absorb water, creating a translucent, stretchy crumb during baking.
- Yeast Metabolism: Honey provides immediate simple sugars for the yeast, ensuring a vigorous initial rise and a deep, golden Maillard reaction on the crust.
- Oil Heat Transfer: The 60g of olive oil in the pan acts as a frying medium, effectively shallow frying the bottom of the dough for maximum crunch.
| Method | Time | Texture | Best For |
|---|---|---|---|
| Fresh Dough | 4 hours | Maximum airy bubbles | Ultimate weekend treat |
| Shortcut (Store Dough) | 45 mins | Denser, more chewy | Busy weeknight side |
| Cold Ferment | 24 hours | Deep sourdough like tang | Advanced flavor seekers |
Using a cold ferment is a great way to prep ahead, but even the standard four hour version beats anything you can buy at the grocery store. The long rise is what builds those massive air pockets we all crave.
Essential Stats for Success
| Ingredient | Science Role | Pro Secret |
|---|---|---|
| Bread Flour | High protein (12-14%) | Creates the structural "balloons" that hold air |
| Warm Water (100°F) | Solvent and activator | Too hot kills yeast; too cold stalls it |
| Instant Yeast | Leavening agent | Mix directly with flour to save time |
| Extra Virgin Olive Oil | Fat and flavor | Use the good stuff; it’s the main flavor profile |
Managing the temperature of your water is the most important part of the setup. If it feels like a warm bath, it's perfect for the 8g of instant yeast to start working its magic.
Simple Items You Need
You won't find any complicated additives here. We are sticking to high-quality basics that let the fermentation process shine. If you're missing something, don't panic, there's usually a way to work around it.
- 500g bread flour: Provides the strength needed for a tall rise. Why this? AP flour works but results in a softer, less chewy crumb.
- 400g warm water (100°F): The engine of the dough's hydration.
- 8g instant yeast: For a reliable and relatively quick rise.
- 10g honey: Feeds the yeast and helps with browning. Why this? Adds a subtle floral note that complements the olive oil.
- 10g fine sea salt: Regulates yeast and flavors the flour.
- 30g extra virgin olive oil (dough): Keeps the interior crumb velvety.
- 60g extra virgin olive oil (pan/top): Creates the signature fried crust.
- 3g flaky sea salt: For those essential salty crunches on top.
- 2g fresh rosemary: Classic aromatic topping.
- 9g garlic: Thinly sliced for a toasted, savory finish.
| Original Ingredient | Substitute | Why It Works |
|---|---|---|
| Bread Flour | All Purpose Flour | Lower protein but still makes a good loaf. Note: Crumb will be softer. |
| Honey | Granulated Sugar | Provides the same sweetness and browning power for yeast. |
| Instant Yeast | Active Dry Yeast | Same leavening power. Note: Must bloom in water for 5 mins first. |
| Fresh Rosemary | Dried Thyme | Earthy herb profile. Note: Use half the amount as it's more potent. |
Minimal Gear Required
One of the reasons I love this focaccia bread recipe is that it doesn't require a stand mixer or a bread machine. You can do everything in one large bowl with a sturdy spatula or even your hands.
You'll need a 9x13 inch metal baking pan for the best results. Metal conducts heat faster than glass, which is key for getting that crispy bottom. If you only have a glass dish, just know the bottom might be a bit paler.
A kitchen scale is also your best friend here because measuring by weight ensures your hydration ratio is spot on every single time.
step-by-step Guide
Phase 1: Mixing
Whisk the 500g bread flour, 8g instant yeast, and 10g fine sea salt in a large bowl. Add the 400g warm water, 10g honey, and 30g olive oil, then stir with a spatula until a shaggy, sticky dough forms. Note: Don't worry if it looks messy; the water will hydrate the flour over time.
Phase 2: Fermentation
Cover the bowl with a damp cloth or plastic wrap and let it sit in a warm spot for about 1 hour 30 mins until doubled in size and jiggly. Note: Bubbles should start appearing on the surface of the dough.
Phase 3: The Transfer
Pour 30g of the olive oil into your 9x13 inch pan, coating the bottom and sides thoroughly. Gently deflate the dough and tip it into the pan, flipping it once until both sides are coated in oil.
Phase 4: Second Rise
Let the dough rest in the pan, uncovered, for another 1 hour 30 mins until it naturally spreads to the corners. Note: Don't force it; the gluten needs to relax to fill the space.
Phase 5: Dimpling
Preheat your oven to 425°F (220°C). Pour the remaining 30g of olive oil over the dough and use your fingertips to press straight down until your fingers hit the bottom of the pan.
Phase 6: Topping
Press the 9g of sliced garlic and 2g of fresh rosemary into the dimples. Sprinkle the 3g of flaky sea salt evenly across the surface until every inch has a little seasoning.
Phase 7: Baking
Slide the pan into the oven and bake for 20 mins until the top is deeply golden and the edges pull away. Note: The oil should be sizzling around the edges of the bread.
Phase 8: Cooling
Immediately move the bread to a wire rack. Let it sit for at least 15 mins until the crust sets and the crumb finishes steaming.
Avoid These Common Errors
The biggest hurdle with high hydration dough is usually the stickiness. If you try to handle it like traditional pizza dough, you'll end up with a mess on your hands. Keep your fingers oiled or wet when touching the dough to prevent it from clinging to your skin.
To Fix Sticky Dough
If the dough feels impossible to manage during the transfer, don't add more flour. Instead, use a bowl scraper or a large spoon. Adding more flour will ruin the hydration ratio and result in a heavy, dense bread.
To Prevent Soggy Bottoms
If your bread is golden on top but soft on the bottom, it's likely a heat transfer issue. Make sure you aren't using a dark "non stick" pan that might be insulating the dough too much.
| Problem | Root Cause | Solution |
|---|---|---|
| No Bubbles | Dead yeast or cold water | Use water at exactly 100°F and check yeast expiration. |
| Tough Crust | Over baking or low oil | Ensure the dough is well coated and pull at 20 mins. |
| Small Rise | Cold room temperature | Place the bowl in a turned off oven with the light on. |
Chef's Tip: If you want a deeper flavor, let the dough sit in the fridge overnight after the first rise. The cold slows down the yeast but allows bacteria to produce complex, tangy acids.
- ✓ Use a metal pan for a superior, crispy bottom crust.
- ✓ Ensure your water is warm but not hot to avoid killing the yeast.
- ✓ Don't skimp on the olive oil; it is the "sauce" of this bread.
- ✓ Let the bread cool on a rack, never in the pan, to prevent steaming.
- ✓ Dimple deeply you want to see the bottom of the pan through the dough.
Easy Flavor Swaps
While rosemary and garlic are the gold standard, this dough is a blank canvas. You can go sweet or savory depending on what you're serving. If you're doing a big summer spread, this bread pairs beautifully with a Coleslaw Recipe because the creamy crunch of the cabbage offsets the oily richness of the bread.
For a Spicy Garlic Focaccia
Add a teaspoon of red pepper flakes to your olive oil and let it sit for ten minutes before drizzling. This infuses the fat with heat that permeates the entire loaf as it bakes.
For a Garden Style Loaf
Use cherry tomatoes, thinly sliced red onions, and bell peppers to create "flowers" on top of the dough. Just be sure to press them deep into the dimples so they don't pop off as the bread rises in the oven.
Storage and Leftover Tips
Focaccia is at its peak about 30 minutes after it leaves the oven. However, if you have leftovers, you can store them in an airtight container at room temperature for up to 2 days.
To bring back that "just baked" shatter, pop the slices into a toaster oven at 350°F (180°C) for 5 minutes.
You can also freeze this bread for up to 2 months. Slice it into squares first, then wrap them tightly in plastic and foil. When you're ready for a snack, you can toast them straight from frozen. For a weird but brilliant breakfast, try dipping a warm slice into a Country Gravy Recipe — the airy bubbles act like little cups for the sauce.
To reduce waste, take any stale ends and pulse them in a food processor. These make the most incredible, olive oil-infused breadcrumbs for pasta or salads.
Best Pairing Ideas
This bread is substantial enough to be a meal on its own, but it really shines when it has something to soak up. It is the ultimate companion for soups and stews where you need a sturdy vessel for dipping.
If you are hosting a party, serve it alongside a charcuterie board. The saltiness of the bread complements cured meats and sharp cheeses perfectly. For a quick lunch, slice a square in half horizontally and use it as sandwich bread.
The oily crust holds up much better to wet fillings like tuna salad or roasted vegetables than standard sliced bread ever could.
Finally,, don't forget the dipping oil. A small bowl of balsamic vinegar mixed with more olive oil and a crack of black pepper is all you really need to make this bread the star of the show.
Scaling Guidelines
If you need to make more or less of this bread, follow these simple rules to keep the texture consistent.
- Down (1/2 size): Use a 9 inch cake pan or a small loaf pan. Reduce the baking time by about 5 minutes, but keep the oven temperature the same.
- Up (2x size): Use two 9x13 inch pans rather than one giant one. This ensures even heat distribution. You can mix the dough in one large batch, but increase the salt and spices to only 1.5x to avoid overwhelming the yeast.
- Baking (2x): If you must use a larger, deeper pan for a double batch, lower the oven temperature to 400°F (200°C) and extend the baking time by 10-15 minutes to ensure the middle cooks through.
Bread Texture Truths
There are a lot of old wives' tales about bread making that just don't hold up to science. Let's clear a few things up so you can bake with confidence.
Squeezing the air out of the dough after the first rise doesn't "ruin" the bubbles. In fact, gently deflating it redistributes the yeast and the sugars, giving them fresh food to work with for a stronger second rise. The huge bubbles you see in the final product are actually created during that second proof in the pan.
Another common belief is that you need to knead the dough for ten minutes to get a good crumb. In a high hydration dough like this, the water does the work for you. As the dough sits, the water molecules naturally align the gluten proteins into a strong network.
It's a process called autolyse, and it's a lazy baker's best friend.

Focaccia Bread Recipe FAQs
What is the secret to making good focaccia?
Generous use of olive oil and a long, slow fermentation. You need to fully coat the pan and dimple the dough deeply so the oil fries the bottom crust, creating that signature shatter.
What is the best flour for focaccia?
Bread flour is highly recommended for structure. Its higher protein content (12-14%) creates the strong gluten network needed to support the large air bubbles in a high hydration dough.
Is it better to make focaccia with bread flour or all-purpose flour?
Bread flour yields a chewier, more open crumb. While all-purpose flour works, it lacks the protein strength, resulting in a softer texture that lacks the ideal structural integrity for this tall, airy bread.
Is focaccia bread healthier than sourdough?
No, focaccia is typically higher in fat and lower in acid. Sourdough offers prebiotic benefits and potentially better digestibility due to the long fermentation process that breaks down gluten.
How do I prevent my focaccia from sticking to the pan?
Coat the entire pan heavily with olive oil before placing the dough inside. Ensure the dough rests long enough so it naturally stretches across the oiled surface before baking.
Why does my focaccia dough feel so wet and sticky?
This is expected because focaccia uses a high hydration ratio, often 80% water to flour. Use oiled hands or a dough scraper instead of adding flour, similar to how you handle a highly liquid batter for our Italian Sausage Orzo recipe.
Can I substitute the honey in the recipe?
Yes, you can easily substitute granulated sugar for the honey. Both provide simple sugars that activate the yeast quickly and aid in the deep golden Maillard reaction during baking.
Easy Focaccia Bread Recipe

Ingredients:
Instructions:
Nutrition Facts:
| Calories | 224 kcal |
|---|---|
| Protein | 5.3g |
| Fat | 7.9g |
| Carbs | 32.6g |
| Fiber | 1.2g |
| Sugar | 0.7g |
| Sodium | 420mg |
