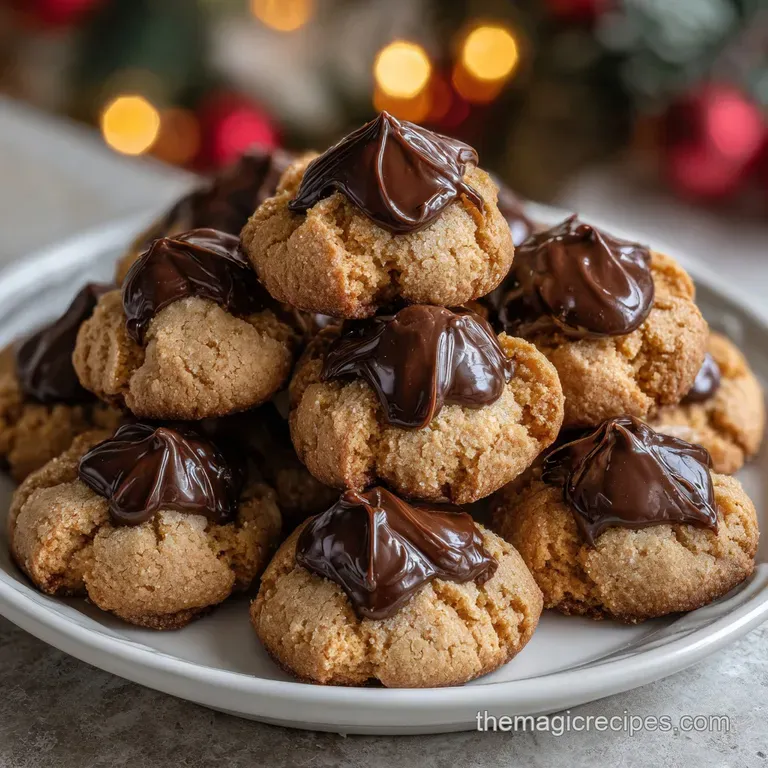
Peanut Butter Blossom Cookies: Fluffy and Fudgy Classics
- The Queen's Own Peanut Butter Blossoms: The Ultimate Classic Cookie
- Mastering the Texture: Why This Recipe Delivers Maximum Chew and Tenderness
- Essential Components for Fabulously Festive Cookie Dough
- From Dough to Delight: A Step-by-Step Guide to Baking Perfect Blossoms
- Avoiding Common Pitfalls: Expert Tips for Bakery-Quality Results
- Preserving Freshness: Storing Your Peanut Butter Blossom Cookies
- Decadent Pairings and Presentation Ideas
- Recipe FAQs
- 📝 Recipe Card
The Queen's Own Peanut Butter Blossoms: The Ultimate Classic Cookie
There are few aromas more instantly comforting than the scent of warm peanut butter and melting chocolate wafting from your oven. It smells like childhood, holiday cookie swaps, and total, utter success. That incredibly soft, chewy interior wrapped around a perfectly sweet milk chocolate center?
Chef’s kiss.
If you think making bakery quality cookies is complicated, you’re wrong. This is the ultimate starter recipe, using pantry staples that deliver huge flavor without demanding hours of your time or advanced pastry techniques. This recipe is a guaranteed winner, making it a lifesaver when the clock is ticking.
Today, we are diving deep into how to make the absolute best Peanut Butter Blossom Cookies you will ever taste. I’ve made all the mistakes for you, so grab your mixer and let’s crack on!
Mastering the Texture: Why This Recipe Delivers Maximum Chew and Tenderness
We aren't just baking cookies; we are building texture. The secret to phenomenal Peanut Butter Blossom Cookies isn't complicated, but it relies on strict adherence to fat and sugar ratios. This balance gives us a cookie that resists spreading while still being ridiculously tender.
A History of the Iconic 'Kiss' Cookie
Did you know these perfect little creations originated back in the 1950s? Honestly, what a time to be alive! We have Mrs. Freda Smith to thank for this genius combination. She entered the recipe in a Pillsbury bake off, and history was made.
Every holiday season, I remember why these Peanut Butter Kiss Cookies have endured they are simply perfect comfort food.
What Makes This Blossom Recipe Stand Out?
So many recipes yield dry, crumbly peanut butter dough, but not this one. We prioritize moisture retention through precise sugar blending and, critically, by not over baking. If you follow my guidance on the bake time, you will achieve that coveted soft center every time.
This approach ensures these Classic Peanut Butter Blossom Cookies remain chewy for days.
The Science of Sugars: Balancing White Granulated vs. Brown Sugar
Granulated sugar helps the dough spread just a tiny bit and crisps up the edges beautifully. Brown sugar, on the other hand, contains molasses, which is hydroscopic it holds onto moisture.
Using an equal blend of both ensures maximum chewiness and tenderness, which is exactly what we want in a great peanut butter base.
Achieving the Perfect Crinkle
That beautiful crinkled look around the chocolate kiss is a sign of success. To get it, the cookie needs to be slightly under baked when it comes out of the oven. If the cookies bake until fully brown and set, they won't absorb the chocolate properly, and you'll miss that glorious, slightly sunken centre.
The Role of Salt in Enhancing Peanut Flavor
Peanut butter demands salt. It’s a flavor amplifier, stopping the cookie from tasting flat and overly sweet. Even if you use salted butter (which I don’t recommend, but hey, sometimes life happens!), you still need a touch of extra fine sea salt in the dry mix.
Trust me, it makes the nutty flavor truly sing.
Essential Components for Fabulously Festive Cookie Dough
The quality of your ingredients matters here, especially the peanut butter. Don't cheap out on the foundation of your dough!
Selecting the Right Peanut Butter: Creamy vs. Natural
Rule #1 for successful Peanut Butter Blossom Cookies: Use standard, commercial, processed creamy peanut butter (think Jif or Skippy). Natural peanut butter, which separates oil and requires stirring, has a different consistency and fat ratio that will make the cookie dough too oily and crumbly, leading to spreading disasters.
| Ingredient | My Recommendation | Quick Substitution |
|---|---|---|
| Peanut Butter | Jif/Skippy Creamy | Almond butter or Sunbutter (if allergy is a concern) |
| Butter | Unsalted, high fat content | Vegan butter sticks (not margarine!) |
| Flour | All-Purpose, spooned and leveled | Measure for-measure GF blend |
Dairy Fats: Butter Temperature and Consistency Notes
Your butter needs to be perfectly at room temperature soft enough that your finger leaves a dent without melting. If it’s too cold, you won’t incorporate enough air during the creaming stage.
If it’s too soft (borderline melted), the structure will be ruined, and your cookies will spread excessively.
Optimal Chocolate Choices for the Center Press
The iconic look requires bell shaped chocolate drops, like a certain brand of "Kisses." CRITICAL TIP: Keep these refrigerated until the moment they are used. This temperature shock prevents them from instantly turning into a sad puddle when they hit the hot cookie.
Flour and Leavening Agents: Sifting for Superior Fluff
I know sifting feels like a fussy extra step, but if you want the softest texture, whisking the flour, baking soda, and salt really makes a difference. This incorporates air and ensures your leaveners are evenly distributed.
Even better, make sure you spoon your flour into your measuring cup rather than scooping it directly from the bag that prevents packing too much flour, which results in dry dough.
From Dough to Delight: A step-by-step Guide to Baking Perfect Blossoms

The Creaming Stage: Achieving Light and Aerated Foundations
Start by creaming the softened butter, peanut butter, and both sugars together on medium speed for at least 3 minutes. Stop frequently to scrape the bowl down.
You are looking for the color to lighten significantly and the texture to become very fluffy this is how you incorporate the essential air needed for lift.
Forming Uniform Spheres and Sugar Coating Technique
Once the dough is just mixed remember, we stop mixing as soon as the flour disappears it's time for the chill. Even for an Easy Peanut Butter Blossom Cookies recipe, chilling for 30 minutes prevents premature spreading.
Use a 1.5 tablespoon cookie scoop (a #40 scoop) to ensure every cookie is the same size. Then, roll each sphere quickly in granulated sugar for a lovely crunchy exterior.
Precise Baking Times for a Soft Center
Bake these at 375°F (190°C) for 8 to 10 minutes. Look for the edges to be set and barely starting to turn golden brown, while the center still looks slightly puffy and soft. Do not wait for the center to look fully baked.
The residual heat will finish the job on the cooling rack, guaranteeing that chewy interior we crave.
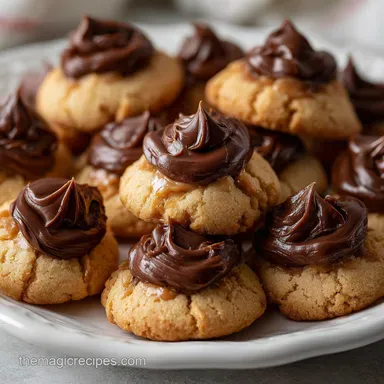
The Crucial Post Bake 'Kiss' Press
This is the most time sensitive part! Immediately remove the hot tray from the oven. Grab those chilled chocolate kisses and gently, but decisively, press one into the center of each cookie. The heat will immediately begin to melt the base, helping it stick and creating that perfect chocolate sheen.
If you wait even 60 seconds, the surface of the cookie will set, and the chocolate won't adhere properly.
Chef's Note: If your chocolate kiss cracks when you press it, your cookie dough might be slightly overbaked. Don't fret! Just transfer the cookies to the cooling rack and enjoy your perfectly crackled treat.
Avoiding Common Pitfalls: Expert Tips for Bakery Quality Results
The Danger Zone: Why Overmixing Spells Disaster
Once the wet ingredients are added, the introduction of flour means gluten development begins. If you continue mixing past the point where the flour streaks disappear, you develop too much gluten. And what does excessive gluten give you? Tough, rubbery cookies.
Mix until just combined, and then stop that mixer immediately!
Fixing a Crumbly or Sticky Dough
If you accidentally packed too much flour, your dough might feel crumbly after chilling. To fix this, mix in one teaspoon of milk (or cream) at a time until the dough holds together when squeezed. Conversely, if your dough is too sticky (maybe your butter was too warm), simply add 1 2 tablespoons of flour and mix briefly. If you want consistently reliable results, consider using my Sugar Cookies: Flawless, No-Spread Recipe for Decorating technique of weighing your ingredients.
Temperature Control: Ensuring the Chocolate Doesn't Melt Completely
Remember my rule: Chill the Kisses! If you press room temperature chocolate into a hot cookie, it will completely liquefy and lose its shape. We want the chocolate to melt just enough to stick and soften, but still hold that iconic shape.
Preserving Freshness: Storing Your Peanut Butter Blossom Cookies
Short Term Storage: Maintaining Softness at Room Temperature
Once fully cooled and the chocolate is set, store your Peanut Butter Blossom Cookies in an airtight container at room temperature. They will stay perfectly soft and fresh for about 4 5 days.
I usually sneak a slice of plain white bread into the container it helps keep the cookies soft by sacrificing its own moisture to the air.
Freezing the Cookie Dough vs. Baked Cookies
You bet they freeze well! You have two great options. For the best result, freeze the dough balls (after they are coated in sugar) on a sheet pan, then transfer them to a freezer bag. Bake them straight from frozen, adding 2– 3 minutes to the total baking time. Baked Peanut Butter Blossom Cookies also freeze well, but the chocolate can sometimes get a little frosty. Just make sure they are completely cooled before freezing in a sturdy container. For more freezing tips, especially for holiday baking, check out my approach for Christmas Cookies: The Queens Spiced Shortbread Recipe .
Decadent Pairings and Presentation Ideas
Beverage Complements: What to Sip Alongside These Sweet Treats
The absolute classic pairing for Chocolate Peanut Butter Blossom Cookies is a tall glass of cold, whole milk. The fat and chill cut through the richness beautifully. However, if you are looking for an adult pairing, a slightly acidic coffee or a strong, smoky Lapsang Souchong tea is incredible. And if you’re a fan of rich, soft cookies, these go beautifully with the same milky brew you’d use for my Snickerdoodle Cookies: The Ultimate Soft Tangy Recipe .
These cookies are so gorgeous on their own, but if you want extra flair, melt a tiny bit of white chocolate and drizzle thin stripes across the cooled chocolate kiss.
Honestly, baking these traditional cookies is a ritual. Making a batch of softest Peanut Butter Blossoms instantly makes any day feel like a special occasion. Happy baking!

Recipe FAQs
Why are my Peanut Butter Blossom cookies dry or crumbling apart?
This is usually due to measuring too much flour or overbaking the cookies. Ensure you are lightly spooning flour into the measuring cup and leveling it off, rather than scooping directly.
Additionally, bake the cookies only until the edges are set and the centers look slightly soft, as they will continue cooking on the hot sheet.
When exactly should I press the chocolate kisses into the cookies?
The kisses must be pressed into the center immediately after the baking sheet comes out of the oven. If you wait more than a minute, the surface of the cookie will set, causing the chocolate to crack the cookie or prevent it from adhering properly. Gently press down until the chocolate forms a slight dimple.
Can I use natural peanut butter instead of commercial creamy peanut butter?
It is strongly recommended to use commercial, shelf stable creamy peanut butter (such as Jif or Skippy) for consistent texture. Natural peanut butter often separates and alters the crucial fat-to-solids ratio in the dough, which can lead to a very dry or overly oily cookie.
If you must use natural peanut butter, ensure it is thoroughly mixed and decrease the butter slightly.
How should I store the finished Peanut Butter Blossoms, and can I freeze them?
Store cooled cookies in an airtight container at room temperature for up to one week; refrigeration is not necessary and can dry them out. For longer storage, freeze the baked, cooled cookies (kisses and all) in layers separated by parchment paper for up to three months.
Note that the chocolate might "bloom" (develop a harmless, grayish surface) upon thawing.
My chocolate kisses melted flat after pressing. What went wrong?
This usually happens if the cookies remain on a hot metal surface after the kisses are pressed. To prevent excessive melting, transfer the cookies immediately to a wire cooling rack after pressing the chocolate. This allows them to cool quickly and stops the residual heat from flattening the shape.
Can this recipe be adapted to be dairy-free or vegan?
Yes, you can easily adapt this recipe by substituting the dairy butter with a solid vegetable shortening or a high-quality vegan butter stick. You must also substitute the egg for a flax egg (1 tablespoon flaxseed meal + 3 tablespoons water) and use dairy-free chocolate kisses or chunks for the topping.
Do I need to roll the dough balls in granulated sugar before baking?
While optional, rolling the dough balls in granulated sugar adds a delightful texture and sparkle to the finished cookie. The sugar coating also helps stabilize the cookie structure, preventing it from spreading too thin during baking and ensuring that soft, dense center.
Fluffy Peanut Butter Blossom Cookies
Ingredients:
Instructions:
Nutrition Facts:
| Calories | 106 kcal |
|---|---|
| Protein | 2.0 g |
| Fat | 6.0 g |
| Carbs | 13.0 g |
