Chocolate Icing: the Ultimate Glossy Fudge Style Icing
- Introducing The Ultimate Glossy Chocolate Icing: Why Cooked Fudge Style is Superior
- The Science of Gloss: Achieving That Perfect Fudge Icing Texture
- Essential Ingredients for Decadent Cooked Chocolate Icing
- Step-by-Step: Crafting Your Ultimate Chocolate Icing Base
- Troubleshooting and Expert Tips for Perfect Glossy Results
- Storage, Shelf Life, and Making Ahead
- Showstopping Uses for This Rich Fudge Chocolate Icing
- Recipe FAQs
- 📝 Recipe Card
Introducing The Ultimate Glossy Chocolate Icing: Why Cooked Fudge Style is Superior
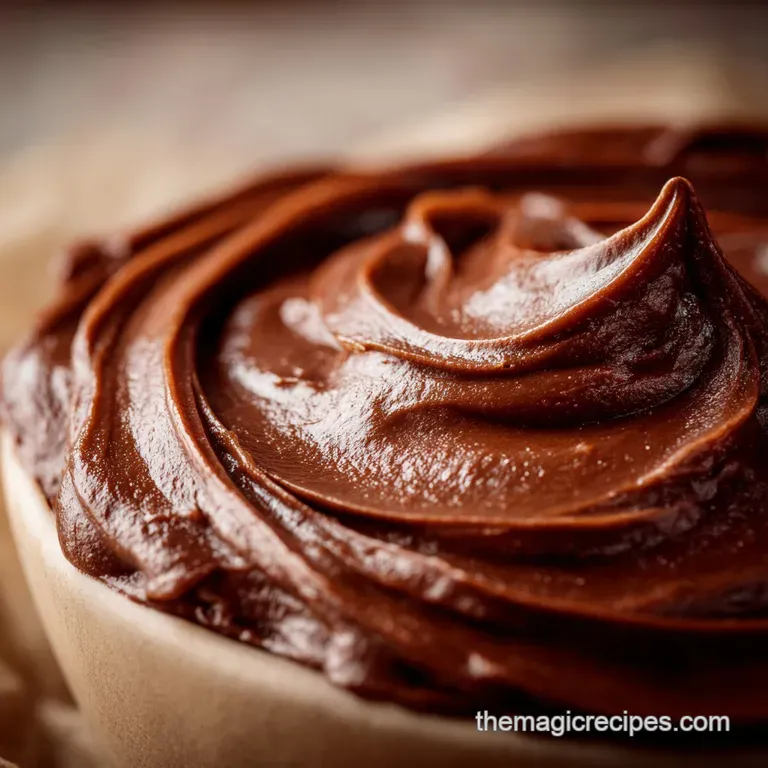
The aroma of this cooling chocolate syrup is honestly better than any air freshener I’ve ever bought. It promises this deep, dark, intense chocolate flavour that hits you the second you pour it.
When it sets, you get this luxuriously glossy, deeply fudgy layer that cracks slightly when you bite it the texture is everything.
Look, American buttercream is fine, but it’s often gritty, greasy, and just too sweet for my liking. This cooked fudge icing changes everything because we are transforming the sugar, not just hiding it in butter.
It's cheap to make, requires zero exotic ingredients, and delivers a professional level finish every single time. This is the real deal, the stuff proper British tea rooms have been using forever.
I wasted years making subpar icing until I learned this fundamental old-school trick: you have to cook the sugar to dissolve it completely. This temperature control is the absolute key to achieving that high gloss and perfectly chewy texture.
Let's crack on and make the best chocolate icing recipe you've ever had.
The Science of Gloss: Achieving That Perfect Fudge Icing Texture
Moving Beyond Basic Buttercream and American Frosting
If you only mix powdered sugar and butter, you’re essentially coating microscopic sugar grains in fat, which is why your buttercream always feels gritty. We are doing something completely different here by creating a chocolate fudge foundation.
This results in a richness and deep chocolate intensity that whipped frosting just can't match, making it the perfect chocolate icing for cake .
The Difference Between Fudge Icing and a Simple Ganache Glaze
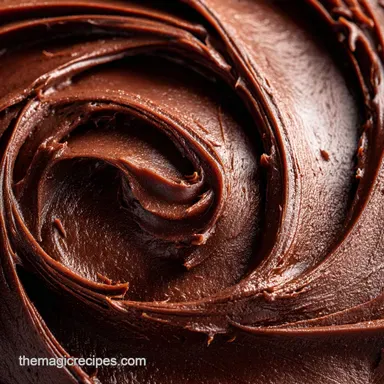
Ganache is just cream and chocolate, and while it’s lovely as a simple, soft glaze, it won't set firm enough to hold its shape or offer that satisfying chew. This cooked icing, conversely, contains dissolved sugar crystals that reform perfectly when beaten and cooled.
It gives you structure and texture, transforming into true chocolate fudge icing that sets but doesn't shatter.
Why We Cook the Sugar to Achieve a Superior Sheen
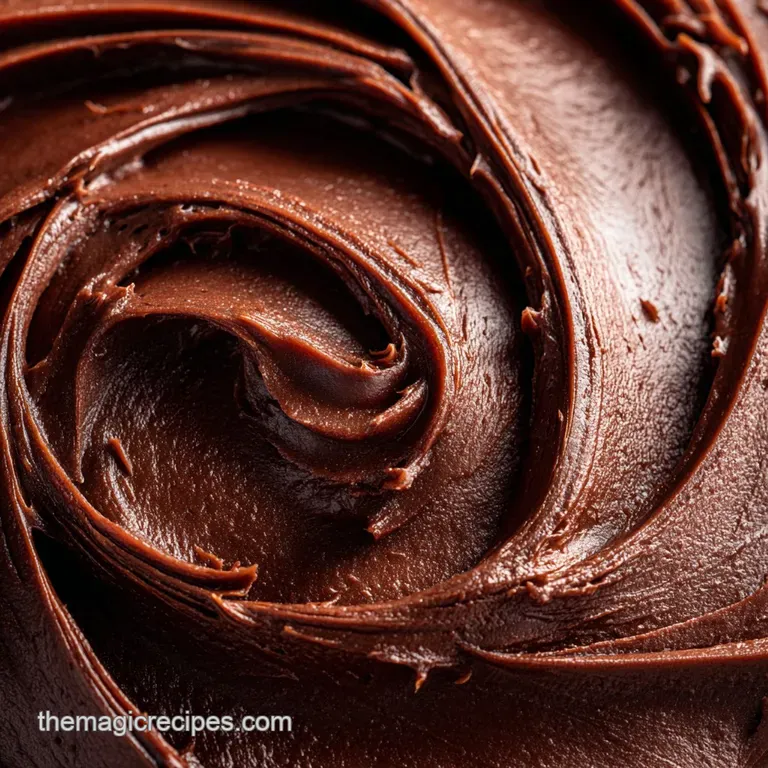
Cooking the sugar dissolves the crystals completely into the milk and fat mixture. We are aiming for a homogenous solution, eliminating all those scratchy initial sugar bits. When the syrup cools slowly, those crystals reform into extremely small, uniform structures.
This uniformity is exactly what creates that incredible mirror like gloss and smooth mouthfeel.
The Importance of the Soft Ball Stage (235°F)
This specific temperature, 235°F (113°C), is crucial; it controls the final firmness of your icing. If you go too low, maybe 220°F, the chocolate icing won't set up firmly enough, staying annoyingly sticky.
If you push it too high say, 245°F or 250°F you have successfully made literal hard fudge, and it will set hard as a brick before you can even spread it onto your cake. Use a good candy thermometer, or trust the cold water test, but be precise.
How Dissolved Sugar Prevents Graininess in the Icing
Graininess happens when you have large, uneven sugar crystals remaining in the final product. By cooking the mixture to the soft ball stage, we eliminate those starting crystals entirely. Crucially, we then let it cool undisturbed so new, tiny, perfect crystals can form slowly before beating.
Stirring too soon is my number one mistake from years ago; don't be me!
Mastering the Setting and Pouring Window
This is the only part of the process that requires you to hustle. Fudge icing goes from pourable liquid to set block remarkably fast once you introduce air by beating it. Have your cake or chocolate icing for cupcakes ready and your mixer on standby.
You must apply the icing the second it reaches a thick, spreadable consistency; once it sets, you have to reheat it slightly to work it again.
Essential Ingredients for Decadent Cooked Chocolate Icing
Selecting the Best Cocoa Powder for Deep Colour and Flavour
Since we are making chocolate icing with cocoa powder and chocolate icing without icing sugar , the cocoa quality is everything. Use unsweetened Dutch process cocoa powder if you can find it.
It has a smoother, less acidic flavour profile and provides a deep, rich mahogany color that looks luxurious. Natural cocoa powder works in a pinch, but the flavour will be much sharper.
Substitutions: Which Fats Work Best?
| Ingredient | Role | Viable Substitution | Notes |
|---|---|---|---|
| Unsalted Butter | Flavour and structure | high-quality Vegan Butter Sticks | Do not use thin margarine or oil; the structure won't hold. |
| Whole Milk | Hydration and fat content | Heavy Cream or Oat/Cashew Milk | Cream makes it richer; plant milk keeps it dairy-free but use full fat versions. |
Unsalted butter is the absolute gold standard for achieving the right flavour and glossy texture. If you need a chocolate icing no butter option due to dietary needs, opt for a high fat vegan butter designed for baking.
Adjusting Consistency with Liquid Ratios
The liquid ratio is critical for reaching the right temperature and setting point. Whole milk is the best choice because it provides the necessary fat for structure and prevents too much evaporation.
If your icing does set too hard, use tiny amounts (teaspoon by teaspoon) of hot water or hot milk to bring it back to spreadable perfection.
Sourcing the Right Type of Granulated Sugar
Granulated sugar works perfectly fine here, but if you happen to have caster sugar (superfine granulated sugar) in the cupboard, use it instead. It dissolves faster in the initial stage, which reduces the risk of scorching the sugar/milk mixture on the bottom of your pan before it even reaches the boil.
step-by-step: Crafting Your Ultimate Chocolate Icing Base
Cooking the Syrup to the Exact Temperature
Combine the sugar, milk, butter, salt, and sifted cocoa powder in a heavy bottomed saucepan. Stir constantly over medium heat until all the butter is melted and the sugar seems dissolved, about five minutes. Bring the mixture to a full, rolling boil, then stop stirring immediately.
Clip your thermometer onto the side and let it boil, undisturbed, until it hits 235°F (113° C) .
Achieving the Perfect Glossy Emulsion
Immediately pull the pan off the heat the second it hits the temperature target. Stir in the vanilla extract, and then pour the hot syrup directly into your large, clean, room temperature mixing bowl. This rapid temperature change helps the crystallization process start correctly, making the final beat easier.
Chef's Note: Do NOT scrape the sides or bottom of the saucepan! Any crystallized sugar remaining on the edges can contaminate your smooth syrup and cause the whole batch to become grainy.
The Crucial Cooling and Whipping Process
Now, the hard part: waiting. Allow the syrup to cool completely, undisturbed, until it reaches a lukewarm temperature, around 110°F (43°C). Once cooled, attach the paddle attachment to your stand mixer or grab a powerful hand mixer and start beating vigorously.
It will look like a thin chocolate soup for a few minutes, then, suddenly, it will turn opaque, thicken dramatically, and become creamy and glossy.
Applying the Icing Before It Sets
The entire beating process takes roughly 5 to 10 minutes. As soon as the icing loses its liquid shine and holds soft, spreadable peaks, stop the mixer. Spread quickly and evenly onto your cake or chocolate icing for brownies right away.
Remember, you have maybe five minutes before this beautiful mixture starts to set up too firmly.
Troubleshooting and Expert Tips for Perfect Glossy Results
My Icing is Grainy! This almost always means you stirred the syrup while it was cooling, or you didn't cook the sugar long enough for it to fully dissolve. Fix this by placing the entire grainy mixture back into the saucepan with 2 tablespoons of hot milk.
Heat gently, stirring constantly until it liquefies fully and the grains are gone, then repeat the cooling and beating process, being absolutely meticulous about not stirring the cooling syrup.
My Icing Set Too Hard (I made Fudge!) You likely cooked the mixture 5 to 10 degrees too high (above 235°F). Don't panic! Place the hardened icing back in the saucepan with 3 4 tablespoons of whole milk or heavy cream.
Stir gently over very low heat until it has just softened enough to be spreadable again, but absolutely do not let it boil this time. Spread it immediately, knowing it will set much quicker this time.
The Best Way to Handle Cocoa Powder Lumps Sifting the cocoa powder before you start is non-negotiable. If you don't sift, those little lumps of dry cocoa won't dissolve properly in the fat and will result in a spotted, uneven texture, even if the sugar is perfect.
Storage, Shelf Life, and Making Ahead
Because this is a cooked sugar icing and not a perishable buttercream, it keeps really well. You can store leftover chocolate icing in an airtight container at room temperature for up to two days, though it will harden completely. For longer storage, keep it in the fridge for up to two weeks.
To Reheat: Fudge icing must be softened gently. Place the hardened icing into a saucepan with a tablespoon of fresh milk. Heat over the lowest possible setting, stirring constantly, until it reaches a spreadable consistency. Do not overheat, or you will ruin the texture and gloss.
Freezing: You can freeze this icing! Store it in an airtight container for up to three months. Thaw overnight in the fridge. To re-use, you will have to gently reheat it in a saucepan with a splash of milk, just like bringing it back from the fridge.
Showstopping Uses for This Rich Fudge Chocolate Icing
This rich, dark icing is so versatile because it sets firm and glossy. It is, of course, the ultimate chocolate icing for cake , especially classic layer cakes or even a simple vanilla sponge.
I love using it to frost my incredibly popular Banana and Chocolate Chip Loaf: Perfectly Moist Easy Loaf Cake Recipe — the slight tartness of the banana pairs perfectly with this intense, fudgy glaze. It also works brilliantly as a filling for chocolate sandwich cookies or slathered over fresh baked, still warm chocolate icing for brownies .

Recipe FAQs
Why did my icing turn out grainy instead of smooth and glossy?
Graininess occurs when the sugar crystals do not fully dissolve during the initial cooking process. To prevent this, ensure you stir the mixture thoroughly until it comes to a boil, and wash down any sugar crystals clinging to the sides of the pan using a damp pastry brush before boiling begins.
My icing set up too quickly and is now too stiff or hard to spread. How can I fix this?
This cooked icing sets rapidly once it begins cooling, often indicating it was beaten too long or cooled too much before application. To recover it, gently reheat the mixture over a double boiler (bain marie) while stirring in a tablespoon of hot milk or cream until it reaches a spreadable consistency again.
How do I ensure I get that promised high gloss sheen?
The characteristic gloss comes from the sugar being perfectly dissolved and the rapid beating process. For maximum shine, ensure your icing is applied immediately after beating while it is still very warm and glossy, spreading it quickly before it starts to lose heat and sets up.
Can I use this fudge icing for intricate piping or decoration?
Generally, this cooked fudge icing is best suited for smooth spreading or pouring over cakes and bars, as it becomes too firm for intricate piping once fully set. If you must pipe, use wide tip nozzles and work very quickly while the icing is still warm and at its softest consistency.
Can I substitute cocoa powder for the melted chocolate called for in the recipe?
While you can substitute, doing so will change the overall texture and richness of the icing because cocoa powder lacks the cocoa butter found in melted chocolate. For a true "fudge style" depth of flavor and proper chew, using good quality melted chocolate is strongly recommended.
How long will a cake frosted with this chocolate icing last, and should it be refrigerated?
A cake frosted with this icing can be stored at cool room temperature (below 70°F) for up to 3 days, provided the cake itself is shelf stable. If refrigerated for longer storage, cover the cake loosely; be aware that chilling may temporarily dull the icing’s signature gloss.
I accidentally cooked the mixture past the soft ball stage. Is the icing ruined?
If overcooked, the icing will likely crystallize or become crumbly when beaten. While difficult to fully salvage, you can try adding a few tablespoons of hot water or milk and reheating the entire batch very gently, stirring continuously, to try and dissolve the hardened sugar crystals again.
Glossy Cooked Fudge Chocolate Icing Recipe
Ingredients:
Instructions:
Nutrition Facts:
| Calories | 171 kcal |
|---|---|
| Protein | 8.0 g |
| Fat | 6.3 g |
| Carbs | 20.6 g |
