Burnt Ends Brisket: King of Bbq Smoked to Sticky Perfection
- The Definitive Guide to Authentic Kansas City Burnt Ends
- The Science of Smoke, Bark, and Sticky Caramelization
- Essential Shopping List and Component Breakdown for Burnt Ends
- Detailed Two-Phase Method: Smoking and Caramelizing the Burnt Ends
- Troubleshooting and Advanced Techniques for Perfect Burnt Ends
- Best Practices for Storing and Reheating Leftover Smoked Burnt Ends
- Complementary Sides That Elevate Smoked Burnt Ends
- Recipe FAQs
- 📝 Recipe Card
The Definitive Guide to Authentic Kansas City Burnt Ends
Have you ever smelled victory? I mean, the sticky, peppery, deeply smoky aroma of perfectly rendered fat melting into a crusty, black bark? That, my friend, is the smell of burnt ends , the undisputed crown jewels of backyard barbecue.
When you bite into that cube, you get this incredible texture contrast: crunchy exterior followed by impossibly tender, moist meat that just melts away.
Now, let’s be real, this isn't a quick Tuesday dinner; this is a glorious, 14 hour commitment that pays dividends in flavour and glory. Learning how to make burnt ends properly means understanding patience and controlling smoke, but the good news is that the process is simple, requiring minimal active work once the initial prep is done.
This recipe is your roadmap to achieving competition level smoky brisket burnt ends right in your own backyard smoker.
We’re skipping the shortcuts and diving headfirst into the traditional Kansas City method, which utilizes the fattiest, most flavourful part of the brisket. Get ready to wrap, cube, and caramelize your way to barbecue legend status.
I’m sharing every trick, every mistake I’ve made, and exactly how you get that insane, tacky coating on your finished product.
The Science of Smoke, Bark, and Sticky Caramelization
What Exactly Are Burnt Ends (And Why Are They Called That)?
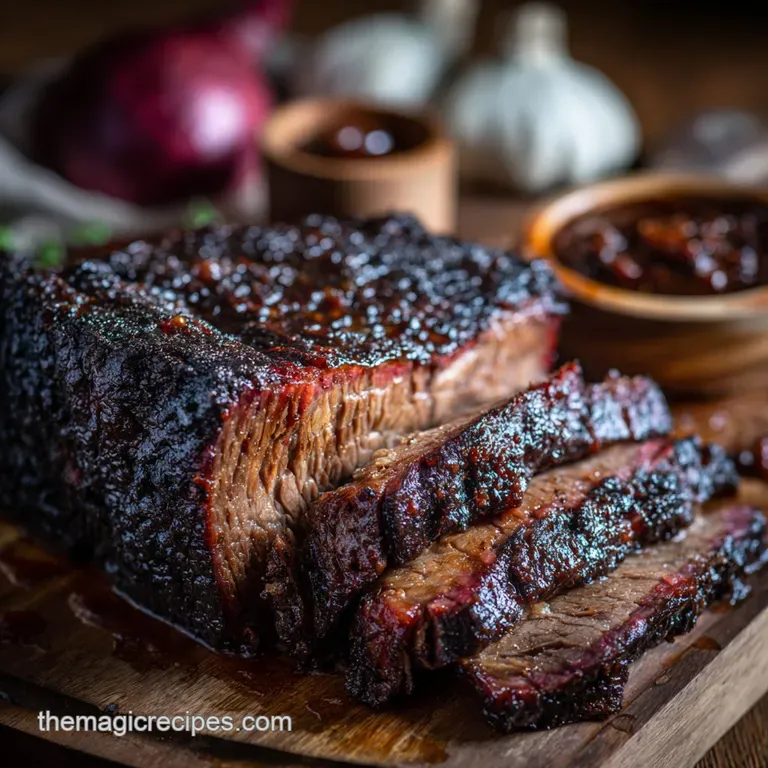
Burnt ends are the highly desirable, heavily charred, and deeply flavoured pieces of meat cut from the point section of a smoked brisket. Historically, these tasty bits were the scrappy edges trimmed off the main brisket (the flat) and discarded, or maybe given away to faithful customers.
Can you imagine throwing these away?
Thankfully, true masters realized the incredible potential of that fatty point muscle when smoked low and slow. The name "burnt" is a bit misleading, though; they aren't truly burned, but rather intensely caramelized and blackened by the dark, smoky crust known as the "bark."
The Essential Difference: Utilizing the Brisket Point vs. The Flat
If you want amazing burnt ends , you must start with the brisket point , also called the deckle. The flat is leaner, perfect for slicing, but the point is laced with intramuscular fat and thick collagen the exact stuff that renders down beautifully over 12 hours.
This high fat content in the point is what prevents the cubes from drying out during the crucial second phase of cooking (the "burn"). The point is essential for the rich, juicy texture we are aiming for in this burnt ends recipe .
A Brief History of the Barbecue Crown Jewel
While barbecue traditions run deep across the US, the definitive popularity of the burnt ends brisket comes straight out of Kansas City, Missouri. Barbecue joints there popularized taking the trimmed scraps, dousing them in sweet, thick sauce, and cooking them until they were sticky little treasures.
This recipe honours that tradition, focusing on the dual phases of long smoking followed by a rich, sweet, finishing glaze. It’s all about respecting the smoke and celebrating the sauce.
Achieving the Perfect 'Bark' (The Maillard Reaction)
The "bark" is that dark, beautiful crust that forms on the meat's surface during the initial smoke. It's crucial for perfect burnt ends . The key ingredients? Coarse salt and, most importantly, 16 mesh black pepper .
The coarse grind of the pepper resists dissolving, forming tiny, crunchy islands on the meat's surface.
As the meat smokes, the sugars and proteins in the rub react with the heat (the Maillard reaction), forming thousands of new flavour compounds and achieving that deep mahogany to black crust. Don't skimp on the pepper ; it's the foundation of your bark.
Mastering the Double Smoke Technique
Making burnt ends requires a two-phase cooking approach, which is why I call it the "double smoke." First, you smoke the whole point low and slow to develop the bark and break down the internal collagen.
Second, once the point is tender, you cube it, toss those cubes in the glaze, and return them to the smoker (or oven) for a over high heat, shorter cook. This final "burn" step is where the sauce reduces into a thick, tacky, caramelised coating, totally transforming the cubes.
The Critical Role of Collagen Breakdown for Tenderness
Patience is mandatory when making burnt ends . The brisket point is tough because it's packed with connective tissue (collagen). We cook it low and slow specifically to melt that collagen into gelatin. Gelatin is what makes the meat moist and tender.
You know it's done not by time, but by tenderness. When you probe the meat, the thermometer should slide in and out with almost no resistance like poking a stick into soft butter. Trust the probe, not the clock.
Essential Shopping List and Component Breakdown for Burnt Ends
Here is the rundown of what you need. Remember, quality in equals quality out, especially when it comes to the rub and the glaze.
Selecting the Ideal Brisket Point (Marbling Matters)
You need the fattiest point you can find, preferably USDA Choice grade or higher. Ask your butcher specifically for the "brisket point" or "deckle," separated from the flat. A good point should have plenty of visible fat lines running through the muscle.
Chef’s Note: Trim the hard, uneven fat chunks off the exterior, but leave a thin, uniform layer (about 1/8 inch or 3mm) of fat on the top surface. This fat melts into the meat and keeps your burnt ends juicy.
Crafting the Signature Barbecue Rub Formula
Our rub is heavy on pepper for the bark, with just enough sugar to aid caramelisation but not burn prematurely.
| Ingredient | Role | Substitute if Missing |
|---|---|---|
| Coarse Black Pepper (16 Mesh) | Bark structure | Standard coarse restaurant grind pepper. |
| Kosher Salt | Flavour base | Sea salt (use slightly less as it's saltier by volume). |
| Dark Brown Sugar | Caramelization aid | Light brown sugar + a touch of molasses. |
| Smoked Paprika | Colour and smokiness | Standard paprika + 1/2 tsp of liquid smoke. |
| Binder (Mustard) | Adhesion | Use olive oil or hot sauce instead. |
Choosing the Right Binder and Finishing Sauce Base
Before applying the rub, I like to slather the point in a thin layer of mustard (usually plain yellow or Dijon). It acts as a binder to help the rub stick beautifully and adds a tiny bit of acidity to balance the richness. Don't worry, you won’t taste the mustard!
For the finishing glaze, we want a thick, sweet base this is Kansas City style, after all!
Quick Substitutions for Regional Sauce Styles
If you prefer a less sweet end result, you can easily modify the finishing glaze:
- Sweet KC Style: Use a heavy, tomato based sauce mixed with honey or molasses.
- Carolina Vinegar Style (Tangy): Substitute half of the BBQ sauce with apple cider vinegar and a pinch of cayenne. This creates a much tangier finish that cuts the richness wonderfully.
- Texas Style (Minimal): Skip the sauce altogether for the final phase. Instead, toss the finished cubes with rendered tallow (fat saved from the trimming process) and a touch more rub before the final "burn."
Detailed Two-Phase Method: Smoking and Caramelizing the Burnt Ends
This entire process takes between 12 and 15 hours. Patience, people!
Phase I: Initial Smoking of the Brisket Point
- Prep and Rub: After trimming the brisket point, slather it lightly with your binder (mustard). Mix all the dry rub ingredients and apply a very generous, even coating to the entire surface. Press that rub deep into the meat. Rest the point on a rack in the fridge for at least two hours or overnight; this lets the salt work its magic.
- Preheat the Smoker: Get your smoker locked in at 225°F (107° C) . Consistency is key here. Place the brisket point fat-side up (if your heat source is below) or towards the heat (if offset). Insert your remote temperature probe into the center of the meat.
- The Spritz Routine: After the first two hours, begin lightly spritzing the brisket point every 45– 60 minutes using apple cider vinegar mixed with water. This keeps the surface moist, helps the smoke adhere, and regulates surface temperature.
The Critical Temperature Check and Handling the Stall
- Hit the Stall: Smoke the meat until it hits an internal temperature of 160 165°F (71 74° C) . Your bark should look dark and beautiful by now. This is where the dreaded "stall" hits, and the temperature stops rising for hours due to evaporative cooling. I once panicked and cranked the heat, resulting in tough, dry meat. Don't do that.
Phase II: Cubing, Dousing, and the Final Sticky Finish
- The Wrap (Texas Crutch): When the stall begins, remove the point. Lay it onto heavy duty butcher paper or foil. Add the slices of cold butter and the beef stock, then wrap it tightly, sealing it completely. Return the wrapped meat to the smoker, increasing the temperature to 250°F (121° C) .
- The Tenderness Check: Continue cooking until the internal temperature reaches 200 205°F (93 96° C) . Now, you must check for tenderness . Probe multiple spots; if it slides in easily, you’re done.
- Rest and Cube: Remove the perfectly tender point and let it rest, still wrapped, on the counter for at least 30 minutes. Unwrap it, drain the juices (save them!), and slice the point into 1.5 inch (4 cm) cubes.
Resting the Cubes for Ultimate Juiciness
Prepare the Glaze: Mix your BBQ sauce, cider vinegar, and honey/molasses until smooth. The vinegar is non-negotiable; it prevents the final product from tasting like pure sugar.
Toss and Pan: Gently toss the cubes with the glaze in a large mixing bowl until coated. Place the cubes snugly into a foil pan, making sure they are not stacked too high you want maximum surface area exposure.
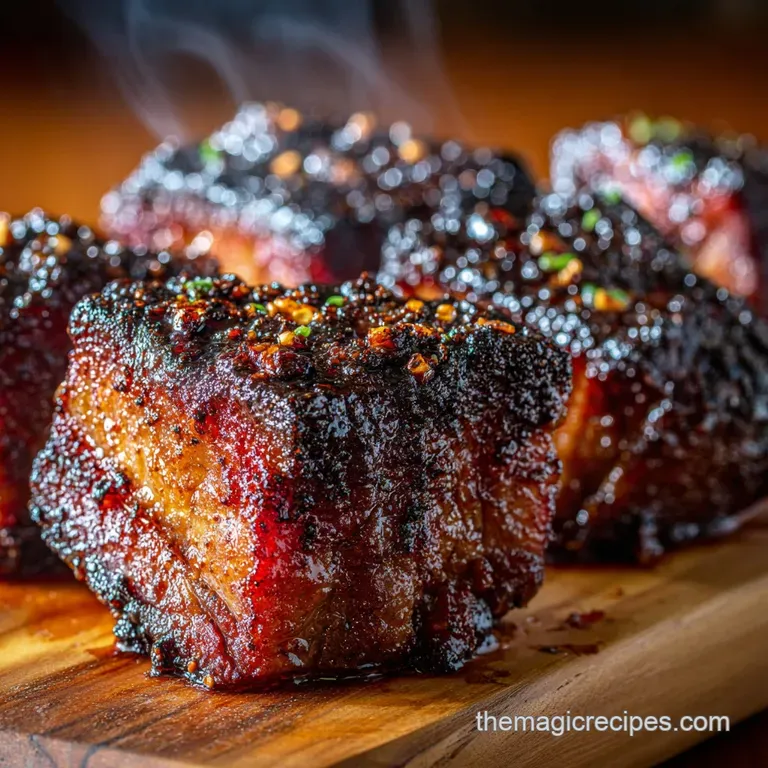
The Final "Burn": Return the pan to the smoker (or a 300°F / 150°C oven). Cook for 45– 60 minutes, stirring halfway through. The sauce should bubble, reduce, and become thick, tacky, and adhere tightly to the meat.
The edges should look sticky and slightly caramelized black.
Final Rest: Remove the pan and let the burnt ends sit for 10 minutes. The residual heat will finish setting that sticky glaze. Serve hot!
Troubleshooting and Advanced Techniques for Perfect Burnt Ends
Preventing Dry, Tough Cubes (Moisture Management)
The number one mistake people make is skipping the "Texas Crutch" (the foil/paper wrap) or trimming too much fat. If you notice your meat drying out during Phase I, increase your spritzing frequency.
Once you wrap the meat (Phase II), the added beef stock and butter create a moist environment that essentially braises the meat, guaranteeing juiciness.
Key Tip: If the cubes look dry after the final "burn," toss them immediately with 1 2 tablespoons of the reserved brisket juices (from the wrap) before serving.
Wood Selection: Hickory, Oak, or Pecan?
The wood you choose drastically affects the final flavour profile.
| Wood Type | Flavor Profile | Best For Burnt Ends? |
|---|---|---|
| Hickory | Strong, distinct, traditional smokehouse flavour. | Excellent, very classic KC profile. |
| Oak | Medium, versatile, pairs well with beef. | Great for a clean, deep smoke base. |
| Pecan | Milder, sweet, and nutty. | Good if you prefer a less aggressive smoke. |
I personally use a 50/50 mix of Hickory and Oak. It gives you that strong, old-school smoke flavour that cuts through the rich glaze beautifully.
Best Practices for Storing and Reheating Leftover Smoked Burnt Ends
What? Leftovers? Highly unlikely, but just in case you manage to make too many glorious burnt ends , here’s how to save them without ruining that texture.
Preparing Leftovers for Short Term Refrigeration
Allow the cubes to cool completely before storing. Place the burnt ends and any residual sauce into an airtight container. They will keep safely in the refrigerator for up to 4 days. Warning: They will solidify because of the rendered fat and gelatin, but don't worry!
Vacuum Sealing for Long Term Freezing
Burnt ends freeze incredibly well. If you plan to keep them longer than four days, place the cooled cubes into a freezer safe zip-top bag, pressing out all the air, or ideally, vacuum seal them. They will maintain their quality for 3 4 months.
The Secret to Reheating Burnt Ends Without Drying Out
Never microwave these beauties; you'll turn them rubbery and sad.
- Thaw (if frozen): Thaw overnight in the fridge.
- Add Moisture: Place the cubes in a small oven safe dish. Add 1 2 tablespoons of water or beef stock to the bottom of the dish this generates steam and prevents drying.
- Low and Slow Reheat: Cover the dish tightly with foil. Reheat in a 300°F (150° C) oven for 15– 20 minutes, or until warmed through. The foil traps moisture, reviving that tender texture.
Complementary Sides That Elevate Smoked Burnt Ends
Traditional Kansas City Pairings (Baked Beans & Fries)
Burnt ends are robust and rich, so they need classic, hearty sides. You can’t go wrong with deeply flavoured, smoky Baked Beans (homemade are non-negotiable) and a pile of crispy French Fries.
I also love a sweet, slightly tart cornbread to sop up the leftover sauce in the pan.
Cutting Through the Richness: Slaws and Pickles
Because the burnt ends are so fatty and sweet, you need acidity and crunch to cleanse the palate between bites.
- Tangy Coleslaw: Ditch the creamy, mayo heavy slaw here. Opt for a vibrant, vinegar based coleslaw with lots of crunch.
- Pickles: A big bowl of homemade bread and butter pickles or sharply acidic dill spears are the perfect counterpoint to the sweetness of the glaze. They make every bite taste fresh again.

Recipe FAQs
Why must I use the Brisket Point instead of the Flat for true Burnt Ends?
The "point" is the fattier, more marbled section of the brisket, which is absolutely crucial for achieving that signature melt-in-your mouth texture. The higher fat content renders during the second stage of cooking (the braise), preventing the meat from drying out and creating the necessary sticky, caramelised exterior that defines a great burnt end.
My Burnt Ends came out tough and dry. What went wrong?
Toughness usually indicates insufficient cooking time during the initial brisket phase, or temperatures that were too high too fast, causing moisture loss. Ensure your primary brisket cook reaches an internal temperature of 200 205°F before cutting, and verify your wrapping during the rest period was secure to retain all internal moisture.
The second cooking phase (cubing and saucing) must be gentle, focusing on glazing rather than dehydrating the meat.
Can I make Burnt Ends without a traditional smoker?
While a traditional smoker delivers superior flavor, you can adapt this recipe using an oven by mimicking the low-and-slow process. Use a large pan to catch rendering fat and incorporate high-quality liquid smoke or smoked paprika into your rub to achieve an approximation of that classic smoky depth.
Maintain a low oven temperature (around 225°F/107°C) for the initial cook.
When should I apply the barbecue sauce or glaze to the cubed meat?
The glaze should only be applied during the final phase of cooking, typically the last 60 to 90 minutes after the meat has been cubed and placed into a covered foil pan. Adding the sauce too early will cause the sugars to burn before the meat is finished cooking, resulting in a bitter flavor and a harsh, crusty bark.
Use a thick sauce or glaze that can withstand some heat.
How can I tell when the Burnt Ends are perfectly tender and ready to serve?
The best test is the "probe test," which is physical tenderness rather than temperature. The cubes should yield absolutely no resistance when poked with a thermometer probe or tooth pick, feeling like soft butter melting around the metal.
Visually, they should have developed a deep, dark mahogany colour and exhibit a sticky, glossy exterior from the caramelised sauce.
Can I prepare the brisket a day ahead of time to shorten the cooking window?
Absolutely; breaking this recipe into two days is an excellent strategy for managing the lengthy cook time. Cook the brisket point entirely on day one, allow it to cool to room temperature, wrap it securely in butcher paper, and refrigerate it overnight.
On day two, simply cube the cold meat, toss with rub, sauce, and proceed with the final smoking/baking phase, which will take about 2 3 hours.
What is the best method for storing and reheating leftover Burnt Ends?
Store any leftovers in an airtight container in the refrigerator for up to four days, ensuring they are tightly sealed to prevent drying out. To reheat, place them in an oven safe dish covered with foil, heating them low and slow at 250°F (120°C) until warmed through.
You may wish to add a tablespoon of water or broth to the pan before covering to inject a little steam and moisture back into the meat.
Kc Smoked Brisket Burnt Ends Recipe

Ingredients:
Instructions:
Nutrition Facts:
| Calories | 616 kcal |
|---|---|
| Protein | 71.5 g |
| Fat | 29.3 g |
| Carbs | 9.8 g |
