The Proper Cherry Cobbler: Rustic Classic with Butter Biscuit Topping
- Defining The Proper Cherry Cobbler: Rustic Comfort Reimagined
- The Science of Perfect Cobbler Texture: Why This Recipe Rises
- Essential Ingredients for Your Best Homemade Cherry Cobbler
- Baking Your Proper Cherry Cobbler: Detailed Step-by-Step Method
- Expert Tips for Troubleshooting and Customizing Your Dessert
- Recipe FAQs
- 📝 Recipe Card
Defining The Proper Cherry Cobbler: Rustic Comfort Reimagined
You know that exact moment. It’s when your kitchen air changes completely, filling up with the scent of hot, bubbling dark cherries, melted butter, and sweet pastry. That incredible aroma promises something truly comforting and deeply satisfying.
This isn't just another dessert, friends; this is the proper cherry cobbler , and it brings pure joy to the dinner table.
I love a gorgeous cherry pie as much as the next person, but honestly, who has the time for fussy pastry crimping every day? This recipe is a lifesaver for busy weeks because it swaps tricky crusts for a quick, drop biscuit topping.
It requires minimal active prep, uses everyday ingredients, and consistently delivers maximum payoff.
If you’ve ever found yourself with an overflowing fruit bowl (or a freezer stash of cherries) and just thirty minutes before dinner guests arrive, this is your solution. Forget the complicated steps; we are going to nail this classic British rustic dessert and ensure that runny filling is a problem of the past.
Let’s get baking!
The Science of Perfect Cobbler Texture: Why This Recipe Rises
What Makes a Cobbler Distinct from a Crisp or Pie?
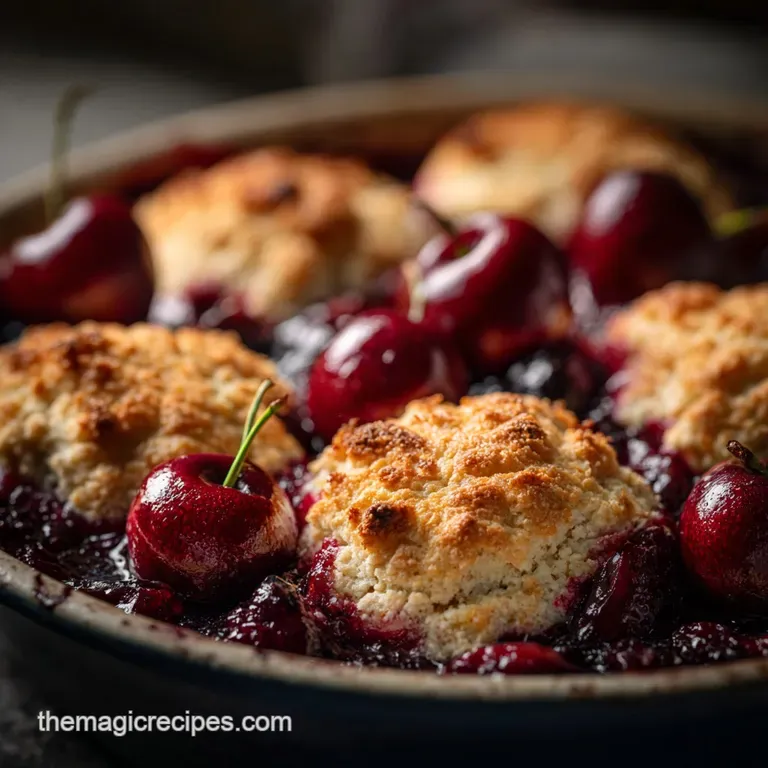
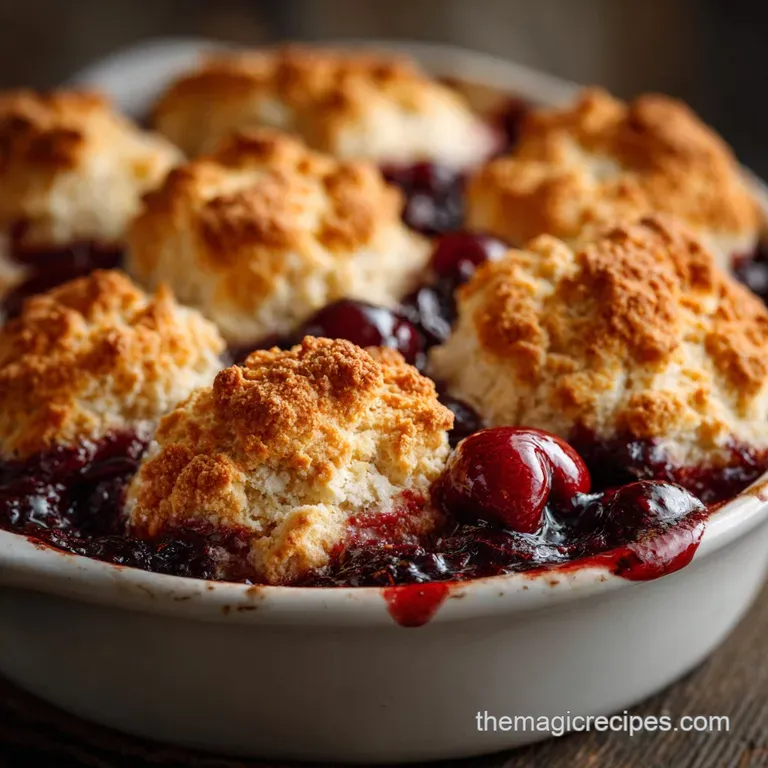
This is a hill I will absolutely die on: a cobbler is not a crisp, and it is certainly not a crumble. The key defining feature of a classic cherry cobbler recipe is the topping. It’s essentially a thick, rustic, drop biscuit dough baked directly over the fruit.
A crisp uses oats in the topping, and a pie is fully enclosed in pastry. This cobbler gives you fluffy, tender pillows that soak up all that incredible cherry steam.
A Brief History of the Classic British Cobbler
The cobbler is an old school, no-fuss dessert, often traced back to early British settlements in America where resources were scarce. Since settlers lacked the typical ingredients for deep dish pies, they dumped mounds of biscuit dough over stewed fruit instead.
It looked like cobblestones, hence the name, and it’s been a simple comfort food ever since. I think we need more of that uncomplicated goodness in our modern kitchens.
Is It Better to Use Fresh or Frozen Cherries?
Here’s the deal: both fresh and frozen cherries work beautifully for this rustic cherry cobbler . If you're using fresh, make sure they are thoroughly pitted that step takes the longest!
If you opt for cherry cobbler with frozen cherries , do not thaw them completely beforehand. Tossing the partially frozen fruit directly with the cornstarch helps manage the excessive moisture released during baking, which keeps your filling thick, not watery.
Achieving the Ideal Balance: Tart Cherry Filling vs. Sweet Topping
Cherries need a little help to achieve greatness. They can sometimes fall flat or be too one-note sweet. We use lemon juice and a tiny hint of almond extract in the filling to give it a deep, complex, almost nutty background flavor. This tart, acidic contrast makes the sweet, buttery topping taste even better.
The Role of Cold Butter in Creating Fluffy Biscuit Pillows
This is the non-negotiable step for the topping. Always use butter straight from the freezer or fridge. When you cut that cold butter into the flour, it creates tiny, distinct pockets of fat. When those pockets hit the heat of the oven, the moisture in the butter converts instantly to steam.
That rapid expansion is what gives you a light, tender, and incredibly flaky biscuit topping, instead of one that is dense or tough.
Essential Ingredients for Your Best Homemade Cherry Cobbler
| Ingredient | Why We Use It | Substitution Tip |
|---|---|---|
| Dark Sweet Cherries | Deep color, balanced sweetness. | Use 5 cups cherry pie filling (reduce sugar by 1/4 cup) or tart cherries (increase sugar by 1/4 cup). |
| Cornstarch | Primary thickener for the filling. | Tapioca starch or instant tapioca works well; use 1 extra tablespoon for safety. |
| Cold Butter | Creates steam for flaky topping. | Chilled vegetable shortening or vegan baking sticks. |
| Whole Milk | Adds richness and moisture to the dough. | Use the buttermilk trick: 1/2 cup dairy-free milk + 1/2 tsp white vinegar. |
Choosing Your Cherries: Dark Sweet vs. Sour Varieties
I usually grab dark sweet cherries (like Bing or Rainier) because they are readily available, either fresh or frozen. If you prefer a truly tart experience, use sour (Morello) cherries, but you will need to increase the sugar in the filling by 1/4 cup to balance the flavor. Either way, ensure they are pitted!
Flour & Leavening Agents: The Secret to a Light Topping
We rely on standard all-purpose flour for the dough, but the magic truly comes from the baking powder. Use the full 1 1/2 teaspoons specified. This aggressive amount of leavening ensures that the topping rises high and quickly into those coveted light, fluffy mounds.
Flavor Enhancers: Lemon Zest and Almond Extract Notes
Do not skip the lemon juice and that tiny dash of almond extract! Cherries and almonds are a match made in culinary heaven, complementing each other perfectly. The lemon cuts through the overall richness, ensuring the dessert feels bright, not heavy.
Dairy Substitutions for a Lighter or Non-Dairy Topping
No buttermilk in the fridge? No problem. Simply measure the whole milk (or your preferred dairy substitute) and stir in half a teaspoon of white vinegar or lemon juice. Let it stand for five minutes; the slight curdling creates a mild acidity that reacts beautifully with the baking powder, giving your dough extra lift and flavor.
Baking Your Proper Cherry Cobbler: Detailed step-by-step Method
Preparing the Sweet Cherry Filling and Thickeners
First, preheat your oven to 375°F (190°C) and grease your baking dish thoroughly. In a large bowl, whisk together the sugar, cornstarch, and salt until there are absolutely no lumps of starch visible. Then, toss in your cherries, lemon juice, and almond extract until everything is coated well.
Pour this vibrant, thick mixture directly into the prepared dish.
Mixing and Cutting the Rustic Cobbler Topping Dough
In a separate bowl, whisk together the dry ingredients for the topping. Now, add your cubes of super cold butter. Use a pastry blender or your fingertips to work the butter into the flour quickly remember, we want little pea-sized pieces.
Once incorporated, pour in the cold milk all at once and mix with a rubber spatula only until the dough just comes together. This mixture should look shaggy and slightly messy. Trust me on this; less mixing means more tenderness.
Assembling and Achieving the Perfect Bake Time
Use a large spoon or an ice cream scoop to drop the dough onto the filling, covering most of the fruit but leaving small gaps so the cherries can bubble up beautifully. Brush the tops with the optional egg wash (egg yolk + milk) and sprinkle with sugar for that glorious, sparkly crust.
Bake for 40 to 45 minutes. The topping should be deep golden brown, and the fruit filling must be visibly thick and aggressively bubbling around the edges.
Preventing a Soggy Bottom: Starch Ratios Explained
The ratio of cornstarch to fruit is critical for preventing a watery mess. Six cups of cherries need three tablespoons of cornstarch to bind properly. The biggest rookie mistake I ever made was skipping the crucial cooling step.
If you try to serve it immediately, the filling will run like soup because the starch hasn’t had time to fully set and gelatinize. You must let it rest for at least 30 minutes!
Crucial Chef’s Note: If you are using pre-made canned cherry pie filling, you may need to reduce the sugar in the filling by half and skip the cornstarch entirely, as the canned filling is already thickened.
Expert Tips for Troubleshooting and Customizing Your Dessert
Solving the Runny Filling Problem Mid-Bake
If you pull your cobbler out and the filling looks excessively watery (after the mandatory 30 minute rest!), there isn't much you can do after the fact except chill it completely in the fridge, which helps it firm up a bit.
To prevent it, ensure your cherries (especially frozen ones) are still partially solid when you toss them with the starch, and use that full three tablespoons of cornstarch. If I have really juicy fruit, I sometimes add a fourth tablespoon for safety.
How to Know When the Topping is Fully Cooked Through
Visually, the top should be deep golden brown, not pale yellow. If you gently tap the top of one of the biscuit mounds, it should feel firm and not spongy. If the top is browning too quickly, lightly tent the dish with foil for the last 10 minutes of baking.
Adapting the Recipe for Different Pan Sizes and Shapes
I use a 9x9-inch square pan because it provides a great ratio of topping to filling. If you use a 9 inch circular dish, the bake time should stay about the same. If you switch to a very shallow dish, the bake time will decrease slightly, maybe down to 35 minutes.
If you use a deeper 9x13-inch dish (and double the recipe), remember that the internal temperature will take longer to stabilize, requiring up to 55- 60 minutes.
Best Practices for Storing Leftover Cobbler
Leftover proper cherry cobbler is a treat for breakfast the next day. Once cooled completely, cover the dish tightly with foil or plastic wrap. It will keep beautifully in the refrigerator for 3 to 4 days. Because of the dairy in the topping, you should keep it chilled.
Can You Freeze Unbaked or Baked Cobbler?
Yes, and this is a great make-ahead tip! You can assemble the entire dish (filling and topping), cover it tightly with foil, and freeze it unbaked for up to three months. When ready to bake, transfer it straight from the freezer to a cold oven, then set the temperature to 375°F (190°C) and add about 20- 30 minutes to the total baking time.
Reheating already baked cobbler should be done low and slow, around 300°F (150°C), covered with foil, for 20 minutes until warmed through.
The Ultimate Pairing: Essential Accompaniments for Warm Cobbler
You simply cannot serve warm cobbler naked! A scoop of premium vanilla bean ice cream that slowly melts into the hot fruit is divine. For something truly traditional, grab some proper, thick vanilla custard it’s pure heaven. Want something tangy to cut the sweetness? A dollop of cool crème fraîche or clotted cream is incredible. If you're looking for an alternative sweet treat that needs even less work, sometimes I skip the biscuit altogether and make Dump Cake Recipes: The Easiest Cherry Pineapple Bake (10 Min Prep) instead.

Recipe FAQs
Why is my cherry filling too runny or watery after baking?
A runny filling usually means the fruit released too much juice, or the thickening agent (cornstarch/flour) wasn't given enough time to activate. Ensure you boil down the extracted juices slightly with the starch mixture before assembly, or if using frozen cherries, do not thaw them first as this releases excessive liquid.
Why is the cobbler topping tough or hard instead of soft and fluffy?
This typically occurs from overmixing the biscuit dough, which develops the gluten too much and results in a tough texture. Mix the wet and dry ingredients just until combined, handling the dough as little as possible.
Also, ensure your butter is very cold and well cut into the flour to create the steam pockets needed for a light crumb.
Can I use a different fruit instead of cherries for this recipe?
Absolutely. This buttery cobbler topping pairs excellently with various fruits, including peaches, plums, or a mix of summer berries like raspberries and blueberries. Note that firmer fruits, such as apples, may require a brief pre-cook or blanching to ensure they soften completely during the cobbler bake time.
Can this cherry cobbler be made vegan or gluten-free?
Yes, for a vegan cobbler, substitute the dairy butter with a solid plant based butter alternative and use oat or almond milk for the liquid. To make it gluten-free, swap the wheat flour in the topping for a high-quality 1:1 gluten-free baking blend that includes xanthan gum to maintain structure.
What is the best way to store leftovers, and can I freeze the baked cobbler?
Store leftover cobbler, tightly covered, in the refrigerator for up to three days; it reheats well in a low oven (300°F/150°C). While the baked filling freezes adequately, the biscuit topping tends to lose its fluffy texture upon thawing, so freezing unbaked filling separate from the topping is generally recommended.
My topping is browning too quickly, but the filling isn't bubbly yet. What should I do?
If the topping is browning prematurely, loosely tent the cobbler dish with a piece of aluminum foil. This shields the exposed biscuit while allowing the filling underneath to continue cooking, thicken properly, and reach the necessary internal temperature.
Remove the foil during the last few minutes if you need a final touch of golden color.
I am using frozen cherries. Do I need to thaw them before starting the recipe?
It is generally better to use frozen cherries straight from the bag without thawing. Thawing causes them to release a large volume of liquid, making the filling watery and less concentrated in flavor. Simply toss them with the sugar and thickening agent and allow for an extra 5-10 minutes of bake time.
Proper Cherry Cobbler Recipe

Ingredients:
Instructions:
Nutrition Facts:
| Calories | 320 kcal |
|---|---|
| Protein | 3.0 g |
| Fat | 9.0 g |
| Carbs | 60.0 g |
