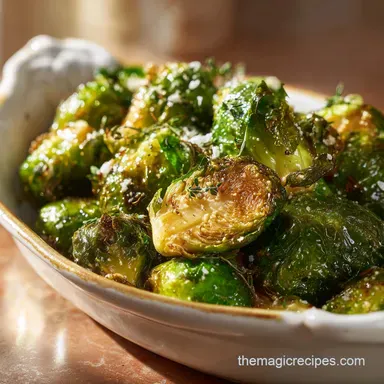
Easy Smashed Roasted Brussels Sprouts

- Time: Active 10 minutes, Passive 25 minutes, Total 35 minutes
- Flavor/Texture Hook: Shatter crisp edges with velvety, melt in-your mouth centers
- Perfect for: Vibrant weeknight dinners or a nourishing holiday side dish
- Creating an easy smashed roasted brussels sprouts recipe
- The Secret to Shatterproof Texture
- Understanding the Recipe Specs
- Essential Components for Success
- Tools for Smashed Perfection
- Step-by-Step Cooking Guide
- Fixing Common Smashed Sprout Issues
- Personalizing Your Vegetable Side
- Scaling for Large or Small Batches
- Myths About Cooking Sprouts
- Storage and Keeping Sprouts Fresh
- Best Pairings for This Dish
- Recipe FAQs
- 📝 Recipe Card
Creating an easy smashed roasted brussels sprouts recipe
The first time I heard the sound of a fork hitting a properly roasted sprout, I knew my vegetable game had changed forever. It wasn't a dull thud or a mushy squelch; it was a distinct, glassy shatter.
That sound is the hallmark of a successful cook, a signal that the moisture has escaped and the natural sugars have transformed into something vibrant and golden. When you pull these out of the oven, the aroma of toasted garlic and nutty brassica fills the kitchen, immediately signaling that this isn't the soggy, grey side dish many of us grew up fearing.
I used to just toss whole sprouts in oil and hope for the best, but they always ended up either burnt on the outside or uncomfortably firm in the middle. The breakthrough came when I realized that compression is the key to consistency.
By flattening the vegetable, you create a thin, uniform surface that roasts at the exact same rate. It’s a simple mechanical change that yields a massive flavor payoff. You aren't just eating a vegetable anymore; you’re eating a savory, crispy morsel that holds onto balsamic glaze and lemon zest in every little crevice.
This easy smashed roasted brussels sprouts recipe is about more than just a quick side; it’s about understanding how to treat a hardy vegetable with the respect it deserves. We are going to build layers of flavor starting with a salty par boil, moving into a over high heat sear with smoked paprika, and finishing with the bright zing of citrus.
It’s a nourishing way to fill your plate, and honestly, don’t be surprised if you find yourself snacking on these straight off the baking sheet before they even make it to the dinner table.
The Secret to Shatterproof Texture
Success here depends on two distinct phases of heat application. If we just roasted them raw, the outer leaves would turn to ash before the core ever softened. By starting with a rolling boil, we hydrate the dense interior and begin breaking down the tough cellular structures.
This makes the vegetable pliable enough to survive the "smash" without disintegrating into a pile of loose leaves.
- Mechanical Surface Expansion: Smashing increases the surface area in contact with the hot pan by roughly 300 percent, creating more room for browning.
- Cellular Pliability: Par boiling softens the pectin "glue" between cells, allowing the sprout to flatten into a disc rather than cracking into pieces.
- Thermal Evaporation: High heat at 425°F causes residual moisture to rapidly steam off, which is what creates that signature shatter crisp exterior.
- Maillard Enhancement: The combination of avocado oil and the flat surface accelerates the browning of natural sugars, creating a deep, nutty flavor profile.
| Method | Time | Texture | Best For |
|---|---|---|---|
| Oven Roasting | 25 minutes | Deeply browned and exceptionally crispy | Large batches and maximum crunch |
| Air Fryer | 15 minutes | Lightly charred and very fast | Quick lunches or small 1-2 person portions |
| Cast Iron Sear | 12 minutes | Heavy char with a smokier finish | Achieving a rustic, blackened appearance |
Using a high smoke point oil like avocado oil is non negotiable here. It allows us to push the oven temperature to 425°F without the oil breaking down or tasting bitter.
This intense heat is what fries the edges of the smashed sprout, turning those loose leaves into delicate chips that contrast beautifully with the tender, seasoned middle.
Understanding the Recipe Specs
Precision matters when you want a vegetable to act like a snack. This recipe is designed to yield 4 servings, which is usually around 1.5 lbs of fresh produce. If you try to crowd more than that onto a single standard baking sheet, you’ll end up steaming the sprouts rather than roasting them.
They need their personal space to get that golden glow.
When it comes to timing, 35 minutes total is the magic number. You spend 10 minutes on prep trimming those little woody ends and getting the water boiling and then 25 minutes of passive roasting time.
The roast is split into two parts: 15 minutes to set the bottom crust, a quick flip, and 10 more minutes to finish the top. This ensures that both sides get equal time against the hot metal of the pan.
If you are planning a larger meal, perhaps pairing this with a low and slow Texas brisket, you can easily double the recipe. Just remember the golden rule: two pounds of sprouts require two separate baking sheets. Putting them all on one pan is a mistake I made once at a holiday dinner, and I ended up with a tray of grey, sad mush. Never again! Keep them separated and they will reward you with that perfect crunch every time.
Essential Components for Success
| Ingredient | Science Role | Pro Secret |
|---|---|---|
| Brussels Sprouts | Structural base providing fiber and natural sugars | Choose medium sized sprouts for the best surface to core ratio. |
| Avocado Oil | over High heat lipid that transfers energy evenly | Use a spray or a brush to ensure the underside is fully coated for browning. |
| Parmesan Cheese | Protein and fat that creates a savory lace | Grate it fresh so it melts and crisps rather than clumping. |
| Balsamic Glaze | Acidic reduction that balances the earthy tones | Apply after roasting to keep the sugars from burning in the oven. |
The foundation starts with 1.5 lbs Brussels sprouts, ends trimmed. Trimming is vital because it allows the salt water to penetrate the core during the 8 to 10 minute boil. For the fat, we use 2 tbsp Avocado oil, which is the unsung hero of over high heat roasting.
Unlike olive oil, it won't smoke you out of the kitchen at 425°F.
To build the flavor layers, we use 1 tbsp Sea salt in the water (it seasons from the inside out), followed by 1/2 tsp Garlic powder, 1/2 tsp Smoked paprika, and 1/4 tsp Cracked black pepper on the pan.
The finish is where the vibrancy comes in: 1/4 cup Freshly grated Parmesan cheese for umami, 1 tbsp Balsamic glaze for sweetness, 1 tsp Lemon zest for brightness, and a pinch of Red pepper flakes for a tiny hint of heat.
- Brussels Sprouts (1.5 lbs): Why this? They provide the perfect density for smashing without losing their shape entirely.
- Avocado Oil (2 tbsp): Why this? Essential for over high heat roasting without developing off flavors from smoke.
- Fresh Parmesan (1/4 cup): Why this? Adds a salty, crispy "lace" that binds the seasonings to the sprout.
- Balsamic Glaze (1 tbsp): Why this? The concentrated acidity cuts through the richness of the oil and cheese.
Tools for Smashed Perfection
You don't need a pantry full of gadgets, but a few specific items make this easy smashed roasted brussels sprouts recipe much more successful. First, a large pot for the par boil is essential. You want the sprouts to have enough room to move so the water temperature doesn't drop too much when you add them.
A solid colander is also a must have for the 2 minute steam dry step. Getting that excess water off is the difference between a crisp sprout and a soggy one.
For the smashing itself, a heavy glass with a flat bottom is my go to. I’ve used a potato masher before, but sometimes the leaves get stuck in the wires. A smooth glass bottom gives you a clean, even press every time.
You’ll also need a large baking sheet, preferably a heavy gauge one that won't warp in the high heat. Lining it with parchment paper isn't just for easy cleanup; it prevents the balsamic glaze and cheese from sticking to the metal later on.
Chef's Tip: If your sprouts are rolling around while you try to smash them, give them a tiny "nick" with a knife on the rounded side before pressing down. This breaks the tension of the outer skin and lets them flatten perfectly without sliding across the parchment.
step-by-step Cooking Guide

- Bring a large pot of salted water to a rolling boil. Add 1.5 lbs trimmed Brussels sprouts and cook for 8 to 10 minutes until they are fork tender but still holding their shape. Note: Overcooking here will make them too mushy to smash.
- Drain the sprouts into a colander. Let them sit and steam dry for 2 minutes to remove surface moisture.
- Preheat your oven to 425°F (220°C). Place the sprouts on a parchment lined baking sheet and use the bottom of a heavy glass until each sprout is flattened to 1/2 inch thickness.
- Drizzle with 2 tbsp avocado oil. Sprinkle evenly with 1/2 tsp garlic powder, 1/2 tsp smoked paprika, and 1/4 tsp cracked black pepper.
- Toss the sprouts gently on the tray to coat both sides. Arrange them so none are overlapping to ensure maximum airflow.
- Roast for 15 minutes. Use a spatula to flip each disc. Roast for an additional 10 minutes until the edges are deeply browned and shatter crisp.
- Remove from the oven. Immediately sprinkle with 1/4 cup grated Parmesan cheese so it melts into the hot crevices.
- Drizzle with 1 tbsp balsamic glaze and finish with 1 tsp lemon zest and a pinch of red pepper flakes. The aroma should be bright and toasted.
Fixing Common Smashed Sprout Issues
Even a simple recipe can go sideways if the variables aren't controlled. The most frequent complaint I hear is about sogginess. If your sprouts aren't crunching, it’s almost always a moisture issue.
Either they weren't dried long enough after boiling, or the oven wasn't hot enough to evaporate the liquid before the vegetable finished cooking.
Soggy Sprout Solutions
This usually happens when the sprouts are crowded on the pan. When vegetables are too close together, the moisture they release turns into steam. Instead of roasting, they end up steaming each other, which leads to a soft, limp texture. Always ensure there is at least a half inch of space around each smashed disc. If you're doubling the recipe for roasted holiday vegetables, use two pans.
Broken Sprout Prevention
If your sprouts are disintegrating into a pile of leaves when you smash them, they are likely overcooked from the boiling stage. They should be "fork tender," meaning a fork goes in with just a little resistance. If they are falling apart in the water, they definitely won't survive the glass press.
On the flip side, if they are too hard to smash, they need another minute or two in the boiling water.
| Problem | Root Cause | Solution |
|---|---|---|
| Soggy Centers | Excess water or crowding | Steam dry for 2 full mins and use two pans if needed. |
| Burnt Edges | Oven rack is too high | Move the baking sheet to the center rack for even heat. |
| Bitter Flavor | Over roasting or old sprouts | Use fresh, bright green sprouts and watch the 25 min timer. |
Common Mistakes Checklist
- ✓ Pat the sprouts dry with a kitchen towel after draining if they still look wet.
- ✓ Ensure the oven is fully preheated to 425°F before the pan goes in.
- ✓ Don't skip the flip; the side touching the pan gets the most crunch.
- ✓ Add the balsamic glaze ONLY after roasting to prevent the sugars from burning.
- ✓ Use freshly grated Parmesan, as the pre shredded kind has anti clumping agents that prevent a good melt.
Personalizing Your Vegetable Side
One of the best things about this easy smashed roasted brussels sprouts recipe is how adaptable it is. While the balsamic and lemon version is my favorite for a vibrant, nourishing meal, you can easily pivot based on what's in your pantry. If you want something earthier, swap the lemon zest for fresh thyme or rosemary.
The "smash" technique works with almost any flavor profile you can imagine.
Smashed Brussels Sprouts with Bacon
For a more indulgent twist, you can add 1/4 cup of cooked, crumbled bacon at the same time you add the Parmesan. The smoky fat from the bacon complements the charred edges of the sprouts perfectly.
If you go this route, you might want to reduce the sea salt slightly, as the bacon and cheese provide plenty of sodium on their own.
Smashed Brussels Sprouts Air Fryer Version
If you're in a hurry or just cooking for one, the air fryer is a fantastic tool. Follow the par boiling and smashing steps exactly as written. Instead of the oven, place the smashed sprouts in a single layer in the air fryer basket at 400°F.
Cook for 10 to 12 minutes, shaking the basket halfway through. They tend to get even crispier in the air fryer due to the intense air circulation.
The Vegan Umami Swap
To make this dish entirely plant based, replace the Parmesan cheese with 2 tbsp of nutritional yeast. It provides that same nutty, cheesy flavor and helps create a bit of a crust. You can also swap the balsamic glaze for a drizzle of tahini mixed with a little maple syrup and lemon juice for a creamy, vibrant finish that is still incredibly nourishing.
Scaling for Large or Small Batches
When you need to scale this recipe down for a solo dinner, it’s quite simple. For a single serving, use 0.4 lbs of sprouts and reduce the oil to about 1.5 teaspoons. You can use a small toaster oven or air fryer, which often heats up faster than a full sized oven.
Since you're working with a smaller volume of water to boil, keep a close eye on the 8 minute mark so they don't overcook.
Scaling up for a big party requires a bit more strategy. For 8 to 12 servings, you’ll be working with 3 to 4.5 lbs of sprouts. Do the par boiling in batches so the water stays at a boil. When roasting, the most important thing is to avoid the temptation to stack the pans.
If you have two racks in your oven, rotate the pans halfway through the 25 minute cook time (when you do the flip) to ensure both trays get exposure to the top and bottom heating elements.
For the spices and seasonings when scaling up, don't just double or triple everything linearly. Start with 1.5x the smoked paprika and garlic powder, then taste and adjust. Spices can become overwhelming in large quantities.
However, you should keep the oil ratio consistent to ensure every sprout gets that necessary fat coating for the perfect shatter crisp texture.
Myths About Cooking Sprouts
One of the biggest misconceptions is that boiling Brussels sprouts makes them stinky or bitter. The truth is that the "sulfur" smell only happens when you overcook them. A quick 8 minute par boil isn't long enough to release those compounds; it simply softens the core.
In fact, par boiling helps remove some of the outer bitterness, leaving you with a much milder, sweeter vegetable.
Another myth is that you need a ton of oil to get things crispy. People think they need to deep fry sprouts to get that restaurant style crunch. However, the smashing technique proves that surface area is more important than the amount of fat.
With just 2 tbsp of avocado oil and the right oven temperature, you can achieve a texture that rivals any fried version without the heavy, greasy feeling.
Finally,, many believe that "fresh is always best" and you can't use sprouts that have been in the fridge for a week. While vibrant, firm sprouts are ideal, the smashing technique is actually quite forgiving for sprouts that have lost a bit of their moisture.
The par boiling rehydrates them slightly, and the roasting finishes the job. As long as they aren't yellowing or soft, they are perfect for smashing.
Storage and Keeping Sprouts Fresh
If you happen to have leftovers though in my house, that’s a rarity they store surprisingly well. Place them in an airtight container in the fridge for up to 3 days. They will lose their initial "shatter" crunch as they sit, but the flavor remains vibrant.
To use up any scraps or loose leaves that fell off during the smashing process, toss them into a morning omelet or a grain bowl for an extra hit of nutrition.
When it's time to reheat, skip the microwave. Microwaving will turn your crispy masterpieces into rubbery disappointment. Instead, put them back on a baking sheet or in an air fryer at 350°F for about 5 minutes.
This will draw out the moisture again and bring back a good portion of that original crispiness. They are also delicious cold, chopped up and thrown into a kale salad with some extra lemon juice.
For zero waste, don't throw away those trimmed ends! While they are too woody for this recipe, they are packed with flavor. Throw them into a freezer bag with your other veggie scraps like onion skins and carrot tops. Once the bag is full, boil them all down to make a nourishing, homemade vegetable stock.
It’s a great way to respect the whole plant and get the most value out of your grocery haul.
Best Pairings for This Dish
These sprouts are versatile enough to sit alongside almost any protein, but they really shine when paired with something that has a bit of weight to it. The acidity of the balsamic and lemon cuts through rich meats beautifully. I love serving these next to a roast or a thick cut steak.
The contrast between the velvety meat and the shatter crisp sprouts is a sensory delight that makes the whole meal feel like a special occasion.
If you are looking for a lighter pairing, they go wonderfully with a piece of pan seared salmon or a roasted chicken breast. The smoked paprika in the sprout seasoning echoes the char on the chicken skin, creating a cohesive flavor bridge across the plate.
For a vegetarian feast, serve them alongside a creamy polenta or a wild rice pilaf. The sprouts provide the necessary texture that soft grains often lack.
Finally, don't forget the power of a good sauce. While the balsamic glaze is built in, a side of garlic aioli or a spicy tahini dip can take these to another level. They essentially become healthy, nourishing "fries" that you can dip and enjoy.
Whether you're serving them at a fancy holiday dinner or as a quick Tuesday night side, they bring a sense of vibrant energy to the table that everyone will appreciate.

Recipe FAQs
How to make smashed brussels sprouts?
Boil the trimmed sprouts for 8 10 minutes until fork tender, then steam dry them for 2 minutes. Place them on a parchment lined baking sheet and use the bottom of a heavy glass or a potato masher to press each sprout down to a 1/2 inch thickness before roasting at 425°F.
What is the secret ingredient for the best roasted Brussels sprouts?
Avocado oil and balsamic glaze provide the ultimate flavor foundation. The high smoke point of avocado oil allows for intense caramelization, while the balsamic glaze adds the perfect acidity to cut through the richness of the Parmesan cheese.
Are brussels sprouts good for diabetics?
Yes, they are an excellent choice for a diabetic friendly diet. They are naturally low in calories and carbohydrates while offering a high fiber content, which helps maintain stable blood sugar levels when served as part of a balanced meal.
What is the trick to crispy Brussels sprouts?
Eliminate excess surface moisture before roasting. Allowing the boiled sprouts to steam dry in the colander for 2 minutes is critical, as any leftover water will cause them to steam in the oven rather than achieving that signature crispy, browned edge.
How to reheat leftovers without losing the crunch?
Use a hot oven or air fryer instead of a microwave. Microwaving introduces steam that softens the texture, whereas reheating in an oven preheated to 425°F will help restore some of that original crispiness. If you enjoyed the technique of achieving a perfect crust here, you can apply similar high heat principles to get a Scalloped Potatoes recipe.
Can I prepare these ahead of time?
Yes, you can boil and dry the sprouts in advance. Store the pre-boiled sprouts in the refrigerator, then smash and season them just before you are ready to roast them to ensure the best possible texture.
How do I know when the sprouts are perfectly cooked?
Look for deeply browned, crispy edges after the final 10 minutes of roasting. The sprouts should feel firm when handled but easily break apart with a fork, showing caramelized leaves and a tender center.
Smashed Roasted Brussels Sprouts
Ingredients:
Instructions:
Nutrition Facts:
| Calories | 168 calories |
|---|---|
| Protein | 8.1 g |
| Fat | 9.2 g |
| Carbs | 17.4 g |
| Fiber | 6.5 g |
| Sugar | 4.8 g |
| Sodium | 260 mg |
