Velvety Sugar Cookie Icing Recipe
- Effort/Time: 10 minutes total
- Flavor Hook: Rich vanilla bean with a glass-like, light-reflecting finish
- Perfect for: Holiday cookie-swaps, intricate piping, and flood-style decorating
- Mastering the Ultimate sugar cookie icing for Glossy Bakery Results
- The Molecular Mechanics of Gloss: Why This Recipe Works
- Precision Timing and Yield for Cookie Decorating
- The Alchemy of Sweetness: Essential Icing Components
- Professional Tools for Achieving a Velvety Finish
- Mastering the Flow: Step-by-Step Icing Execution
- Why Your Icing Won't Set and How to Fix It
- Flavor Architecture and Ingredient Swaps
- ⚗️ The Scaling Lab: The Physics of Quantity
- Common Myths
- Preserving Your Indulgent Homemade Cookie Treats
- Pairing Your Indulgent Treats for Maximum Impact
- Recipe FAQs
- 📝 Recipe Card
Imagine spending four hours meticulously cutting out star shaped cookies, only to have the finish look like dull, gray construction paper. There is nothing worse than a cookie that tastes like butter and heaven but looks like a dry, matte disappointment because the sugar cookie icing failed to shine.
If you have ever stacked your "dried" cookies only to find them fused together in a sugary, ruined block of cement, you know the emotional and financial cost of a bad set.
I’ve been there I once ruined three dozen intricate snowflake cookies for a high stakes holiday party because I rushed the drying process and didn't understand the physics of sugar saturation.
I tried to "fix" a runny batch by dumping in un-sifted sugar, resulting in a lumpy, gritty texture that clogged every piping tip I owned. It was a sticky, expensive nightmare that taught me one vital lesson: cookie decorating isn't about artistic talent; it's about mastering fluid dynamics and glucose chains.
Mastering sugar cookie icing requires precision.
The secret to a professional grade sugar cookie icing isn't more sugar; it's the specific inclusion of glucose in the form of corn syrup. This creates an interference to sucrose crystallization, allowing the icing to set with a shattering, glass like gloss rather than a crumbly, opaque finish.
By controlling the moisture-to-solids ratio, we achieve a velvety flow that levels itself out into a perfectly smooth, indulgent surface that smells like a high end bakery. This type of sugar cookie icing is essential.
Mastering the Ultimate sugar cookie icing for Glossy Bakery Results
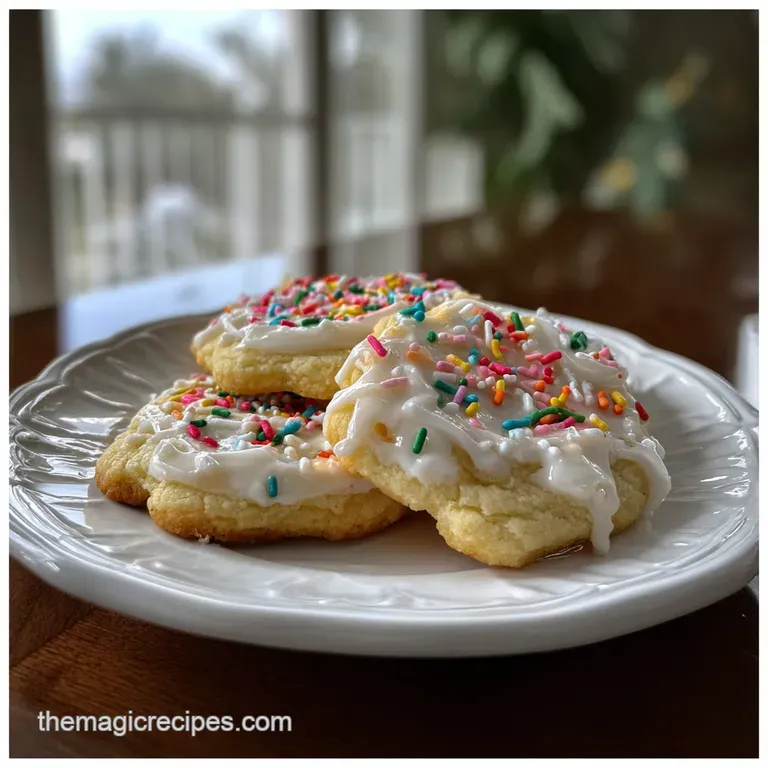
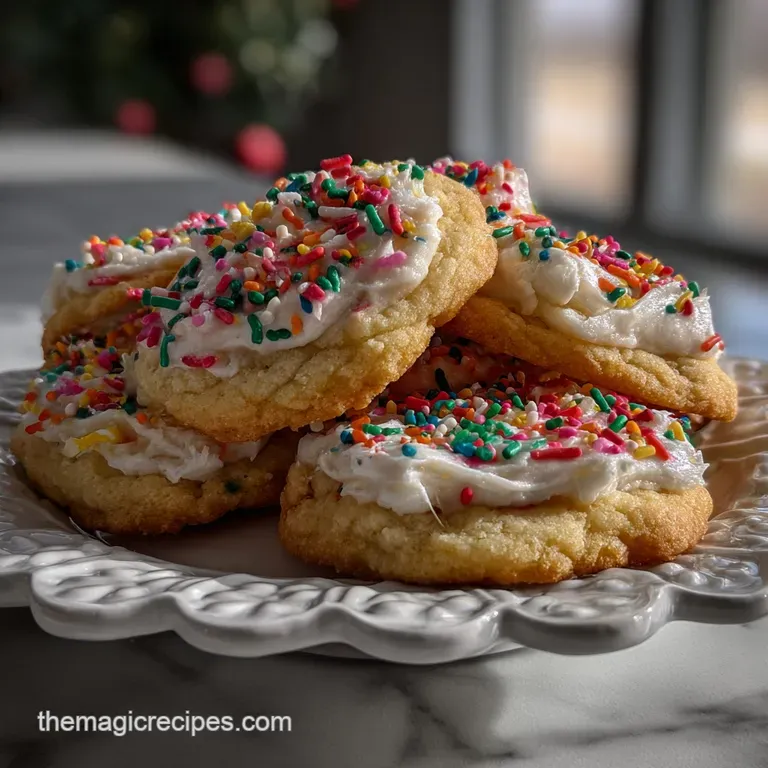
When you bite into a cookie decorated with this sugar cookie icing, the first thing you notice is the "shatter." This isn't the soft, toothpaste like texture of a canned frosting; it is a sophisticated, thin shell that protects the soft cookie underneath.
This recipe bridges the gap between the difficult-to-master royal icing (which uses egg whites or meringue powder) and a basic glaze. This fantastic sugar cookie icing is thicker, richer, and far more forgiving for the home cook who wants indulgent treats without a culinary degree.
The magic lies in the light reflecting properties of the corn syrup. As the sugar cookie icing dries, the water evaporates, leaving behind a dense network of sugar crystals that are coated in a thin layer of syrup.
This prevents the crystals from growing too large which would create a matte, gritty look and instead keeps them microscopic and smooth. The result is a vibrant, saturated color and a finish that looks like it was poured by a professional pastry chef.
The Molecular Mechanics of Gloss: Why This Recipe Works
- Glucose Interference: Light corn syrup introduces glucose molecules that physically block sucrose from forming large, dull crystals, ensuring a high gloss, light reflecting finish for your sugar cookie icing.
- Hygroscopic Balancing: Powdered sugar is naturally hygroscopic, meaning it pulls moisture from the air; the salt in this recipe stabilizes the osmotic pressure to prevent the icing from "sweating" in humid kitchens.
- Controlled Viscosity: Sifting the 10x powdered sugar removes cornstarch clumps, allowing for a Newtonian fluid behavior where the sugar cookie icing flows evenly and levels itself before setting.
- Evaporative Setting: The specific ratio of whole milk to sugar allows for rapid surface evaporation, creating a "skin" within minutes that prevents colors from bleeding.
Precision Timing and Yield for Cookie Decorating
To ensure your baking session goes smoothly, follow these exact numeric checkpoints. If you are making a larger batch, remember our Scaling Laws: when doubling the sugar, scale the salt only to 1.5x (approximately 3/8 teaspoon) to avoid an over salted profile.
A larger quantity of this sugar cookie icing requires careful management.
- Sifting Time: Spend a full 2 minutes sifting the sugar; 480g of sugar can hide significant clumps that ruin a 1mm piping tip.
- Set Time (Touch): The icing will develop a surface "skin" in 15 minutes at room temperature.
- Full Cure Time: Allow 24 hours for a complete, stackable cure if the humidity is above 50%.
| Feature | Fresh Homemade Icing | Shortcut Tub Frosting |
|---|---|---|
| Finish | High gloss, professional "shatter" | Matte, soft, and greasy |
| Stackability | Dries rock hard for easy transport | Remains tacky; will ruin if stacked |
| Flavor Profile | Indulgent vanilla and cream | Artificial, waxy, and overly sweet |
The Alchemy of Sweetness: Essential Icing Components
Choosing the right elements is the difference between a "home style" look and a "bakery boutique" finish. If you find yourself out of powdered sugar, you can learn How To Make recipe at home with just a blender and a little cornstarch.
Ingredient Chemistry Breakdown
| Ingredient | Chemical/Physical Role (Science) | The Pro Secret (Why This Matters) |
|---|---|---|
| Powdered Sugar | Providing the structural matrix through sucrose saturation | Sifting ensures a uniform micron size for a velvety, non-gritty mouthfeel. |
| Whole Milk | Acts as the solvent for hydration and protein stabilization | The fat content in whole milk creates a more opaque, indulgent finish than water. |
| Light Corn Syrup | Acts as a crystal inhibitor and gloss agent | Essential for that "hard set" shine that doesn't crack or flake when bitten, perfect for beautiful sugar cookie icing. |
| Pure Vanilla Extract | Flavor volatile aromatic compound | Use clear vanilla to maintain a bright, snow white base for tinting. |
- 4 cups (480g) C&H Powdered Sugar, sifted: Why this? 10x milling provides the highest surface area for rapid, smooth dissolution.
- 3 tablespoons Whole Milk: Why this? Fat molecules provide a creamy opacity that prevents the cookie from showing through.
- 3 tablespoons Karo Light Corn Syrup: Why this? Long chain glucose prevents the icing from becoming brittle or matte.
- 1 teaspoon Nielsen Massey Pure Vanilla Extract: Provides the aromatic backbone of the sugar cookie icing.
- 1/4 teaspoon Diamond Crystal Kosher Salt: Cuts through the cloying sweetness to highlight the vanilla notes.
Professional Tools for Achieving a Velvety Finish
While you don't need a professional kitchen, a few specific tools from brands like KitchenAid or Ateco make the process much more indulgent when creating this sugar cookie icing.
- KitchenAid Stand Mixer (with Paddle Attachment): Using a paddle on low speed prevents the incorporation of air bubbles, which are the enemy of a smooth flood.
- Fine Mesh Stainless Steel Sifter: Mandatory for removing the factory packed clumps in the powdered sugar.
- Ateco 12 inch Disposable Piping Bags: Easier to handle than reusable bags and allows for precise pressure control.
- Ateco #2 or #3 Round Piping Tips: The "goldilocks" size for both outlining and detail work.
- Scribe Tool or Toothpick: Critical for popping tiny air bubbles and "teasing" the icing into corners.
Mastering the Flow: step-by-step Icing Execution
Follow these steps precisely to avoid the "runny disaster" that plagues many beginners. For a perfect pairing, use this sugar cookie icing on my Peanut Butter Blossom Cookies recipe or on classic cut-outs.
- Sift the 4 cups (480g) of powdered sugar into a large glass bowl until no visible granules or lumps remain. Note: This prevents tip-clogging during piping.
- Add the 3 tablespoons of whole milk and 3 tablespoons of light corn syrup to the center of the sugar. Note: Starting with liquids in a "well" aids even hydration.
- Stir gently with a silicone spatula until the sugar is fully moistened and no dry pockets exist. Note: Use a slow, circular motion to minimize air incorporation.
- Incorporate the 1 teaspoon of vanilla extract and 1/4 teaspoon of salt until the mixture looks glossy and uniform.
- Test the consistency by lifting the spatula; the "ribbon" should disappear back into the bowl in exactly 10 seconds until the surface is perfectly flat again.
- Adjust by adding milk (1/2 teaspoon at a time) if too thick, or sugar (1 tablespoon at a time) if too thin, until the 10 second rule is achieved.
- Divide the sugar cookie icing into smaller bowls until you are ready to tint with gel food coloring.
- Transfer the sugar cookie icing into piping bags until they are no more than 2/3 full to prevent blowouts.
- Pipe an outline around the cookie edge until the border is set (about 2 minutes) before filling the center.
- Flood the interior of the cookie until the icing reaches the border, using a scribe tool to pop bubbles.
Why Your Icing Won't Set and How to Fix It
The most common frustration with homemade sugar cookie icing is a "soft set" or "cloudy" finish. Usually, this is a result of over hydration or sucrose recrystallization.
If the environment is too humid, the sugar absorbs atmospheric moisture, preventing the evaporative set required for stacking.
The "Runny" Disaster
When the icing runs off the side of the cookie, the viscosity is too low. This is often caused by measuring milk with "generous" tablespoons. Sugar is incredibly sensitive to liquid ratios; a single teaspoon of extra milk can turn a piping icing into a runny glaze.
| Problem | Root Cause | The Fix | Pro Protocol |
|---|---|---|---|
| Runny Icing | Too much solvent (milk) | Add sifted sugar in 1 tbsp increments | Use the "10 second rule" to test flow |
| Air Bubbles | Over whisking at high speed | Tap bowl on counter; let sit 10 mins | Use a scribe tool to pop surface bubbles |
| Dull Finish | Omitted corn syrup or high humidity | Add 1 tsp corn syrup; use a fan to dry | Dry cookies in a room with a dehumidifier |
Flavor Architecture and Ingredient Swaps
While the vanilla base is classic, you can easily pivot the flavor profile to match different cookie types. For example, if you're making my Russian Tea Cakes Recipe, a hint of almond in the sugar cookie icing adds an extra layer of indulgence.
| Original Ingredient | Substitute | Why It Works |
|---|---|---|
| Whole Milk (3 tbsp) | Heavy Cream (3 tbsp) | Higher fat content results in a thicker, even more indulgent and opaque icing. |
| Light Corn Syrup | Brown Rice Syrup | Similar glucose structure, but adds a slight toasted nut flavor. Note: Will tint the icing ivory. |
| Vanilla Extract | Lemon Juice | Acid cuts the sweetness and provides a bright, citrusy "pop" that pairs well with fruit cookies. |
Decision Shortcut: If You Want X, Do Y
- If you want deep, vibrant colors: Use gel-based food coloring rather than liquid, as liquid colors will thin the icing and cause "bleeding."
- If you want a matte, "vintage" look: Omit the corn syrup and replace it with an equal amount of milk.
- If you want to stack cookies immediately: Add an extra 1/2 cup of powdered sugar to create a thicker "stiff peak" icing for the borders.
⚗️ The Scaling Lab: The Physics of Quantity
When you need to ice 100 cookies for a wedding or bake sale, do not simply double or triple everything. Scaling this sugar cookie icing requires attention.
- The Evaporation Paradox: In a large bowl, the surface area relative to the volume is smaller than in a small bowl. This means a triple batch will dry out slower while you are working with it, but it also means the sugar can settle. Keep large batches covered with a damp cloth at all times.
- Flavor Saturation: Spices and salt should only be scaled to 1.5x. If you triple the sugar, only double the salt.
- Batching: If doubling, use a stand mixer to ensure the heavy mass of 8 cups of sugar is fully hydrated. Hand mixing a double batch often leads to "pockets" of dry sugar that explode in your piping bag later.
Common Myths
Myth: You need egg whites for icing to harden. Truth: This is false. High concentrations of powdered sugar combined with corn syrup will undergo an evaporative set that becomes firm enough to stack and ship without the safety concerns of raw eggs.
Myth: Sifting isn't really necessary if the sugar looks fine. Truth: Powdered sugar contains cornstarch that clumps under pressure. These microscopic lumps act as "seeds" for crystallization, which can make your icing look grainy or matte once dried, ruining the desired effect of the sugar cookie icing.
Preserving Your Indulgent Homemade Cookie Treats
Proper storage is the key to maintaining that professional "shatter." Because of the high sugar content, this sugar cookie icing has a long shelf life, but it is sensitive to temperature fluctuations.
- Fridge: Store leftover icing in an airtight container for up to 1 week. Pro Tip: Press plastic wrap directly onto the surface of the icing before sealing the lid to prevent a crust from forming.
- Freeze: You can freeze this icing for up to 2 months. Thaw in the fridge overnight and re-whisk gently by hand to restore the emulsion.
- Reheating: Never microwave the icing. If it has thickened in the fridge, let it come to room temperature and add milk by the drop to return to the 10 second consistency.
💡 ZERO WASTE: Don't Discard the Scraps
Don't discard leftover colored icing. Transform: Mix all leftovers together to create a "custom" neutral brown or gray, then use it to ice Peanut Butter Cookies recipe or use it as "glue" for gingerbread houses. Science: The sugar remains a stable preservative, and the mixed flavors (vanilla/almond/lemon) create a complex "bakery" taste.
Pairing Your Indulgent Treats for Maximum Impact
This sugar cookie icing isn't just for cut-outs. Its versatile nature makes it a perfect companion for a variety of baking projects.
- The Contrast Pair: Use this bright, sweet icing on a dark, bitter chocolate shortbread or my Oats Cocoa Cookies recipe. The sugar "snap" provides a beautiful textural counterpoint to a fudgy, soft cookie center.
- The Tea Party Palette: Tint the icing in soft pastels and use it to drizzle over lemon zest butter cookies. The acidity of the lemon in the cookie balances the indulgent sweetness of the icing.
- The Holiday Stack: For gifting, ensure the icing is fully cured (24 hours). Place a small square of parchment paper between each cookie to protect the gloss from scratching.
By understanding the chemistry of glucose and the importance of sifting, you are no longer just "putting frosting on a cookie." You are creating a professional grade finish that provides that satisfying, decadent snap.
Whether you're a seasoned baker or a beginner looking for an achievable win, this masterclass approach ensures your treats look every bit as indulgent as they taste. Trust me, once you see that light reflecting off your first batch of "flooded" stars, you'll never go back to the tub. Let's crack on and get decorating!

Recipe FAQs
What is the secret ingredient for glossy sugar cookie icing?
Light corn syrup. Glucose molecules physically block sucrose from forming large, dull crystals, ensuring a high gloss finish rather than a matte look.
Can I substitute powdered sugar with regular granulated sugar?
No. Granulated sugar will not dissolve correctly. It requires significant heat and mechanical breakdown to mimic the micron size of 10x powdered sugar, resulting in a gritty texture.
Why is my icing running off the cookie edges immediately?
The icing viscosity is too low from excess liquid. This happens when the milk/syrup ratio exceeds the sugar's absorption capacity, turning the fluid into a Newtonian glaze instead of a flood consistency. If you are struggling with fluid dynamics here, the same precise volumetric control is key when making a thick sauce like in our Chocolate Icing Recipe: The Ultimate Glossy Fudge Icing for Cakes.
- Measure liquids carefully
- Add sugar 1 tbsp at a time
- Ensure sugar was fully sifted first
Should I use salted or unsalted butter for the cookie base?
Unsalted butter for precision control. Commercial salted butter brands vary widely in sodium content, making precise flavor calibration impossible for delicate sugar cookies. Unsalted butter allows you to perfectly balance the sweet icing with the dough's flavor profile.
Myth: I must use meringue powder or egg whites to make icing set hard.
Myth: This is false. High concentrations of powdered sugar combined with corn syrup undergo an evaporative set that becomes firm enough to stack and ship without the safety concerns of raw eggs.
How long does this icing take to fully cure and become stackable?
At least 24 hours in average humidity. Full cure requires complete water evaporation; quick drying surfaces rely on airflow and low humidity to achieve the desired shattering finish.
Can I substitute the light corn syrup with simple sugar syrup?
No, simple syrup will cause crystallization. Simple syrup is pure sucrose and water; corn syrup contains essential glucose molecules that physically interfere with sucrose crystallization, which is necessary for the gloss and pliability.
Sugar Cookie Icing Perfection
Ingredients:
Instructions:
Nutrition Facts:
| Calories | 69 kcal |
|---|---|
| Protein | 0.1 g |
| Fat | 0.1 g |
| Carbs | 17.6 g |
| Fiber | 0 g |
| Sugar | 17.3 g |
| Sodium | 19 mg |
