Butter Cake: the Ultimate Classic Recipe for a Tender, Crumbly Treat
- The Ultimate Classic Crumb Butter Cake (A Proper Tea-Time Treat)
- The Science of Superior Texture: Why This Butter Cake Holds Its Shape
- Essential Ingredients and Expert Substitutions
- Step-by-Step: Crafting Your Classic Butter Cake
- Advanced Tips and Troubleshooting for Your Butter Cake
- Preservation Guide: Storing and Freezing Your Baked Cake
- Perfect Pairings: Serving Suggestions for Tea Time
- Recipe FAQs
- 📝 Recipe Card
The Ultimate Classic Crumb Butter Cake (A Proper Tea-Time Treat)
Seriously, is there anything better than the smell of proper butter cake baking? That rich, nutty, caramelized aroma is pure comfort, the kind that permeates your house and makes everyone suddenly appear in the kitchen. It just hugs you right when you walk in the door, promising a slice of true domestic bliss.
Forget those fussy layer cakes that demand architectural perfection; this Classic Butter Cake Recipe is a lifesaver, especially when you need a reliable, comforting dessert fast. It’s surprisingly quick to pull together once you master the temperature basics, proving you don't need fancy equipment, just excellent ingredients and a little patience.
Plus, it’s a brilliant tea time treat that doesn’t require frosting unless you really want it.
Over the years, I’ve messed this up every way imaginable too dry, too dense, sunken in the middle, you name it. I finally nailed the foolproof version by focusing on the 'why' behind the steps, and now I’m sharing the real secrets with you.
Let’s crack on and bake this incredible, tender Crumb Butter Cake.
The Science of Superior Texture: Why This Butter Cake Holds Its Shape
Defining the Perfect Crumb: What Makes This Cake Special?
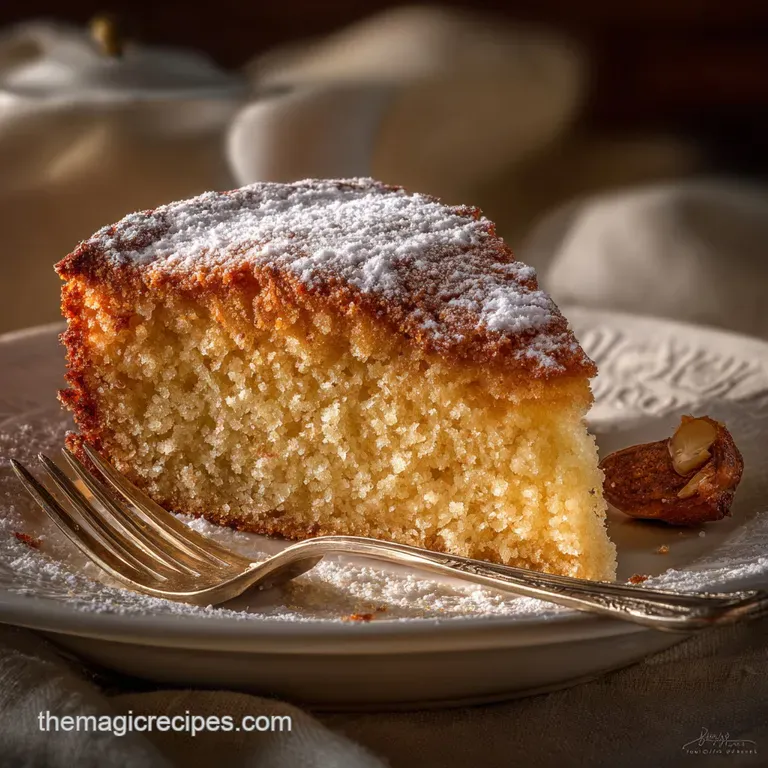
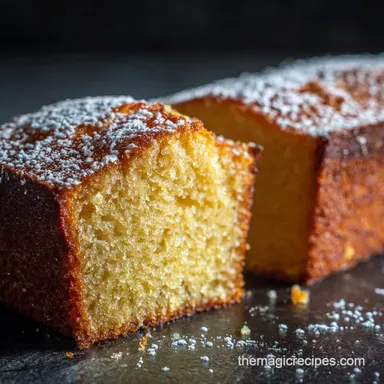
This isn’t a light and airy sponge; we are aiming for something substantial. The perfect butter cake possesses a delicate yet tight, velvety crumb that still feels light when you eat it, holding together beautifully without crumbling everywhere.
Achieving this texture relies heavily on the quality of your creaming process. We need to maximize the fat and sugar bonding to trap air, which provides the structural support and lift needed to carry all that wonderful butter flavour.
Baking Level Assessed: Why We Rate This Recipe Medium Difficulty
You might look at the ingredients and think it’s simple, and it is ingredients wise. We rate this Foolproof Butter Cake medium difficulty purely because it requires patience and precision with temperature, two things beginning bakers often rush.
If your butter is too cold, the batter curdles; if your butter is too warm, the cake structure collapses, leading to a dense disaster. You must follow the steps exactly, especially regarding ingredient temperature.
Essential Equipment Checklist (Before You Start)
Don't panic, you don't need a professional pastry kitchen, but a stand mixer helps massively. The creaming stage is tiring if done by hand, and a mixer ensures constant, even aeration. Make sure you have a quality 9 inch round pan, and always use parchment paper to guarantee a clean release.
Mastering the Creaming Method: The Key to Richness
The creaming method is the backbone of this recipe, hands down. We are literally whipping air pockets into the softened butter and granulated sugar, which act as the primary leavener once they hit the heat.
You must cream them for a full 5 to 7 minutes until the mixture turns noticeably pale and looks light and fluffy, like heavy whipped cream starting to stabilize. If you under cream, the cake will be flat and greasy.
Temperature Control: The Single Most Important Factor for Crumb Structure
I cannot stress this enough: every single ingredient butter, eggs, and milk needs to be at true room temperature. Cold ingredients refuse to emulsify properly, causing the batter to break and curdle instantly. Curdled batter bakes into a dense, sad brick, not a tender Homemade Butter Cake.
Flour Selection: Balancing Protein for Tender Results
We are using standard all-purpose flour for this recipe because the protein content is ideal. It provides enough structure to support the fat and sugar without making the final cake tough. If you use bread flour (high protein), your cake will be chewy.
If you try to use cake flour (very low protein), the cake might not have enough strength and could crumble too easily.
Essential Ingredients and Expert Substitutions
To make this incredible Crumb Butter Cake, you need quality ingredients, since the flavour is so straightforward. I always weigh my ingredients it prevents so many avoidable disasters.
| Ingredient | Why It Matters | Expert Substitution |
|---|---|---|
| Unsalted Butter | Controls the final salt level; critical for the creaming process. | If using salted, omit the 1/2 tsp of added salt. |
| All-Purpose Flour | Provides balanced structure. Must be sifted. | Use high-quality 1:1 gluten-free blend (adjusting liquid slightly). |
| Granulated Sugar | Provides sweetness and aids in aeration during creaming. | Superfine Caster Sugar can be used 1:1 for a slightly finer crumb. |
| Whole Milk | Adds moisture and richness; aids in gluten development control. | Unsweetened, full fat oat milk or soy milk works well. |
| Eggs | Binds and helps with lift. Must be room temperature. | Sadly, there's no great swap here for classic texture. |
Butter Quality Matters: Choosing Between Salted and Unsalted
Always start with unsalted butter for baking; it gives you total control over the sodium content of the finished product. If you only have salted butter, reduce or completely eliminate the 1/2 teaspoon of salt called for in the dry ingredients.
Seriously, splurge on the good butter here; it’s 70% of the flavour.
Dairy Alternatives: Ensuring Optimal Moisture and Rise
If you're avoiding dairy, full fat alternatives like oat milk or soy milk are your best bets. They have enough fat content to help maintain that luxurious, moist texture we are looking for in a rich butter cake. Just ensure they are definitely at room temperature before they go near the butter mixture.
Measuring Accuracy: Why Weight is Better Than Volume for Baking Success
Please, please, stop scooping flour straight out of the bag with your measuring cup. You end up with 20% too much flour because it gets compacted. Invest in a cheap digital kitchen scale and use the metric weights provided. That small change will instantly improve all your baking successes.
step-by-step: Crafting Your Classic Butter Cake

Phase 1: Perfecting the Cream (Sugar and Butter)
First, preheat that oven to 350°F (175°C) and line your pan. Now, grab your softened butter it should indent easily when pressed but not be greasy. Place the butter in the mixer bowl and beat it until smooth, then gradually add the sugar.
Cream this mixture on medium high for the specified time, scraping down the bowl every 60 seconds. You are looking for a colour change, going from deep yellow to pale, almost white. Add your eggs one at a time, mixing just until each is incorporated; don't rush this part.
Phase 2: Incorporating the Wet and Dry Ingredients
In a separate bowl, whisk together your sifted flour, baking powder, and salt. Sifting is non-negotiable here; it prevents lumps and ensures even distribution of the leavening agent. Now, it’s time for the alternating additions: dry, wet, dry, wet, dry.
The key is mixing on the lowest speed possible and stopping the mixer immediately once the last streak of flour is gone. Use your rubber spatula to finish the mix by hand to avoid overworking the gluten, ensuring a tender Crumb Butter Cake.
Phase 3: Panning, Smoothing, and Oven Preparation
Gently scrape the beautiful, thick batter into your prepared pan. Use the spatula to lightly smooth the top, making sure the batter is slightly higher around the edges. This little trick helps the cake rise more evenly in the middle. Place the cake into the centre rack of the preheated oven.
Do not open the door for the first 40 minutes!
Phase 4: The Crucial Cooling and Release Process
Once the cake is golden brown and a skewer comes out clean (50– 60 minutes, usually), remove it and let it rest in the pan for exactly 10 minutes. This allows the structure to set slightly, preventing it from collapsing when you flip it.
After 10 minutes, invert the cake onto a wire cooling rack and peel off the parchment. Let it cool completely before you even think about slicing.
Chef’s Note: If you want a truly buttery crust, melt 1 tablespoon of butter and brush the top of the cake immediately after it comes out of the oven, before releasing it from the pan. The butter soaks right in and adds an incredible flavour note.
Advanced Tips and Troubleshooting for Your Butter Cake
Troubleshooting the Sinking Center: Diagnosing Oven Issues
A classic deep sink in the middle almost always means two things: either you opened the oven door too early, letting cold air hit the unset structure, or your oven temperature is wildly inaccurate. Check your oven with a separate thermometer it’s the best $10 investment you'll ever make.
Next,, make sure your leavening agent (baking powder) isn't ancient; old powder offers zero lift.
The Home Baker’s Secret: Achieving a Golden Brown Crust
To ensure a gorgeous, golden brown crust and perfect internal baking, always place the pan in the middle of your oven. If you find the edges are browning too fast, loosely tent the top with aluminum foil for the last 15 minutes of baking.
This ensures the surface doesn't scorch while the inside finishes cooking to perfection.
Professional Insight: Why Sifting is Non-Negotiable
I know, it’s an extra step and a little messy, but professional bakers never skip sifting. It breaks up clumps in the flour and incorporates tiny bits of air, leading to a much lighter final texture. If you skip this, your cake is highly likely to be denser.
Fixing Curdled Batter: A Quick Save
We all mess up, right? One time, I rushed the process, and my butter and sugar looked like cottage cheese after adding the eggs. It was a horrible, broken mess. If your batter curdles, the quick fix is adding 1 tablespoon of your reserved flour mixture and mixing briefly.
The flour acts as an emulsifier, binding the liquids and fats back together just enough to save the day!
Preservation Guide: Storing and Freezing Your Baked Cake
Freshness Duration: Countertop vs. Refrigerator Storage
Butter cake has a beautiful shelf life thanks to its high fat content. Keep it wrapped tightly in plastic wrap or stored in an airtight container at room temperature. It will stay wonderfully fresh and moist for up to 4 days.
If you choose to refrigerate it, it can last 7 days, but it tends to dry out faster, so always bring it back to room temperature before serving.
Freezing Fully Baked Cake Layers for Future Use
Yes, this Classic Butter Cake Recipe freezes beautifully! Let the cake cool completely. Wrap it tightly in plastic wrap, followed by a layer of aluminum foil (to prevent freezer burn). Freeze for up to 3 months. To thaw, unwrap the foil layer and let it sit on the counter overnight while still wrapped in the plastic.
This traps the moisture released during thawing, keeping your cake deliciously moist.
Perfect Pairings: Serving Suggestions for Tea Time
A rich Crumb Butter Cake is magnificent on its own, but a little accompaniment elevates it perfectly. The key is to cut the richness with something slightly tart or fruity.
- Simple Glaze: A quick lemon or orange juice glaze drizzled over the top adds a delightful tang and keeps it incredibly moist.
- Whipped Cream & Berries: Serve thick slices with fresh summer berries and a dollop of slightly sweetened, whipped heavy cream.
- Coffee Time: It pairs perfectly with an afternoon latte or a strong cup of black tea. If you're looking for another quick, moist bake to serve alongside it, my Banana and Chocolate Chip Loaf: Perfectly Moist Easy Loaf Cake Recipe is a great alternative when you have overripe fruit lying around.

Recipe FAQs
Why did my butter cake turn out dry and crumbly instead of moist and tender?
The most common culprit for dryness is overbaking; ensure you check for doneness precisely at the minimum time listed, as even a few extra minutes can dry out the crumb. Overmixing the batter after adding the flour can also develop excess gluten, leading to a tough and dry structure rather than a tender one.
How long should I really cream the butter and sugar for the best results?
You should cream them for a minimum of 4 to 6 minutes on medium speed, or until the mixture is visibly very light in color and significantly fluffy. This critical step, which is the foundation of a great butter cake, ensures maximum air is incorporated for lift and creates the ideal tender, open crumb.
My cake domed too much in the center and then sank after cooling. What went wrong?
Sinking usually indicates that the cake structure was not fully set when exposed to a temperature change, often resulting from opening the oven door too early. Alternatively, using too much leavening agent or having ingredients that were too warm can cause a rapid, unstable rise followed by a collapse in the center.
Can I use oil or margarine instead of high-quality butter in this recipe?
While you technically can substitute the fat, doing so sacrifices the signature rich flavor and dense yet tender crumb characteristic of a butter cake. Butter has a specific water content and melting point essential for the creaming process and for creating steam and lift during baking.
Margarine can result in a greasier texture, and oil will yield a much denser, flatter cake.
Can I use all-purpose flour instead of cake flour if the recipe calls for it?
Yes, but be aware that cake flour is lower in protein, which is key to producing a softer, more delicate crumb. If substituting, remove two tablespoons of all-purpose flour per cup required and replace that volume with cornstarch; this mimics the lower protein content and prevents a tough texture.
What is the best way to store or freeze leftover butter cake?
Store the unfrosted cake tightly wrapped in plastic film at room temperature for up to 3 days to maintain optimal moisture. For long term storage, wrap the cooled cake tightly in plastic wrap, followed by a layer of foil, and freeze for up to three months.
How can I incorporate citrus or other flavor variations into the classic butter cake?
To add maximum citrus flavor, finely grate the zest of one lemon or orange and rub it directly into the sugar before starting the creaming process. For a nuttier note, you can substitute up to half of the vanilla extract with a high-quality almond extract, or gently fold in toasted pecans after the batter is mixed.
Ultimate Classic Crumb Butter Cake
Ingredients:
Instructions:
Nutrition Facts:
| Calories | 480 calories |
|---|---|
| Fat | 26 g |
| Fiber | 1 g |
