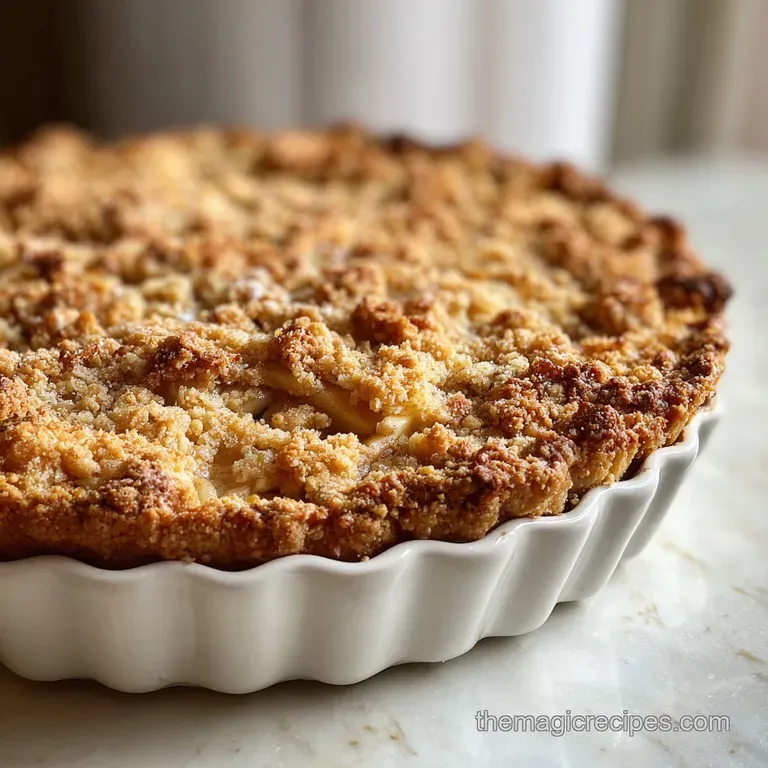
Velvety Dutch Apple Pie Recipe with Oat Topping
- Time: Active 30 minutes, Passive 55 minutes, Total 1 hour 25 mins
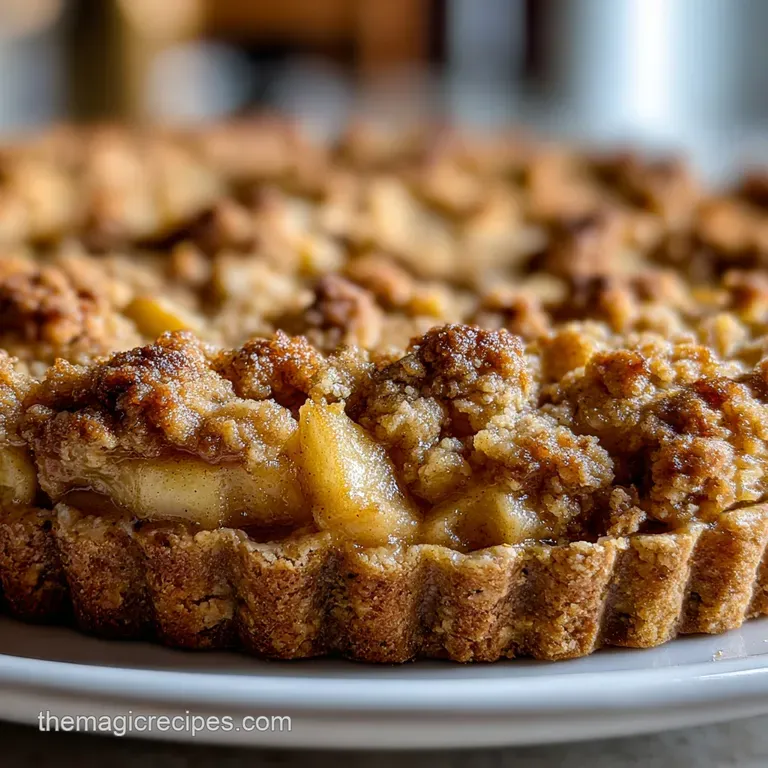
- Flavor/Texture Hook: Shattering oat crust meets velvety spiced apples
- Perfect for: Sunday family dinners or holiday dessert tables
- The Best Decadent Dutch Apple Pie Recipe
- Key Metrics and Flavor Profile
- Selecting Your Indulgent Ingredients
- Baker Approved Tools for Success
- Step by Step Assembly Guide
- Solving Common Pie Disasters
- Adjusting for Specific Diet Needs
- Storage and Reheating Secrets
- Perfect Pairings for Dessert
- Expert Answers for Pie Success
- Recipe FAQs
- 📝 Recipe Card
The Best Decadent Dutch Apple Pie Recipe
Imagine the scent of warm cinnamon and toasted oats drifting through your hallway, hitting you the second you walk in the door. That is the magic of a fresh bake, but the real prize is that first slice.
You press your fork down, hearing the distinct shatter of a buttery crumble before it sinks into a pool of creamy, spiced apples. It is the ultimate comfort, and honestly, after one bite, you will never go back to a standard double crust pie again.
I used to struggle with apple pies that looked great but tasted like wet cardboard on the bottom. I tried everything from pre cooking the apples to painting the crust with egg whites, but nothing quite hit the mark until I started playing with this specific Dutch version.
The secret isn't just in the topping, it's about how we handle the moisture inside that beautiful ceramic dish.
We are going to make a pie that feels like a bakery treat but comes together in your own kitchen without any fancy degree. I will show you exactly how to get that signature crunch on top while keeping the inside silky and rich.
We are talking about deep indulgence here, so grab your apron and let's get into the details that actually matter.
Key Metrics and Flavor Profile
When we talk about this specific bake, we are looking for a very specific balance. The apples need to be tender but hold their shape, and the topping needs to stay crisp even after a day in the fridge. This isn't a "healthy" snack; it is a full on dessert meant to be savored with a big scoop of vanilla bean ice cream.
| Characteristic | Description |
|---|---|
| Primary Texture | Contrast between crunchy oats and silky apples |
| Sweetness Level | Balanced tartness with deep molasses notes |
| Aroma | Toasted butter, spicy nutmeg, and baked fruit |
| Difficulty | Intermediate (mostly due to crust handling) |
To get the best results, you need to be precise with your fruit. I always weigh my apples after peeling and coring to ensure the ratio of fruit to binder is spot on. Using 1kg of Granny Smiths ensures that the natural acidity cuts through the heavy butter and sugar of the topping.
It’s that sweet and sour play that keeps you going back for a second slice.
If you are looking for a different vibe for your dessert table, you might also enjoy my Sweet Potato Souffle recipe which offers a similarly cloud like texture but with a southern flair. But for today, we are focusing on the crunch.
Selecting Your Indulgent Ingredients
The quality of your butter and flour will dictate the final texture of your crust. I swear by using high fat European style butter, like Kerrygold Unsalted Butter, because the lower water content means a flakier result.
- All purpose flour (155g for crust, 95g for topping): Use a consistent brand like King Arthur Flour. Why this? It has a reliable protein content for structural integrity.
- Granny Smith apples (1kg): Stick to these or Honeycrisp. Why this? They don't turn into applesauce at high heat.
- Full fat sour cream (120g): Do not use low-fat here. Why this? It provides the fat needed for a velvety filling mouthfeel.
- Dark brown sugar (100g): For the topping. Why this? The extra molasses adds a deep, toffee like flavor.
- Ice cold water (4 tbsp): Keep it in the freezer until needed. Why this? Prevents the butter from melting during mixing.
- Rolled oats (90g): Use old-fashioned, not instant. Why this? They provide the necessary "shatter" texture.
The Science of Why it Works
- Pectin Stability: The lemon juice lowers the pH, which helps the apple pectin stay strong so the slices don't turn mushy.
- Lipid Barrier: The fat in the sour cream coats the apple slices, preventing them from releasing too much juice into the bottom crust.
| Component | Science Role | Pro Secret |
|---|---|---|
| Cornstarch | Thickening agent | Mix with sugar first to prevent lumps in the filling |
| Cold Butter | Steam creation | Leave some pea sized chunks for maximum flakiness |
| Sour Cream | Acidic tenderizer | The acid weakens gluten for a "melt in-mouth" filling |
Baker Approved Tools for Success
You don't need a thousand gadgets, but a few specific items make this much easier. A heavy duty glass or ceramic pie dish, like a Pyrex 9 inch Pie Plate, is essential for even heat distribution. Metal pans can sometimes heat too quickly, scorching the bottom before the apples are done.
I also highly recommend a pastry blender for the crumble. Yes, you can use your fingers, but the heat from your hands can soften the butter too much. If you want that distinct "pebble" look to your topping, a cold tool is your best friend.
For the apples, a Y peeler makes quick work of the 1kg of fruit, saving your wrists from fatigue.
Chef's Note: Freeze your butter for 10 minutes before grating it into your flour. This unconventional trick creates tiny "pockets" of fat that explode into flakes in the oven.
step-by-step Assembly Guide
1. Construct the Foundation
Whisk your 155g of flour and sea salt in a large bowl. Add the 113g of chilled, cubed butter and use your pastry tool to work it in until it looks like coarse meal. Drizzle in the ice water 1 tablespoon at a time, tossing with a fork until a shaggy dough forms. Wrap it tight and chill for 1 hour.
Do not skip the chill time, or your crust will shrink like a cheap sweater.
2. Prepare the Apple Alchemy
Peel, core, and slice your 1kg of apples into 1/4 inch thick crescents. In a massive bowl, toss them with the lemon juice, 120g sour cream, 65g raw cane sugar, cinnamon, nutmeg, and cornstarch.
Wait until the oven is preheated to do this, otherwise, the sugar will draw out too much liquid while the fruit sits.
3. Engineer the Crumble
In a separate bowl, mix the 90g oats, 95g flour, 100g brown sugar, and flaky salt. Work in the remaining 113g of cold butter until the mixture looks like wet sand with some larger clumps. If you like more texture, you can even use a technique from my Fried Apples recipe where we let the sugars slightly macerate.
4. The Final Assembly & Bake
Roll out your chilled dough on a floured surface to about 12 inches. Drape it over your pie plate and trim the edges. Pile the apple mixture into the center, smoothing it down so there aren't huge air gaps. Scatter the oat crumble over the top until every inch of fruit is covered.
5. The Golden Glow
Slide the pie into a 375°F (190°C) oven. Bake for 55 minutes until the juices are bubbling thick and the topping is deeply bronzed. If the edges of the crust brown too fast, wrap them in a little foil "halo" halfway through.
3 Signs It's Done
- The juice bubbling at the edges looks like thick lava, not watery syrup.
- An instant read thermometer inserted into the center hits 175°F (80°C).
- The oat topping makes a "clink" sound when tapped with a spoon.
Solving Common Pie Disasters
Even the best of us have bad baking days. I remember one Thanksgiving where my filling was so runny it looked like apple soup. I realized later I had skipped the cornstarch because I was in a rush. Don't be like me.
2 Common Failures & Fixes
- The Soggy Bottom: Usually caused by the oven floor not being hot enough. Fix: Bake the pie on the lowest rack or on a preheated baking sheet to blast the bottom crust with immediate heat.
- The Burnt Topping: If your oven runs hot, those oats will turn black before the apples soften. Fix: Tent the top loosely with foil after 30 minutes.
| Problem | Cause | Fix | Pro Tip |
|---|---|---|---|
| Runny Filling | Not enough starch | Add 1 extra tsp cornstarch | Let the pie cool for 2 hours before slicing |
| Tough Crust | Overworking dough | Use a light touch | Use vodka instead of half the water |
| Bland Flavor | Old spices | Use fresh ground nutmeg | Add a pinch of black pepper for depth |
Adjusting for Specific Diet Needs
If you have friends with restrictions, you don't have to leave them out of the dessert loop. This recipe is surprisingly adaptable if you know which swaps won't ruin the structural integrity of the bake.
1. Plant Based Swap
To make this vegan, use a high-quality vegan butter stick (like Miyoko’s) and swap the sour cream for a thick coconut cream. Note: This will add a slight tropical note, but it pairs beautifully with the apples.
2. gluten-free Variation
Replace the all purpose flour with a 1:1 gluten-free blend that includes xantham gum. Ensure your oats are certified gluten-free. The crust will be slightly more fragile, so I recommend pressing it into the pan rather than trying to roll and drape it.
| Original Ingredient | Substitute | Why It Works |
|---|---|---|
| Sour Cream | Greek Yogurt | Similar acidity but slightly more tang |
| Raw Cane Sugar | Coconut Sugar | Earthier sweetness; lowers glycemic index slightly |
| Unsalted Butter | Refined Coconut Oil | Solid at room temp; provides high fat content |
Storage and Reheating Secrets
Honestly, this pie is even better the next morning with a cup of black coffee. The flavors have time to mingle and the filling sets into a fudgy consistency that is just divine.
Storage: Keep the pie at room temperature for up to 2 days, covered loosely with foil. If you live in a humid area, move it to the fridge after 24 hours. It will stay fresh in the refrigerator for up to 4 days.
Freezing: You can freeze the baked pie for up to 3 months. Wrap it in two layers of plastic wrap and one layer of heavy duty foil. To reheat, thaw in the fridge overnight and bake at 350°F (175°C) for 15 minutes to crisp up the topping again.
Zero Waste Tip: Don't throw away those apple peels! Toss them with a little sugar and cinnamon and bake them at 300°F (150°C) for 20 minutes to make "apple chips" for the kids.
Or, simmer the cores with water and honey to create a simple apple syrup for cocktails.
Perfect Pairings for Dessert
While a slice of this is a meal on its own, I love serving it as part of a larger spread. If you are doing a weekend brunch, this follows beautifully after an Overnight French Toast recipe because the cinnamon themes carry through both dishes.
- The Classic: A massive scoop of high-quality vanilla bean ice cream. The way it melts into the warm oat topping is essentially a religious experience.
- The Sophisticate: A dollop of unsweetened whipped cream with a tiny bit of orange zest folded in.
- The Sharp Choice: A slice of extra sharp white cheddar cheese on the side. Don't knock it until you try the salty sweet combination.
Expert Answers for Pie Success
How do I keep the apples from getting mushy? The key is the 1/4 inch slice. If you cut them too thin, they dissolve. If you cut them too thick, they stay crunchy. Also, using Granny Smiths is non negotiable for texture.
Can I make this pie a day ahead? Yes, but the topping will lose a bit of its "shatter" factor. I recommend baking it fully, then giving it 10 minutes in a hot oven right before serving to revive the crunch.
What if I don't have sour cream? Full fat Greek yogurt is your best friend here. It has the same acidic profile which helps tenderize the fruit and create that velvety sauce.
Can I freeze the unbaked pie? I don't recommend it. The apples will release too much water as they thaw, leading to a soggy bottom crust. It is much better to freeze the baked version.
Why is my crumble topping falling off? You might have used too many oats and not enough butter. The butter acts as the "glue." Make sure you really work it in until you see those distinct clumps forming.
Decision Shortcut
- If you want extra crunch, add 50g of chopped walnuts to the topping.
- If you want a tart bite, use 100% Granny Smith apples and add an extra teaspoon of lemon juice.
- If you want it sweeter, use Honeycrisp apples and swap the raw sugar for dark brown sugar in the filling.
Fresh vs Shortcut Comparison
| Method | Effort | Result |
|---|---|---|
| Fresh Homemade Crust | High | Maximum flakiness and buttery flavor |
| store-bought Frozen Crust | Low | Convenient but often lacks structural integrity |
| Graham Cracker Base | Medium | Good crunch but lacks the traditional "pie" feel |
The "No Fail" Myth
People often say you can't overmix pie crust. That is a total lie. The second you see the dough holding together, stop. Every second you spend kneading it is another second you are developing gluten, which turns your flaky crust into a rubbery disk.
Treat your dough like a fragile secret handle it as little as possible.
Another myth is that you need to cook the apples first. With the Dutch method, the oat topping acts as an insulator, allowing the apples to steam perfectly in their own juices without turning into mush. Trust the process and let the oven do the work.
If you follow these steps, you'll have a bakery quality treat that will make everyone at the table think you've been taking secret pastry classes. Right then, let's get baking!

Recipe FAQs
What's the difference between a Dutch apple pie and a regular apple pie?
The topping is the key difference. A regular pie usually has a solid top crust or a lattice, but a Dutch apple pie is defined by its rich, streusel like crumble topping made with oats, flour, butter, and sugar.
What is a Dutch apple pie?
It is a single crust pie topped with a buttery, crumbly streusel topping. Instead of sealing the fruit entirely, the topping allows steam to escape while creating a satisfying textural contrast to the soft, spiced filling.
What are the best apples to use for Dutch apple pie?
Use firm, tart apples like Granny Smith or Honeycrisp. These varieties hold their shape well during the long bake time, preventing the filling from turning into soup.
Should you cook your apples before putting them in pie?
No, for this recipe, you should not pre-cook the apples. The design of the Dutch pie, with its insulating oat topping, allows the apples to cook down perfectly in the oven while releasing just enough steam to mix with the thickeners.
How do I prevent the bottom crust from getting soggy?
Bake the pie on a preheated surface or the lowest rack. This blast of immediate heat sets the bottom crust before the liquid from the filling has time to fully soak through; this principle of precise temperature control is also key when mastering flaky pastries in our Fruit Tart Recipe: Classic
Crème Pâtissière Fresh Berries.
Can I substitute the sour cream in the filling?
Yes, full fat Greek yogurt is the best substitute for sour cream. It provides the necessary acidity and fat content to create a velvety sauce rather than a watery mess, similar to how we balance acid in many of our baking recipes.
How long should the pie bake for the apples to be tender?
Bake for 50 to 60 minutes at 375°F (190°C). You know it is done when the filling is bubbling thickly, not just releasing thin steam, and the topping is deeply golden brown.
Velvety Dutch Apple Pie

Ingredients:
Instructions:
Nutrition Facts:
| Calories | 539 kcal |
|---|---|
| Protein | 5.5 g |
| Fat | 26.8 g |
| Carbs | 71.6 g |
| Fiber | 4.2 g |
| Sugar | 38.5 g |
| Sodium | 295 mg |
