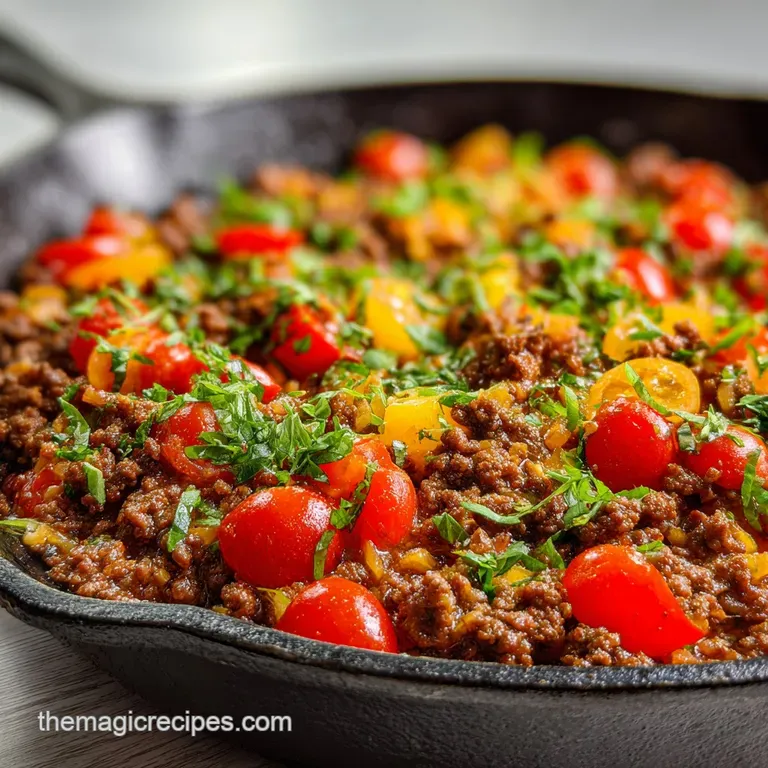
Simple Ground Beef Recipe: Umami Rich

- Time: Active 5 minutes, Passive 0 minutes, Total 20 minutes
- Flavor/Texture Hook: Umami rich mahogany beef with crispy, caramelized edges
- Perfect for: Chaotic weeknight dinners, high protein meal prep, or beginner cooks
- Why This Simple Ground Beef Recipe Wins
- Vital Stats for Fast Meals
- Gathering Essentials for Better Flavor
- Essential Tools for Perfect Searing
- Step-by-Step Cooking for Better Results
- Avoiding Pitfalls and Professional Tips
- Adaptations for Different Dietary Needs
- Freezing and Reheating Your Beef Safely
- Creative Ways to Serve Beef
- Truths About Browning Meat
- Simple Ground Beef Recipe FAQs
- 📝 Recipe Card
Why This Simple Ground Beef Recipe Wins
Picture this: it is 5:45 PM on a Tuesday. The kids are hovering by the kitchen island, the "what's for dinner" chorus has reached a fever pitch, and you have exactly one pound of beef in the fridge. I used to just toss it in a pan, move it around until it turned gray, and dump a jar of sauce over it.
It was functional, but it was never something we actually looked forward to eating.
Everything changed when I stopped treating ground beef like a filler and started treating it like a steak. By letting the meat actually sear instead of steaming it, you unlock a depth of flavor that usually takes hours to build.
This recipe is my secret weapon for those nights when I have zero mental energy but still want a meal that feels intentional and tastes like I spent way more than 15 minutes at the stove.
We are going for that specific, savory sweet balance that hits all the right notes. It is not just about browning the meat; it is about building layers with the onions and garlic so every bite has a bit of crunch and a lot of soul.
Trust me, once you see how much flavor you can pull out of these basic ingredients, you will never go back to the "gray meat" method again.
Vital Stats for Fast Meals
The Physics of the Pan Sear: High heat triggers the Maillard reaction, rearranging amino acids and sugars to create that mahogany crust. Keeping the meat still for the first three minutes prevents moisture from escaping too early, ensuring the beef fries in its own fat rather than boiling in its juices.
- Fat Management: Using 90% lean beef provides enough fat to lubricate the pan without leaving the final dish feeling greasy or heavy.
- Aromatic Infusion: Mincing garlic finely increases its surface area, allowing it to release its sulfur compounds into the oil in under 60 seconds.
- Sugar Caramelization: A tiny pinch of light brown sugar lowers the temperature required for browning, giving you a better crust without overcooking the interior.
- Sodium Synergy: Soy sauce provides glutamates that amplify the natural beefy flavor far more effectively than table salt alone.
| Thickness | Internal Temp | Rest Time | Visual Cue |
|---|---|---|---|
| Crumbled (Small) | 160°F | None | No traces of pink remain |
| Large Chunks | 160°F | 2 minutes | Deep brown with crispy edges |
| Patty Style | 160°F | 3 minutes | Juices run clear when pressed |
I usually prefer the "Large Chunks" method for this specific recipe because those bigger pieces hold onto more moisture while the outside gets that incredible shatter crisp texture. If you are feeding younger kids, you might want to break it down further, but for the best flavor, keep those crumbles a bit rustic.
Gathering Essentials for Better Flavor
| Ingredient | Science Role | Pro Secret |
|---|---|---|
| Lean Ground Beef | Primary Protein | Pat the surface dry with a paper towel before it hits the hot oil. |
| Yellow Onion | Moisture & Sweetness | Dice them tiny so they melt into the meat and become one with the fat. |
| Soy Sauce | Umami Booster | Add it at the very end to deglaze the pan and pick up browned bits. |
| Light Brown Sugar | Maillard Catalyst | Don't skip this; it balances the salt and helps the beef "crisp" faster. |
Building a solid meal starts with the right components. You will need 1 lb of Lean Ground Beef (90% lean is my go to for balance). For the aromatics, grab 0.5 of a Yellow Onion and 3 cloves of Garlic.
The seasoning is simple: 0.5 tsp Coarse Sea Salt, 0.25 tsp Cracked Black Pepper, and 0.5 tsp Red Pepper Flakes for a tiny hint of heat.
To bring it all together, we use 1 tbsp Olive Oil for the sear, 1 tbsp Soy Sauce for that deep savory kick, and 1 tsp Light Brown Sugar to help with the color. If you don't have soy sauce, you can use tamari or even a splash of Worcestershire sauce, though the flavor profile will shift slightly.
The goal here is functionality use what you have in the pantry to make this work for your family.
Essential Tools for Perfect Searing
For this recipe, the pan is your most important partner. I highly recommend a heavy bottomed skillet, like a cast iron pan or a stainless steel sauté pan. These materials hold heat much better than thin non stick pans, which is crucial when you drop cold meat into the skillet.
If the pan temperature drops too fast, the beef will steam instead of sear, and you will lose that crispy texture we are after.
You will also want a sturdy wooden spoon or a heat resistant spatula. I like a wooden spoon with a flat edge because it is perfect for scraping up those "fond" bits (the little browned pieces stuck to the bottom) once you add the soy sauce.
A small prep bowl for your aromatics and a clean plate to set the beef on if you are making a double batch are also helpful. Keeping your workspace organized makes the 15 minute cook time feel calm instead of chaotic.
step-by-step Cooking for Better Results
- Prep the beef. Remove 1 lb Lean Ground Beef from the fridge 10 minutes early. Note: Taking the chill off helps it sear faster without toughening.
- Heat the oil. Add 1 tbsp Olive Oil to your skillet over medium high heat until the oil shimmers and barely wisps smoke.
- Sear the meat. Place the beef in the pan in one large flat disc. Cook 3 minutes without moving it until a deep mahogany crust forms on the bottom.
- Break it up. Use your spoon to break the beef into large bite sized chunks. Note: Don't crumble it into sand; texture is your friend here.
- Add the onion. Toss in 0.5 finely diced Yellow Onion. Sauté 4 minutes until the onion is translucent and soft.
- Incorporate aromatics. Add 3 cloves minced Garlic, 0.5 tsp Coarse Sea Salt, 0.25 tsp Cracked Black Pepper, and 0.5 tsp Red Pepper Flakes.
- Toast the spices. Stir constantly for 1 minute until the garlic smells nutty and fragrant but isn't burnt.
- Deglaze the pan. Pour in 1 tbsp Soy Sauce and sprinkle 1 tsp Light Brown Sugar over the meat.
- Finish the glaze. Toss everything together for 2 minutes until the liquid has evaporated and coated the beef in a glossy finish.
- Final check. Remove from heat immediately once the beef is fully browned and no pink remains.
Avoiding Pitfalls and Professional Tips
One of the biggest mistakes I used to make was "crowding the pan." If you try to cook two pounds of beef in a small skillet, the moisture has nowhere to go. It pools at the bottom, and your meat basically boils. It turns that unappealing gray color and loses all its texture.
If you are doubling this for a bigger family, work in two batches. It takes five extra minutes but the difference in flavor is night and day.
Chef's Tip: If you want an even deeper flavor, freeze your block of ginger and grate about a teaspoon of it directly into the pan when you add the garlic. It adds a bright, zesty note that cuts through the richness of the beef perfectly.
Why Your Beef is Gray
If your meat looks lackluster and gray, it is usually a temperature issue. Either the pan wasn't hot enough when you started, or you moved the meat around too much before it had a chance to develop a crust.
Preventing Garlic Bitterness
Garlic burns in a heartbeat. If you add it at the same time as the beef, it will be bitter and black by the time the meat is done. Always wait until the final few minutes of cooking to add your minced garlic.
| Problem | Root Cause | Solution |
|---|---|---|
| Meat is tough/chewy | Overcooked or low-fat meat | Remove from heat as soon as pink disappears; use 90% lean. |
| Pan is watery | Too much meat at once | Cook in batches or use a larger skillet to allow steam to escape. |
| Flavor is flat | Not enough salt or acidity | Add a tiny splash of rice vinegar or extra soy sauce at the end. |
Common Mistakes Checklist: ✓ Pat the beef dry with a paper towel (moisture is the enemy of a good sear) ✓ Wait for the oil to shimmer before adding the meat ✓ Leave the meat alone for the first 3 minutes (patience creates the crust) ✓ Use a flat edged spoon
to scrape the bottom of the pan ✓ Mince garlic fresh rather than using the pre jarred stuff for better aroma
Adaptations for Different Dietary Needs
If you are looking for a Stuffed Pepper Soup recipe vibe but want to keep it low carb, this beef works perfectly as a base. You can swap the light brown sugar for a keto friendly sweetener or just omit it entirely, though you will lose a bit of that dark color. For a gluten-free version, simply swap the soy sauce for coconut aminos or tamari.
| Original Ingredient | Substitute | Why It Works |
|---|---|---|
| Soy Sauce | Coconut Aminos | Lower sodium and gluten-free. Note: Slightly sweeter than soy. |
| Ground Beef | Ground Turkey | Lower calorie option. Note: Leaner, so add 1 extra tsp of oil. |
| Brown Sugar | Honey | Natural sweetener. Note: Can burn faster, so keep an eye on the heat. |
When scaling this recipe up for a crowd, remember that spices shouldn't always be doubled exactly. If you go from 1 lb to 2 lbs, increase the salt and red pepper flakes by 1.5x first, then taste. You can always add more, but you can't take it out!
For the liquids like soy sauce, keep the ratio steady to ensure the meat gets that velvety glaze.
Freezing and Reheating Your Beef Safely
This beef is a meal prep legend. You can store the cooked beef in an airtight container in the fridge for up to 4 days. When you are ready to eat, the best way to reheat it is back in a skillet over medium heat with a tiny splash of water or beef broth.
This helps "steam" the meat back to life without drying it out, which often happens in the microwave.
For long term storage, this freezes beautifully. Let the meat cool completely before transferring it to a heavy duty freezer bag. Squeeze out as much air as possible to prevent freezer burn. It will stay fresh for up to 3 months. To use, thaw it overnight in the fridge.
Zero Waste Tip: Don't throw away the ends of your onions or the garlic skins! Toss them into a gallon bag in the freezer. Once the bag is full, simmer everything with some water to make a quick vegetable scrap broth for your next soup.
Creative Ways to Serve Beef
The beauty of this simple ground beef is its versatility. My kids love it served over white rice with some steamed broccoli it is like a Ground Beef and Broccoli recipe but much faster. If I’m feeling like something a bit more festive, I’ll use it as the protein for a Ground Beef Enchilada recipe shortcut, layering it with cheese and tortillas.
- If you want a taco vibe
- Add 1 tsp of cumin and swap the soy sauce for lime juice.
- If you want it crispy
- Spread the cooked beef on a baking sheet and broil for 2 minutes.
- If you want it saucy
- Add 1/4 cup of beef broth mixed with 1 tsp of cornstarch at the very end.
One of my favorite "adult" ways to serve this is in lettuce wraps. The cool, crunchy butter lettuce against the warm, savory beef is a texture match made in heaven. Top it with some sliced green onions and a drizzle of sriracha mayo if you are feeling fancy.
It is a functional, fast, and healthy dinner that actually makes you feel good after eating it.
Truths About Browning Meat
One common misconception is that you need to wash your ground beef before cooking. Please, don't do this! Not only does it spread bacteria around your sink, but the extra moisture makes it impossible to get a good sear. The heat of the pan will take care of any safety concerns.
Another myth is that you have to "seal in the juices." Science tells us that searing doesn't actually create an impermeable barrier. Moisture still escapes, but the sear creates flavor through the Maillard reaction. We sear for the taste and texture, not for some magical moisture lock. Finally, don't fear the fat!
While we use lean beef, that little bit of rendered fat is what carries the flavor of the garlic and onions into every crevice of the meat. Be sure to enjoy the process and don't be afraid to let the pan get a little bit noisy that sizzle is the sound of a great dinner in the making.

Simple Ground Beef Recipe FAQs
What's a good lazy dinner?
Yes, this recipe is perfect for lazy dinners. It requires minimal active cooking time and uses common pantry ingredients, making it ideal for nights when you want something satisfying without a lot of effort. For an even more hands off approach, consider a slow cooker option like our Crockpot Roast: The Set It and Forget It Classic Roast Recipe.
What is the easiest way to cook ground beef?
Sear it in a hot pan. Simply heat oil in a skillet, add the ground beef without moving it for a few minutes to develop a crust, then break it up and sauté with aromatics. This method maximizes flavor and texture quickly.
What can I add to ground beef to make it tasty?
Aromatics and savory sauces are key. Finely diced onions and minced garlic add depth. For a savory punch, soy sauce or Worcestershire sauce, along with a pinch of sugar to encourage caramelization, makes a huge difference. If you enjoyed the savory depth here, see how we build flavor in our Prime Rib Side Dish with Garlic Mashed Potatoes.
What is a cowboy dinner?
Often a hearty, simple meal featuring meat. While not a strict definition, a "cowboy dinner" typically involves straightforward ingredients like ground beef, beans, or potatoes, cooked in a way that's filling and doesn't require fancy techniques.
This recipe fits that bill with its satisfying flavor and ease.
Can I make this spicy?
Yes, easily. Add more red pepper flakes for heat, or incorporate diced jalapeños or a dash of hot sauce at the end. If you like things with a kick, you might also enjoy our Fried Tacos Recipe: Crispy pan-fried Beef.
How long does it take to cook ground beef?
About 15-20 minutes total for this recipe. This includes prep and cooking time, focusing on achieving a good sear and incorporating aromatics. If you master the sensory cues for doneness here, apply them to our Prime Rib: oven-roasted Recipe for Beginners for perfect results every time.
Is it true that browning ground beef makes it gray and dry?
No, this is a common misconception. When done correctly in a hot pan, browning (searing) develops a flavorful crust through the Maillard reaction and prevents the meat from steaming and turning gray. Overcooking is what leads to dryness, not the browning process itself.
Simple Ground Beef
Ingredients:
Instructions:
Nutrition Facts:
| Calories | 247 calories |
|---|---|
| Protein | 22.8g |
| Fat | 14.6g |
| Carbs | 3.5g |
| Fiber | 0.5g |
| Sugar | 1.2g |
| Sodium | 525mg |
