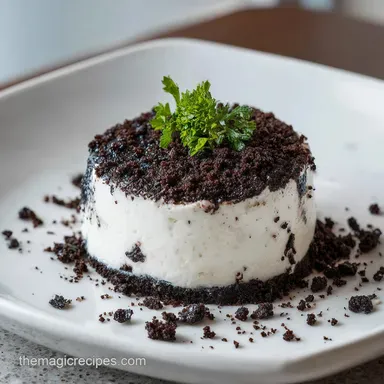
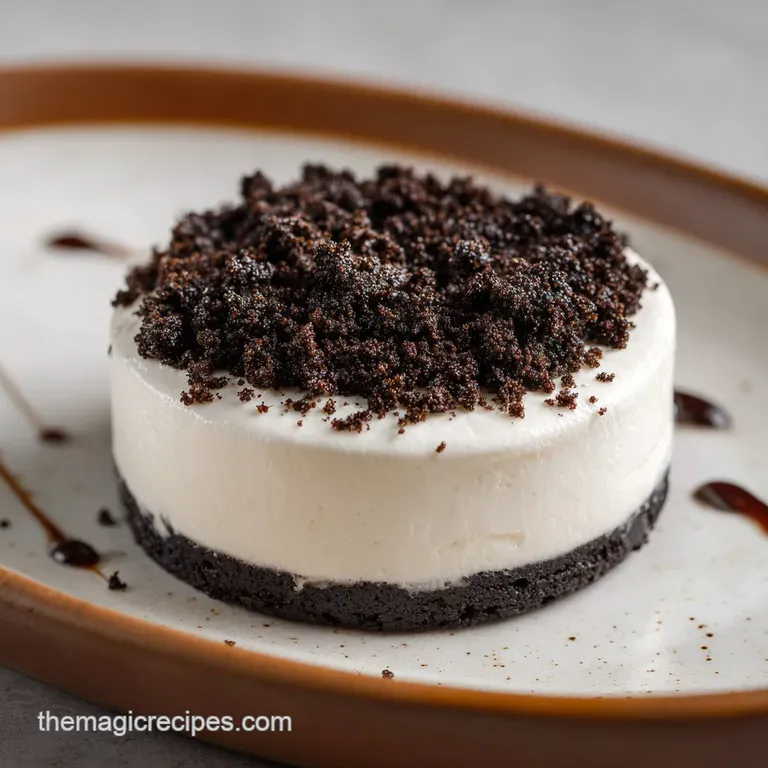
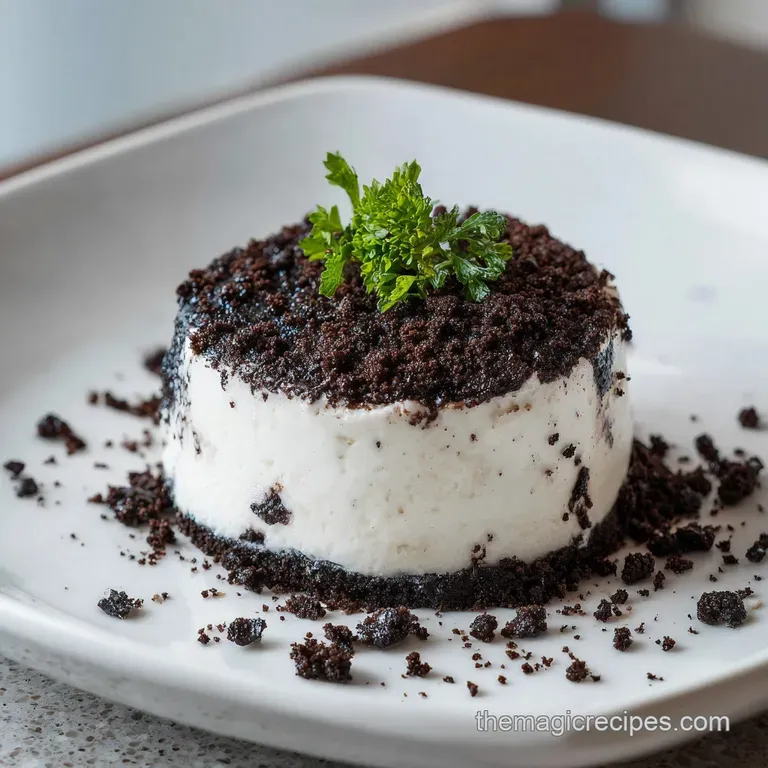
Oreo Dirt Cake: Ultimate No-Bake Dessert
- Time: 20 min active + 4 hours chilling = Total 4 hours 20 mins
- Flavor/Texture Hook: Velvety pudding paired with a cookie shatter
- Perfect for: Potlucks, kids' parties, and nostalgic cravings
That sound of an Oreo shattering under a heavy spoon is basically the soundtrack to my childhood. I remember the first time I saw this at a family reunion, and I honestly thought someone had just dumped a flower bed into a glass bowl.
I was skeptical, but one bite of that cool, creamy filling mixed with the cocoa "soil" and I was hooked.
Forget everything you know about traditional cakes requiring a mixer, an oven, and a prayer that they don't sink in the middle. This is the opposite of that. It's a low stress, high reward dessert where the "baking" is done by the refrigerator.
You don't need a culinary degree to pull this off, just a bit of patience while it sets.
We're making a version that balances the sugar with a hit of tangy cream cheese, so it doesn't just taste like a bowl of frosting. This dirt cake recipe is all about the layers, and when you get that perfect scoop with a bit of everything, it's pure bakery quality bliss.
The Ultimate No Bake Dirt Cake Recipe
- Starch Gelatinization
- The instant pudding mix uses modified cornstarch to thicken the milk quickly without heat.
- Fat Stabilization
- Beating butter and cream cheese creates a structural base that keeps the filling from turning into soup.
- Moisture Migration
- The cookies absorb a tiny bit of moisture from the pudding, creating a soft yet-crunchy contrast.
- Aeration
- Folding in whipped topping adds tiny air bubbles, giving the filling a velvety lift.
Dessert Method Comparison
| Feature | No Bake Cold Method | Traditional Baked Cake |
|---|---|---|
| Texture | Velvety and dense | Spongy and light |
| Prep Time | Fast assembly | Long mixing/baking |
| Risk | Low (no burning) | High (overbaking) |
| Best For | Parties/Crowds | Birthdays/Events |
Component Analysis
| Ingredient | Science Role | Pro Secret |
|---|---|---|
| Cream Cheese | Stability & Tang | Soften completely to avoid lumps |
| Oreo Cookies | Structural "Soil" | Pulse in bursts for sandy texture |
| Instant Pudding | Thickening Agent | Use ice cold milk for faster set |
| Whipped Topping | Volume/Air | Thaw in fridge, not on counter |
Gathering Your Decadent Ingredients
For this to work, you need ingredients that provide a sharp contrast in texture. Don't bother with low-fat cream cheese or skim milk here, as the fat is what carries the flavor and holds the structure together.
- 225 g cream cheese, softened Why this? Adds tang and prevents the filling from being too sweet
- 115 g unsalted butter, softened Why this? Provides a rich, velvety mouthfeel
- 120 g confectioners' sugar Why this? Dissolves instantly for a smooth base
- 96 g instant vanilla pudding mix Why this? Quick set thickening without cooking
- 710 ml cold whole milk Why this? Fat content ensures a creamy set
- 225 g frozen whipped topping, thawed Why this? More stable than fresh whipped cream
- 405 g Oreo cookies Why this? The gold standard for "dirt" texture
- 85 g gummy worms Why this? Essential for the visual theme
Ingredient Swaps
| Original Ingredient | Substitute | Why It Works |
|---|---|---|
| Oreo Cookies | Chocolate Wafers | Similar cocoa profile. Note: Lacks the cream center crunch |
| Whole Milk | Evaporated Milk | Richer, creamier consistency. Note: More intense flavor |
| Vanilla Pudding | Chocolate Pudding | Double chocolate punch. Note: Reduces color contrast |
| Whipped Topping | Stabilized Whipped Cream | More natural taste. Note: Shorter shelf life |
Right then, before we move to the gear, just a quick reminder to make sure your butter and cream cheese are truly at room temperature. If they're still cold, you'll get little white lumps in your filling that no amount of whisking will fix.
The Necessary Tools
You don't need a fancy kitchen to make this, but a few specific tools make the process much smoother. I usually use a 9x13 inch glass baking dish, but you can use a trifle bowl if you want to show off those layers.
A food processor is your best friend for the cookies, but a heavy duty zip top bag and a rolling pin work just as well. You'll also want a hand mixer or a stand mixer such as KitchenAid to get the cream cheese and butter fully emulsified.
Finally, grab a wide silicone spatula. Folding the whipped topping into the pudding mixture requires a gentle touch, and a spatula allows you to incorporate the air without deflating the whole thing.
Step-by-step Assembly
Let's crack on with the actual build. This is the part where the magic happens, and the key is not rushing the layering process.
- Pulse the Oreo cookies in a food processor until they reach a fine, sandy texture. Note: Avoid turning them into a powder; you want some small pebbles for texture.
- Beat softened cream cheese and butter together until the mixture is smooth and pale.
- Gradually mix in the confectioners' sugar until fully incorporated.
- Whisk the vanilla pudding mix with cold milk for 2 minutes until the mixture visibly thickens.
- Gently fold the thickened pudding and thawed whipped topping into the cream cheese base until the color is uniform.
- Spread a thin layer of crushed Oreos across the bottom of the dish.
- Pour half of the creamy pudding mixture over the crumbs, smoothing it with a spatula.
- Repeat the process with another layer of cookies and the remaining pudding mixture.
- Top with a final sprinkle of cookie crumbs and nestle the gummy worms into the "dirt".
- Chill for 4 hours 20 mins until the filling feels firm to the touch.
Chef's Note: For a more professional look, use a piping bag to put the pudding in the dish. It prevents the cookies from mixing into the cream too much during assembly.
Texture Tips and Traps
The biggest risk with this dirt cake recipe is ending up with "cookie soup." This happens when the cookies absorb too much moisture or the filling isn't stable enough to hold them up.
Filling Too Runny
If your filling feels like a sauce rather than a mousse, you likely didn't whisk the pudding long enough or your milk was too warm. According to King Arthur Baking, temperature control is vital for fats like butter and cream cheese to hold air.
Cookie Sogginess
This usually happens if you don't chill the cake long enough. The chilling period allows the fats to solidify, which creates a barrier between the pudding and the cookies.
Common Fixes
| Problem | Root Cause | Solution |
|---|---|---|
| Lumpy Base | Cold Cream Cheese | Microwave for 5-10 seconds |
| Filling Separating | Over mixing | Fold gently by hand |
| Cookies Too Large | Under processing | Pulse 10 seconds more |
Mistakes Checklist
- ✓ Did you thaw the whipped topping completely?
- ✓ Is the pudding fully thickened before folding?
- ✓ Are the cookies sandy, not powdered?
- ✓ Did you chill for the full 4+ hours?
- ✓ Is the cream cheese fully softened?
Creative Flavor Remixes
Once you've nailed the basic version, you can start playing with the profile. I love adding a layer of fresh raspberries or sliced bananas between the pudding and cookies for a bit of brightness.
If you're feeling extra decadent, try drizzling some brown butter salted caramel over the second layer of pudding before adding the final cookie topping. The saltiness of the caramel cuts through the sweetness of the Oreos beautifully.
For a different vibe, you can swap the vanilla pudding for a peanut butter mixture. Just blend a bit of creamy peanut butter into the cream cheese base. This turns it into a peanut butter cup style treat that's an absolute hit at parties.
Decision Shortcut If you want more tang → increase cream cheese by 50g. If you want more crunch → add a layer of crushed pretzels. If you want a lighter feel → use 100ml less milk.
Storage and Freezing
This dessert is actually better the next day because the flavors have more time to meld. Keep it in the fridge in an airtight container for up to 5 days.
Refrigeration Store the dish covered with plastic wrap. The cookies will soften slightly over time, turning the texture from "sandy" to more of a "cakey" feel.
Freezing You can freeze this for up to 2 months. To do this, freeze the assembled cake for 2 hours, then wrap it tightly in foil. When you're ready to eat, thaw it in the fridge overnight.
Zero Waste If you have leftover cookie crumbs, don't toss them! Use them as a topping for vanilla ice cream or mix them into a batter for chocolate brownies to add a bit of texture.
Serving and Presentation
The way you serve this changes the whole experience. For a party, I recommend using clear plastic cups to create individual dirt cake pudding cups. It looks cleaner and prevents the "scoop and smear" look of a big tray.
If you're serving this as part of a larger holiday spread, pair it with something warm and spiced, like a classic sweet potato pie, to provide a temperature and flavor contrast.
- The Garden
- Add a few sprigs of fresh mint to look like plants growing out of the dirt.
- The Graveyard
- Use rectangular cookies (like Milano) as tombstones.
- The Individual
- Layer in small mason jars for a rustic, portable look.
Common Misconceptions "You must use a stand mixer for the pudding." Actually, a hand whisk is better for instant pudding to avoid incorporating too much air that could cause the filling to collapse.
"Fresh cream is always better." While tastier, stabilized whipped topping is what gives this specific recipe its bakery quality structure. Fresh cream can weep over time, making the "dirt" soggy.
Right then, that's everything you need to create a show stopping dessert. This dirt cake recipe is all about the joy of eating something that looks like a mess but tastes like a dream. Enjoy the process, and don't be afraid to get a little messy with the cookie crumbs!
Recipe FAQs
What is dirt cake made of?
It is a layered dessert featuring crushed Oreo cookies and a creamy filling. The filling is a blend of vanilla pudding, whipped topping, cream cheese, butter, and confectioners' sugar, topped with gummy worms.
What is the healthiest pudding to eat?
Chia seed pudding is the healthiest choice. It provides significant fiber and omega-3 fatty acids, unlike traditional puddings which are typically high in refined sugars.
What cake is safe for diabetics?
Cakes made with almond flour and sugar substitutes are safest. These alternatives minimize glucose spikes by removing refined wheat and sucrose.
How to make the best dirt cake?
Pulse cookies until they reach a fine, sandy texture. Ensure your cream cheese and butter are fully softened before beating them together to prevent lumps in your filling.
How to store dirt cake?
Keep it in an airtight container in the fridge for up to 5 days. For longer storage, freeze the cake for 2 hours before wrapping it tightly in foil to preserve its structure for up to 2 months.
Is it true that dirt cake must be frozen to set?
No, this is a common misconception. Simple refrigeration is sufficient for the layers to set, though freezing is an option for long term preservation.
Can I use a different base instead of Oreo cookies?
Yes, any crushed chocolate wafer works well. If you enjoyed mastering the sandy texture of the crust here, see how we achieve a similar crumbly finish in our classic crumb butter cake.
Oreo Dirt Cake Recipe